homeaboutcontactdisclosure
Showing posts with label eyeslipsface. Show all posts

Monday, May 20, 2013

Summer Striping and Studded Ruffian Nail Art


Hi everyone!


Today I have a bright nail look for you!

Looking back through the designs I've posted I realized it's been too long since I've done a tape mani.
So today's design features a bright combo of stripes and studs.


The Steps

My thumb a pinky fingers began with a base of Essie Butler Please. 

I then took my striping tape and placed a small strip horizontally across the nails at an angle. I then cut smaller strips and placed them vertically in an angled but evenly spaced striped pattern, beginning from where I placed the horizontal piece.

I then took Sinful Colors Unicorn (swatched here) and eyeslipsface Mango Madness (swatched here) and painted within the stripes with a small, flat nail art brush.

While the polish was still wet  I removed the strips and finished with a line of studs from my Born Pretty Store stud wheel which you can purchase here (use code BHL91 for 10% off).

My index and middle finger began with a base of eyeslipsface Mango Madness. 

I went over the top third of my nail with Essie Butler Please to create a sort of exaggerated ruffian look that came to a rounded point. 
(Ruffian manicures are simply inverted half moons.)
I outlined the ruffian edge with Sinful Colors Unicorn with a long striper brush and finished with a single stud from the Born Pretty Store stud wheel.

My ring finger was created using the same method as my index and middle fingers, except I began with Sinful Colors Unicorn as my base and used eyeslipsface Mango Madness as the outline.

All nails were given one good coat of  Sally Hansen Ultimate Shield Base and Top Coat.


I really loved this color combination. It's bright and fun and a perfect match for the a day in the sun.


What do you think of  this bright design?

Let me know in the comments below and make sure to give this look some love on  Facebook, Instagram, Tumblr, and Pinterest!


And keep up with me on Twitter, and Bloglovin' for more nail art looks and some exciting new collections I'll have to share with you soon!

Thanks for reading!

Melody

Sunday, May 12, 2013

Happy Mother's Day! Sassy & Sweet Floral Studded Nail Art

Happy Mother's Day everyone!


I spent a lovely afternoon with my own mother and grandmother enjoying lunch and visit the thrift store as we always do when we can get together. My mother also bought her first China Glaze polish today. I almost cried. HAHA!

Today's Mother's Day mani is a tribute to my own mother. When I was little I was such a tomboy (am still am to an extent), and favored my father's interests more than my mother's. It hasn't been until the past couple  years as I have become an adult that I have been able to better connect with mother. I'm still a daddy's girl following in his artistic footsteps, but now I've embraced my more feminine nature of antiquing and interior design...all of which is thanks to my mom.

So today's look is a little sweet and a little sassy. My mother is known to be shy and sweet, while I literally have a family nickname of "Sassyfrass." 
I chose flowers to represent her, and the studs to represent me.


The white base is a subtle glitter mix called "Strawberry Fields" from Neener Neener Nails, which I reviewed here. 
I like the subtle dimension the glitters add to base, although goes almost unnoticed in the pictures above.

The pink base and dotted flowers were created with "Flirty Fuschia" from the eyeslipsface (e.l.f) 14 Piece Spring 2013 Nail Cube, which I reviewed here. 
Apart from mauve and turquoise, my mother is a sucker for fuschia.

The flower centers were dotted in with Sinful Colors "Pistache" from the Buff to Bright collection which I reviewed here. 
Although the glitters can't be seen in the pictures, this shade matches the light green glitters in the white base perfectly and is a nice compliment to the pink.

And finally, the black studs are from Born Pretty Store. 
I debated on placement of these and still not sure if my final choice was the best way to go, but I  like the hard contrast to the brighter colors. It gives it an edge, which is just my style.


Whether you're a mother, grandmother, godmother, or birthmother, I wish you a special day filled with love.

Let me know what you think of this look and don't forget to give it some love on Facebook, Instagram, Tumblr and Pinterest!
Thanks for reading!

-Melody

Sunday, April 28, 2013

Treasures of the Sea: Yellow to Blue Gradient and Round Stud Nail Art

Hello everyone!

As many of you know I am preparing my house for the move in of yet another roommate
That makes for three, 20 something year-old males and myself. Even three out of the four animals are boys.
Needless to say it's a madhouse here, and unfortunately it's been at the expense of my lightbox.

I had to apologize for the inconsistencies with the lighting of my photos lately, but don't fret! My boyfriend and I are hard at work custom building me a new one.


Today I wanted to share with you another nail art look that doesn't hesitate to shine.

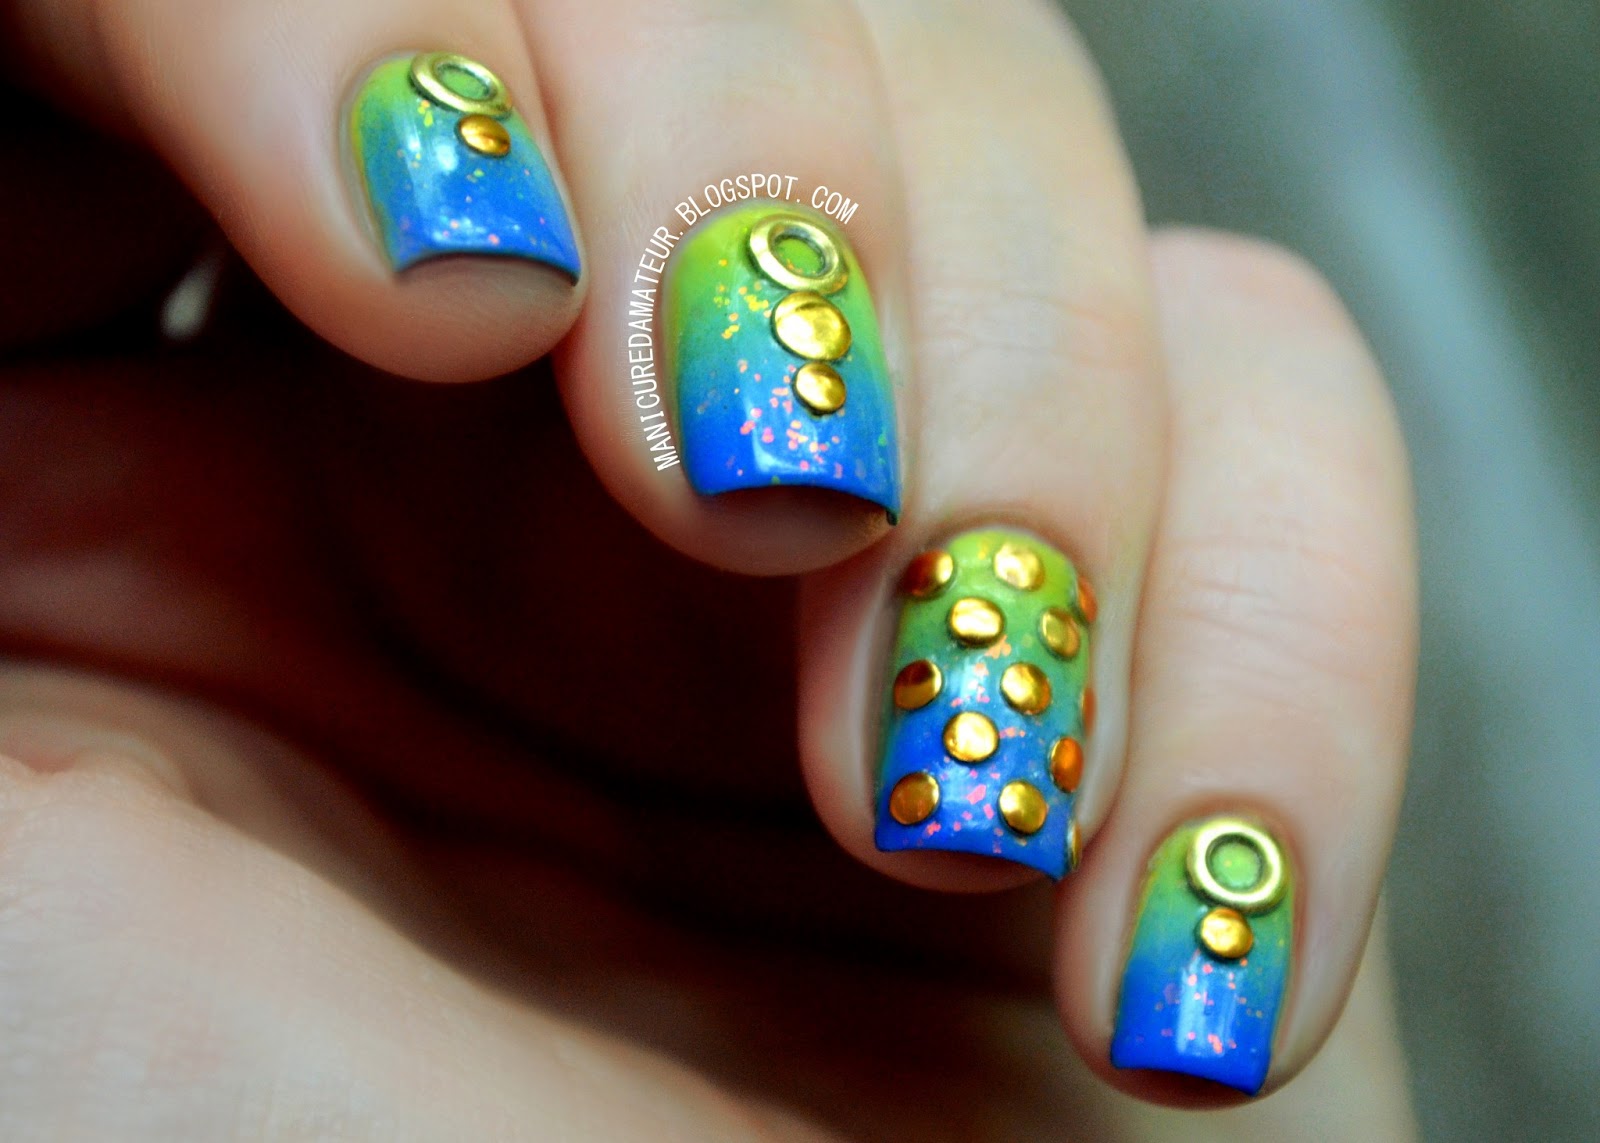
The rain is back in the peach state, but the beach is still on my mind. This design was created with the idea of the sun on the sea, and the treasures hidden underneath.

Okay, so admittedly the idea came to me when watching The Little Mermaid. I am not ashamed. The glittery ocean world with golden castles and crowns was inspiration I just couldn't ignore.


I began with a neon yellow base using Avon Inspire. 

To recreate the look of sun shining through water, I used Avon Inspire, Serene Green, and Sally Hansen Hard As Nails Pacific Blue to create a bright, primary gradient that's Disney approved.

To emphasize the concept and add a little sparkle, I added one coat of eyeslipsface (e.l.f) Fairy Dust. The pink flakies really only reveal themselves in sunlight, and the pink is even a subtle ode to Ariel's hair (and my own).


While I may not have a gold crown of my own, I used three varieties of round studs from Born Pretty Store to give this look the royal treatment. They are applied by simply painting a top coat over the gradient, picking up the studs with a wax-based pencil or orange stick and placing the studs in the desired spots. I just use an old, white eyeliner pencil that I was allergic to and it works great.

 I sealed the entire design with Out the Door top coat, and voilĂ !


The end result is fit for a mermaid, a princess, and all polished lovelies under the summer sun. 
It's beach and pool proof, as the studs really stay put.

I won't lie, with my long red hair I definitely felt like the Little Mermaid.
By the way, did you know her daughter's name was Melody in the sequel? Too bad she had black hair.


What do you think of this design?
How do dress your nails for days by the sea?

Share you summer mani must-haves in the comments below and give this look some love on Facebook, Instagram, Tumblr and Pinterest!

Thanks for reading!

-Melody

Monday, April 22, 2013

E.L.F Essential Spring 14 Piece Nail Cube Swatches and Review (Part Two)


Hi everyone!

Today I have the second half of the eyeslipsface (e.l.f) Spring Essential 14 Piece Nail Cube to share with you.

If you missed the first half of this review, you can jump over here and see the rest of the collection and get more information on pricing and availability.


The Collection

For the second half of this review I will be showcasing the following:


From left to right:

Mint Cream
Lavender Mist
Skinny Jeans
Chic Confetti
Gold Star
Dream Maker
Fairy Cream (I think this is actually Fairy Dust and my sticker is just a misprint)

[Mint Cream, Skinny Jeans, Chic Confetti, Gold Star, Dream Maker, and Fairy Dust (same as Fairy Cream) are available in full size bottles.]

The Colors


Mint Cream is a deep, duusty mint creme. Fitting name, right?

e.l.f. "Mint Cream"


We've all seen plenty of mint polish releases this year, but this one stands out among the crowd. It's skirts the line of being more of seafoam green than a mint green, but it still counts. I'm in favor of this one because it's more suitable for all seasons because of its muted tone. It's also more flattering for those weary of brighter green polishes.

In addition to the color itself, the formula couldn't be better. Smooth and opaque in one coat, and super glossy even before top coat. I did, however, have yet another hair come off the brush into the polish, but reapplication is a simple remedy.


e.l.f. "Mint Cream"


Lavender Mist is a bright periwinkle blue with silver microshimmer.

e.l.f. "Lavender Mist"


I assumed this was going to be a frost like the other two shimmers in the collection, but the brush strokes almost completely disappeared as the color dried. The brush did cause minor streaking, but two coats smoothed everything out. 

I'm a sucker for periwinkle, and a shimmery periwinkle is hard to come by.

e.l.f. "Lavender Mist"


Skinny Jeans is glossy blue creme.

e.l.f "Skinny Jeans"

This shade had the thinnest formula of them all, taking three coats to reach total coverage.

It's a pretty basic blue. There's no real wow factor here, but it does compliment the rest of the collection.

e.l.f. "Skinny Jeans"


Gold Star is a gold mix of fine and small hex glitters suspended in a clear base.

e.l.f. "Gold Star"

This is a great, basic, gold glitter mix depending on how you wish to use it. If you want to achieve the sprinkled look as I have demonstrated above, then this is a steal. The glitter sits so flat you don't even feel it when you run your fingers across the nail.

The reason behind this is also it's downside. The base is really thick. Unfortunately this means that it's extremely difficult to maneuver the glitter around and just about impossible to place a single glitter in a specific area. I basically had to dab it on and hope for the best.

I definitely like the end result, it's just shame that it's not more versatile. 

I know my photos are kind of funky, but since I'm back outside shooting (temporarily) I had to angle my hands down to avoid some major glare from the glitter. 

e.l.f. "Gold Star"


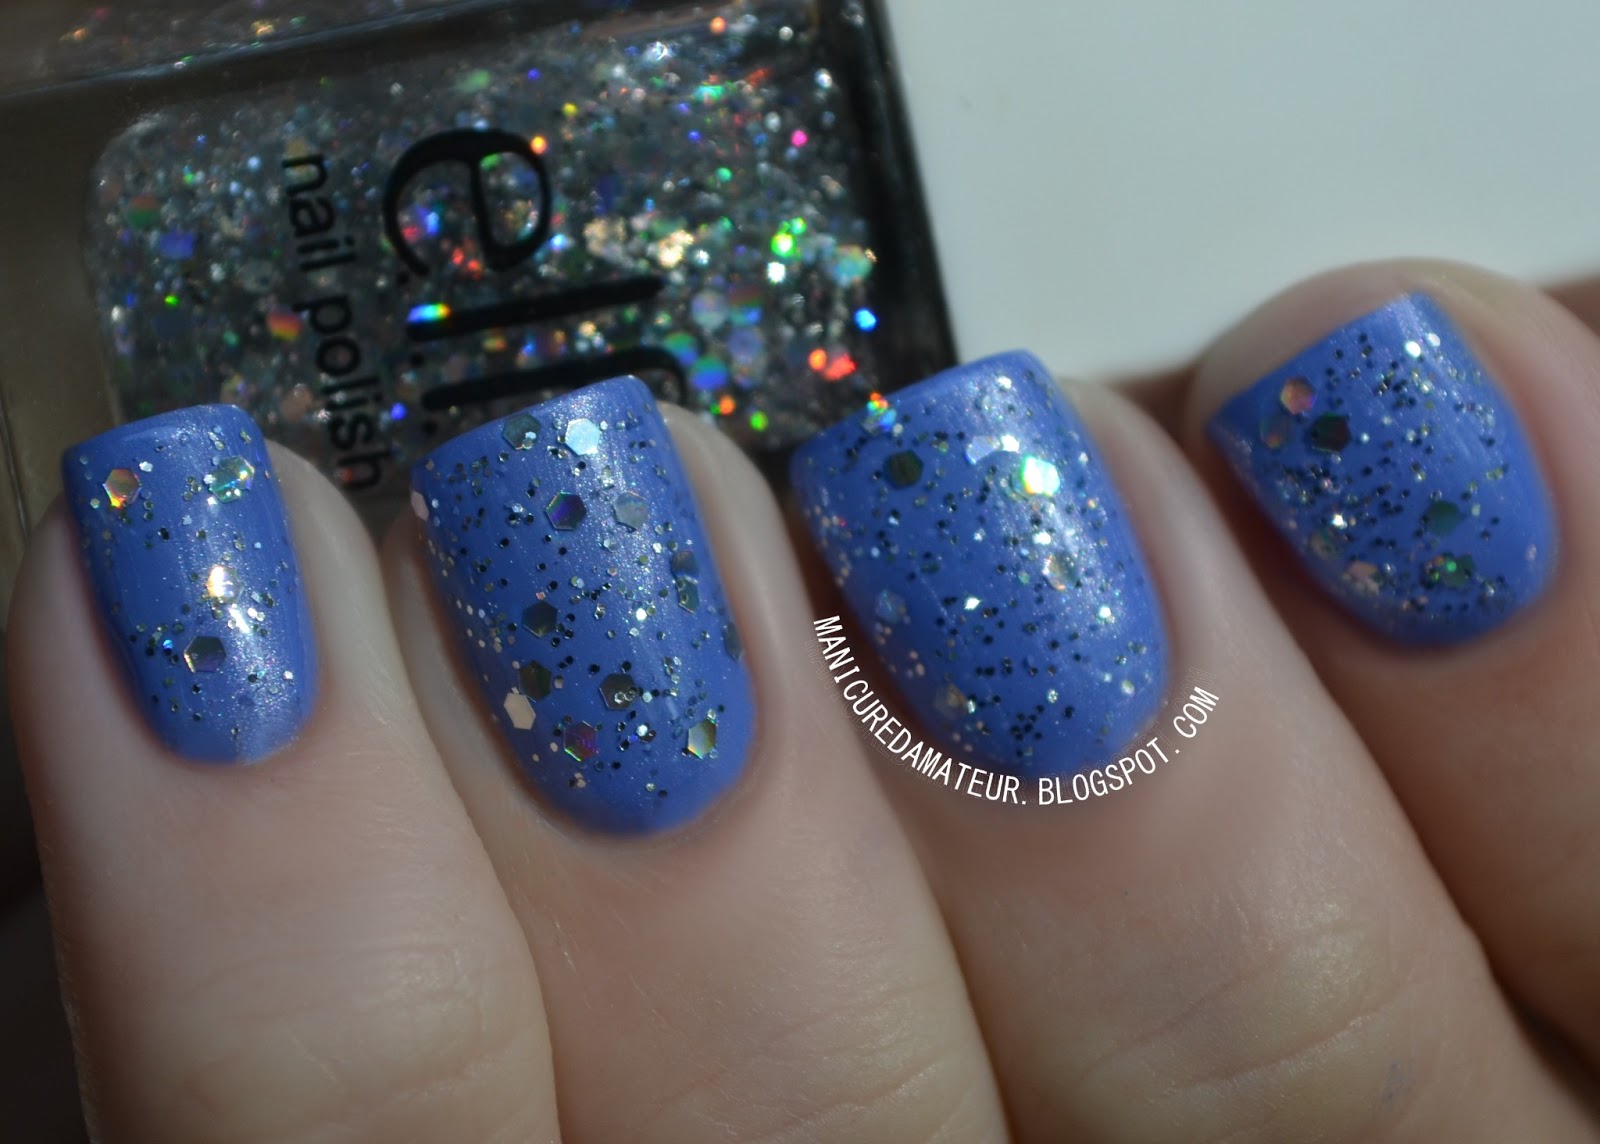
Dream Maker is a holographic mix of fine and small hex glitters suspended in a clear base.
e.l.f. "Dream Maker"


The formula for Dream Maker is nearly identical to Gold Star, but for some reason I had a much harder time getting the hex glitters out of the bottle. 

Even though it took some extra effort, I got the same beautiful result. 


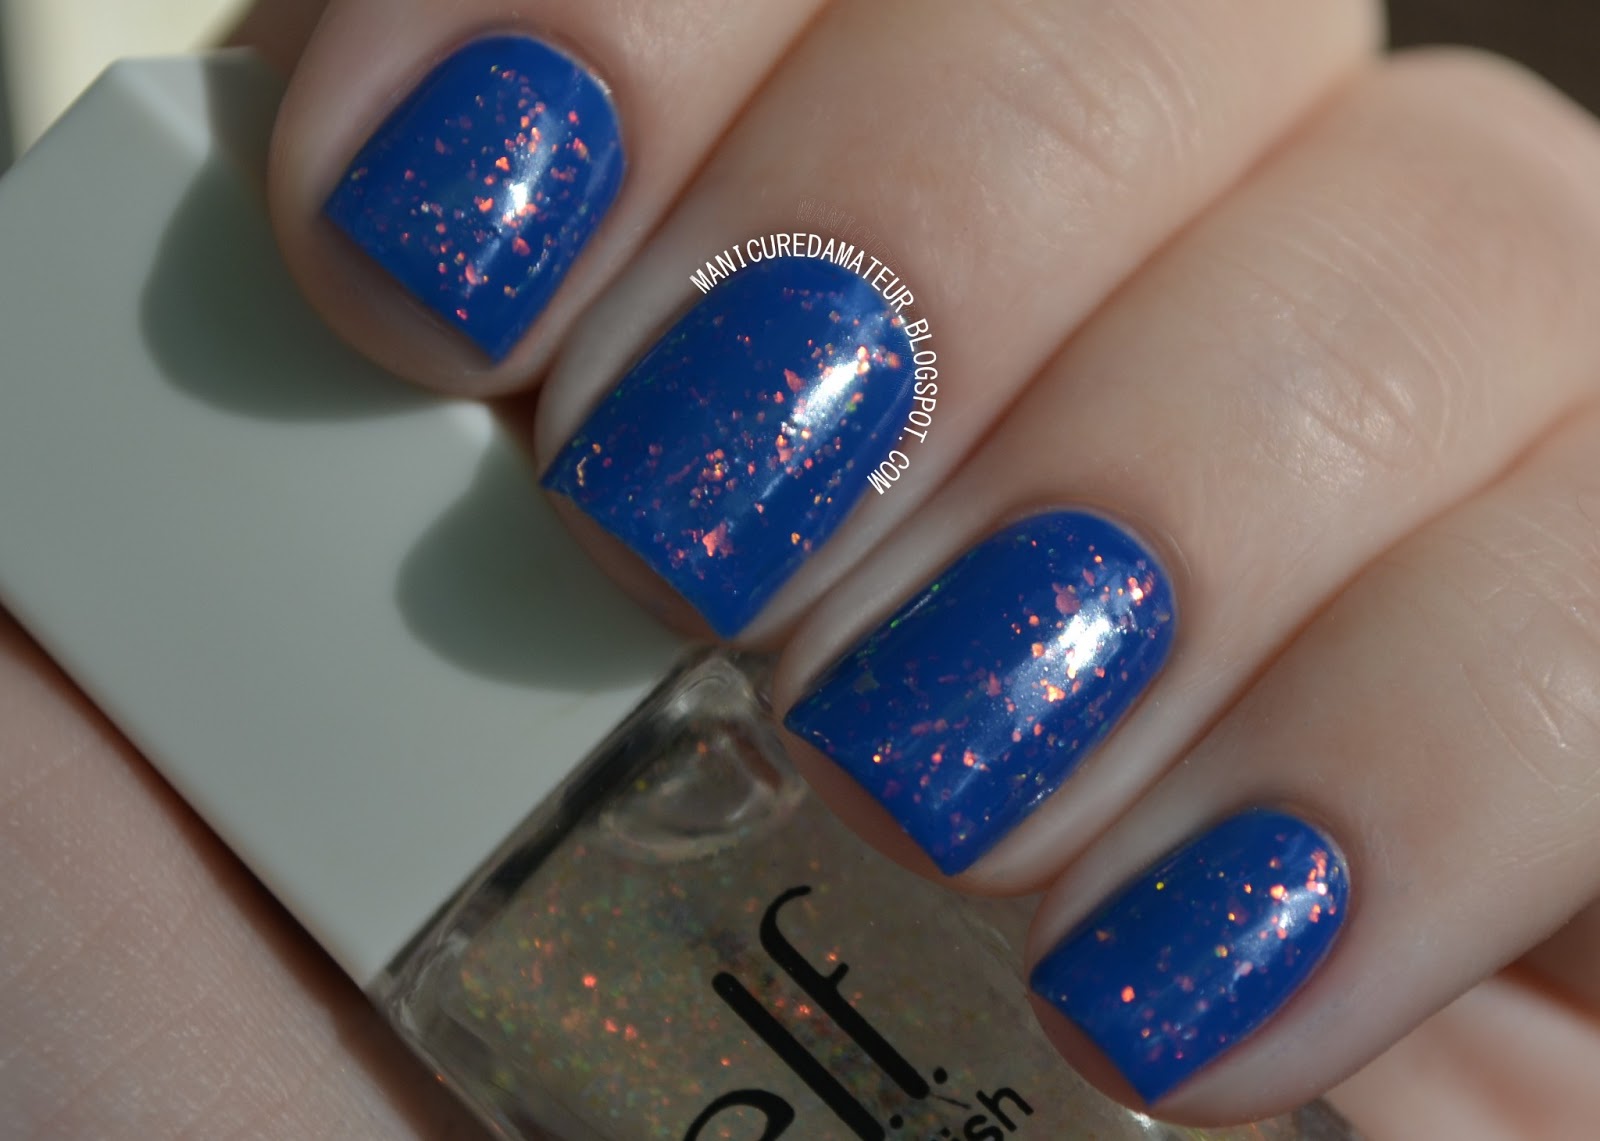
Fairy Dust/Cream consists of tiny, iridescent flakies suspended in a clear base.

e.l.f. "Fairy Dust/Cream"

As with all iridescent finish polishes, Fairy Dust/Cream is extremely camera shy without indoor lighting. That being said, the flakies are more sparse than other iridescent finishes such as Color Club's "Snow Flakes." 

This can actually be a good thing as it allows you to control the intensity of the effect. This was much easier to work with than the previous two mixes. I used two coats for the photos above, but this is in direct sunlight where the effect gets a bit lost.

e.l.f. "Fairy Dust/Cream"


Chic Confetti is colorful mix of round and small hex glitters suspended in a clear base.

e.l.f. "Chic Confetti"


Multicolored  glitter mixes like this are a dime a dozen, and this one isn't all that special.

The formula was a bit more manageable than Gold Star and Dream Maker, but not by much.

I don't hate it, I just have many others like it.

e.l.f. "Chic Confetti"


Overall


Now that I've seen the collection in its entirety, I'm more able to look past my qualms with the brushes. Losing hairs into the polish is still unforgivable, but once I got used to the behavior of the brush I was able to see the polishes for what the really are. 

For $14 dollars you get 14 polishes in a variety of colors and finishes. Deal or no deal isn't really the question here. Of course it's a bargain, but only if you like the colors. While some of the shades are pretty basic, a few stood out as my favorites:

Flirty Fuschia and Mango Madness still rank as my top two, but Mint Cream, Lavender Mist, and Fairy Dust are a few that I'm 100% sure I'll be turning to again.


What were your  favorite shades from the collection? 
Will you picking up this nail cube anytime soon? 
What about as a gift?


Let me know in the comments below and shout out your favorite gift ideas for the polish-loving mother figures in your life.


And don't forget to keep with the Manicured Amateur on Facebook, Twitter, Bloglovin' and all the other little social media outlets by clicking the buttons in the top right-hand corner.

Thanks for reading!

-Melody


Sunday, April 21, 2013

E.L.F Essential Spring 14 Piece Nail Cube Swatches and Review (Part One)


Hi everyone!

Today I have a part one of a two part review of the eyeslipsface (e.l.f) Spring Essential 14 Piece Nail Cube.

With Mother's Day coming up in a few weeks many are searching for the perfect girly gift for mothers, wives and other maternal figures in their life. 

If you're wondering if the e.l.f nail cube is right for a special lady in your life, keep on reading!


The Collection
Photo Courtesy of eyeslipsface.com

The Spring nail cube consists of 14 mini size (0.2 fl.oz.) bottles including 7 creme shades, 3 shimmery shades, and 4 glitter top coats.

For the first part of this review I will be showcasing the following:


From left to right:

Metallic Elegance
Nude
Flirty Fuschia
Electric Fuschia
Smokin' Hot
Mango Madness
Sunflower


Price & Availibility

The nail cube is available for $14.00 at Target and on eyeslipsface.com.
That's $1 per shade. Fair price for the amount of product.
The set is supposedly limited edition, but e.l.f said that about the Holiday Nail Cube too (which I rushed to purchase at the time), and yet it's still available for purchase on their website.

Full size (10ml, 0.34 fl.oz) bottles of Nude, Flirty Fuchsia, Smokin' Hot and Mango Madness are currently available for $2.00 each.


The Colors


Metallic Elegance is a frosty, champagne pink shimmer.

e.l.f "Metallic Elegance"

Okay, so on my first attempt with this polish I thought the formula was horrible. However, after swatching more shades I realized the problem is in the brush, not the polish.

For a frosty shade like this one, a bad brush is a big bummer. Frosts have a naturally streaky application as it is, but a brush that fans out too much and gives you little control over the strokes causes an overall messy manicure.

It's really not possible to paint thin layers without experiencing major baldness or dragging. It took me FOUR coats to even out the streaking and to achieve full coverage, but in the end the polish pooled and sat thick on the nail.

It's a shame really; it's a pretty color.


e.l.f "Metallic Elegance"


Nude is pinky, deep nude creme.

e.l.f "Nude"

Luckily, all of the creme shades gave me much less trouble. While a little bit of streaking was impossible to avoid, Nude was entirely opaque in just one coat, and all strokes were smoothed out with top coat.

I'm still not sure if I like this type of "nude" on me. My skin tone is in the odd in-between of peach and olive undertones...and this particular shade just clashes. It's also too dark to be "my nude" and too light to pass as pinky brown. Can you tell I'm conflicted?


e.l.f "Nude"


Flirty Fuchsia is hot coral-like pink creme.

e.l.f. "Flirty Fuchsia"

I have no idea why this has fuchsia in the name. Nevertheless, this shade is gorgeous! It's borderline neon when you see it in person. Fine for spring, fine for summer, fine for me!

The formula is just a bit thinner than Nude, which resulted in the easiest application. Even and opaque in one coat, and it's very glossy even without topcoat.


e.l.f. "Flirty Fuchsia"


Electric Fuchsia is closer to actual fuchsia, but not quite. It's more of a rich, raspberry pink creme.

e.l.f. "Electric Fuchsia"

Indoors this shade shifts to more of a berry reddish color, but it's still beautiful.

It goes on more sheer than the others, requiring two coats to eliminate the nail line.


e.l.f. "Electric Fuchsia"


Smokin' Hot is a cherry red creme with purple undertones.

e.l.f. "Smokin' Hot"

The formula is identical to Electric fuchsia and required two coats for total coverage. I actually prefer a thinner composed red because it typically leaves less stains in the cuticles during removal.

e.l.f. "Smokin' Hot"


 Mango Madness is an almost neon, coral orange creme.

e.l.f. "Mango Madness"

Mango Madness and Flirty Fuchsia are great examples of the opposite ends of the coral spectrum. Their formulas are identical and are both equal in brightness. 

I immediately saw Mango Madness and thought "TOES!" For $2.00 I'll happily spring for a full size of this one and wear it on my toes all summer long. It's fantastic.

There was a total downside to this one. A hair completely came off the brush and I had to completely remove the polish from one nail and start over.


e.l.f "Mango Madness"


 Sunflower is true to it's name as a pollen colored yellow frost.

e.l.f. "Sunflower"
This is one of the most interesting shades of yellow I have ever seen. The yellow itself has green undertones, but the silver microshimmer gives the overall finish almost a peachy golden glow. 
You can't explain that!

The formula was definitely thicker, matching that of Metallic Elegance. I didn't have quite the same issues as I did with the other which I attribute to the color being much more saturated.

I usually don't care for frosts at all, and boy is this one frosty. But the shade is so interesting and somehow flattering that I feel inclined to make an inception. The brushstrokes almost mimic the actual texture of a sunflower...so well played e.l.f., well played.


e.l.f. "Sunflower"


Overall


So far, it looks like you get what you pay for. As I mentioned before, it's not the polish that's a problem, it's the brush. If you really like the colors, I say buy it anyway. It's still a fantastic deal for the price, and with a little patience you cane make every shade work. The packaging is very gift-friendly and it's a great option for any polish or makeup lover when you aren't sure what colors they'd prefer.


Which colors are you favorite from these shades? 
Will you picking this set up anytime soon?

Let me know in the comments below and share your thoughts about frosty polishes, tricky brushes and anything else!

Keep up with the Manicured Amateur on Facebook, Twitter, and Bloglovin' for part two of this review, updates and more!

I hope everyone is having a great weekend. Thanks for reading!

-Melody
Related Posts Plugin for WordPress, Blogger...