


Hi everyone!
Today I have a fun and funky nail art design created entirely with the L.A. Girl DIY Nail Art Kit.
For more information on the contents, pricing, and availability of the nail art kit, along with swatches of the individual colors included, you can jump over here to read the first part of the review.
Now on to the design!
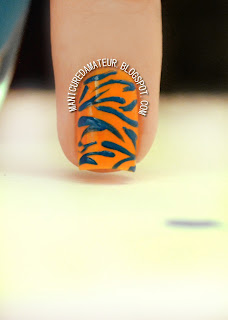
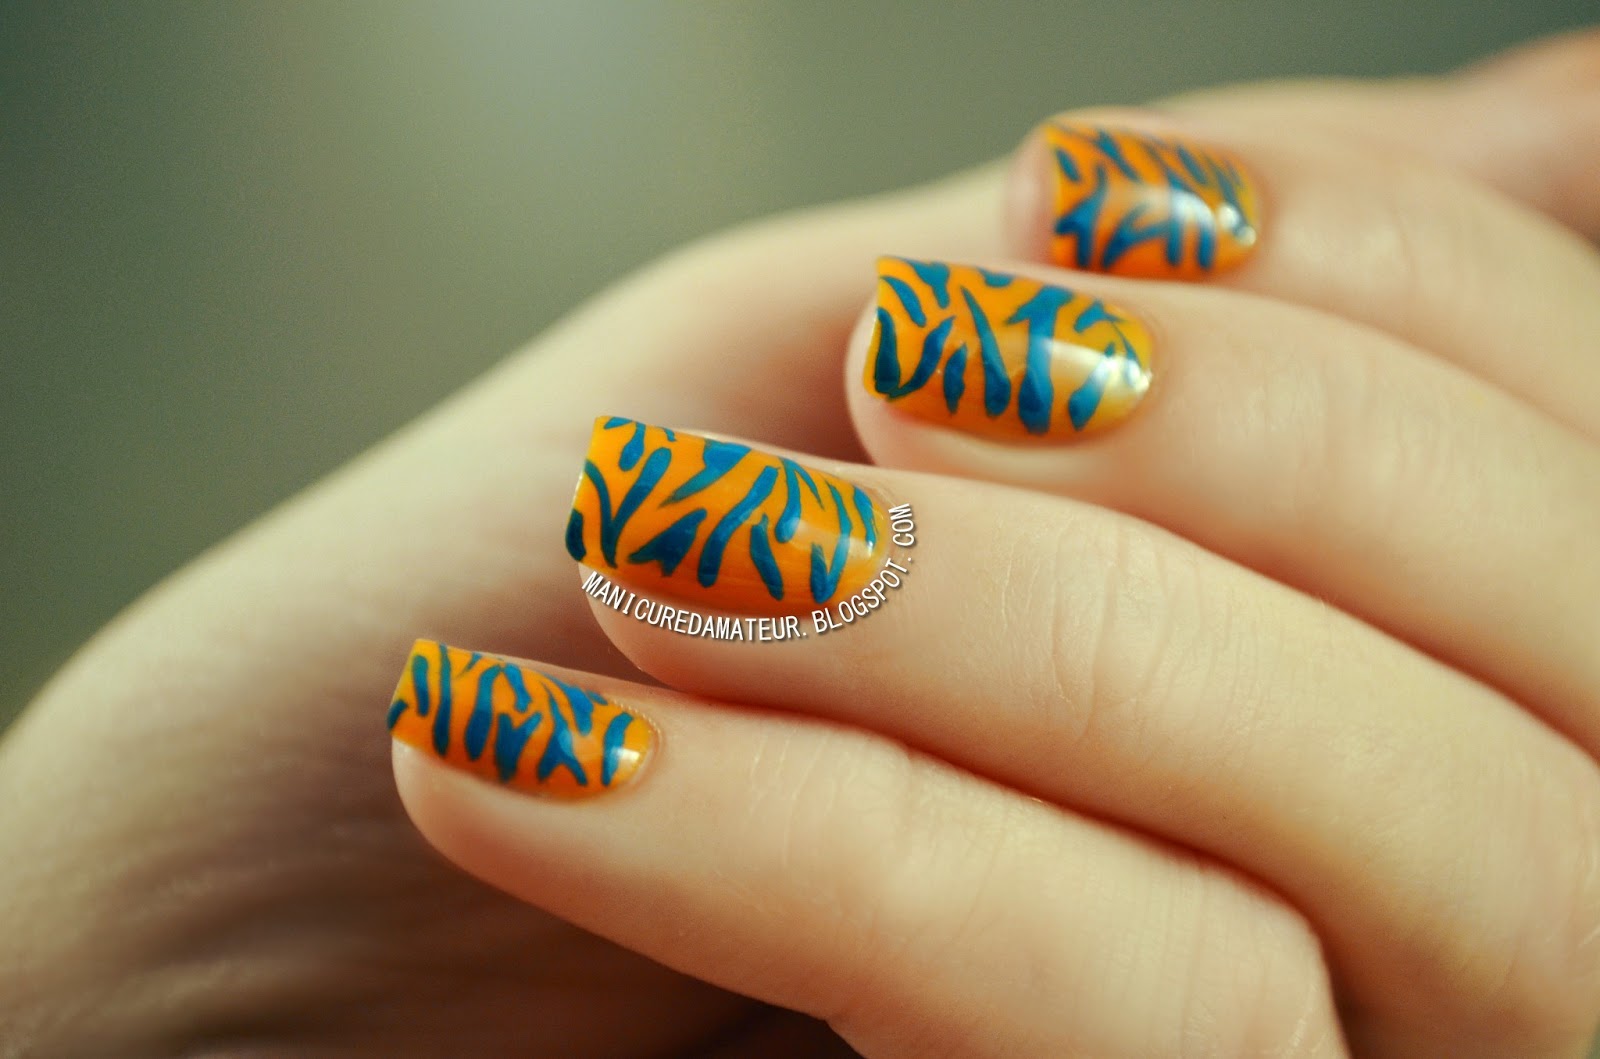
DIY Zebra/Tiger Stripe Nail Art
What you'll need:
For this look we're going to use the blue and orange polish from L.A. DIY Nail Art Kit in Flashy, along with a small nail art brush which is provided in the package.

The following products are not included, but I also recommend a base and top coat, along with a small angled brush for any needed cleanup.
For this design I used Avon's Nail Experts Gel Strength Base Coat and L.A. Girl's Top Coat.
The small angled brush is an old EcoTools angled eyeliner brush.
The Steps
Step 1.
Start with clean, bare nails. You can skip the base coat if you don't have one, but it is highly recommended to add a clear base to protect your natural nail before polishing.
Step 2.
Apply two to three coats of the orange polish, giving each layer enough time to dry to prevent dragging and streaking.
Apply two to three coats of the orange polish, giving each layer enough time to dry to prevent dragging and streaking.
1.  2.
2.
 2.
2.
Step 3.
Drip a dot onto a piece of paper or other palette. Take the small nail art brush and dip the end into the dot.

Draw a curvy line onto your nail by starting at the outside and drawing inward in a wispy motion.
Drip a dot onto a piece of paper or other palette. Take the small nail art brush and dip the end into the dot.

Draw a curvy line onto your nail by starting at the outside and drawing inward in a wispy motion.
Draw another line on the other side, slanting the line in the other direction.
3.  4.
4. 
4.
Step 5.
Begin to fill in the rest of you nail with the same technique. I recommend working from the center outward to prevent any unwanted gaps.
Try not to overthink the design. It's okay for the lines to be bumpy and uneven. If fact, it looks more realistic!
Step 6.
Once you are happy with your design, give the stripes at least 15 to 20 minutes to dry depending on how thick you applied them.
If needed, clean up around your nail using a Q-tip or what I recommend - a small angled brush, which is more precise for cleaning around the cuticle area.
Add your favorite top coat, and enjoy!
5.  6.
6.
 6.
6.

That's it!
It's actually a really quick design that even a first time nail artist can do.
It doesn't require extreme precision and the color combinations are endless.
I hope you enjoyed this tutorial and let me know in the comments below if you try it yourself!
Don't forget to give this look some love on Instagram, Tumblr, and Pinterest,
and keep up with The Manicured Amateur on Facebook, Twitter and Bloglovin' because there are more L.A. Girl DIY Nail Art Tutorials coming your way.
Thanks for reading!
-Melody
*The L.A. Girl Nail Art Kit was provided for my honest review. Any material provided does not influence my opinions in any way. Gotta keep it real!
Doesn't look very zebra or tiger, but super cute nonetheless, adorable color combo!
ReplyDeleteAgreed. It passes as a tiger design in person, but it's definitely a stretch.
DeleteAt least the general idea comes across. I hope. Haha!
I love the orange and blue combo you chose! Great tutorial!
ReplyDeleteThis tutorial was very helpful. I struggle with the zebra/tiger print. Mines often come out looking very wonky. I nominated you for the Liebster Blog Award :)
ReplyDeletehttp://nailsbycoco.blogspot.com/2013/05/liebster-blog-award.html
That's a great combination of colors.
ReplyDeleteloe the combination of colours <3
ReplyDeleteVery beautiful nail art, pretty patterns, beautiful colors. Cheap Nail Art
ReplyDeleteThanks guys! Glad it eas helpful!
ReplyDelete