

homeaboutcontactdisclosure
Showing posts with label orange. Show all posts

Tuesday, June 18, 2013

Avon Cosmic Collection Swatches and Review (Part One)


Hi everyone!

Today I finally have the Avon Cosmic Collection to share with you.
I caught word that these polishes were coming, and checked the site everyday until I could finally scoop up the whole set.

These polishes required special attention, and the only way to accurately demonstrate each shade is to photograph each one both outdoors and in, so both parts of this review are VERY pic heavy.

Apart from balancing blogging with preparing for my move, preparing this collection took much longer than expected with the ongoing storms interfering with my photographs.
In short, tornadoes + no power = hiding in the basement in the dark with no internet. 
Bummer Summer 2013.

So let's see the beauties before the clouds come back!


The Collection


The Avon Cosmic Collection consists of ten shimmery shades that reveal an ambiance of holographic sparkle.

The polishes are available individually for $6.00 each.

You can purchase through your local Avon representative who can be located via the "Find A Rep" page on Avon's website.
If you want to save some time, you can enter "Julie Pruitt, Tennessee" on that page to shop online through my dear family friend (my mother's "BFF," haha).


The first part of this review displays the warmer half of the collection in the five following colors:


From left to right:

Radiant
Starlight
Saturn
Supernova
Starburst


The Colors

Every shade in the collection has an incredible formula. the consistency is just perfect.
While every shade could be left at one coat, if you were to look close enough you'd still see the nail poking through. I recommend two coats for best coverage.
Even though these are scattered and not linear "holos," I still chose to go without a topcoat. 
It is known to polishers that top coat can reduce the linear holographic effect, but the actual holo shimmer in these is so subtle that I chose not to risk it.
Despite the extra protection, they seemed too wear well without chipping.
(I say that, but keep in mind I wear no color for more than 24 hours unless it's on my toes.)


The only thing that separated these shades in terms of formula was the amount of holo goodness.
In short: the lighter the shade, the weaker the holo.

And the effect can really only be noticed in direct sunlight with the exception of a couple of shades. In most lighting situations it comes off as just a silvery microshimmer.

Let's take a closer look, shall we?

Remember, the first two photos of each shade will be direct sunlight and the other two will be indoors under daylight bulbs.


Radiant is a light gold with holographic shimmer.


See how subtle? It's definitely a soft and scattered holo, but it's a true gold with shimmer perfect for the holiday season.


Indoors the holo disappears, but an angelic shimmer remains.


Starlight is an odd mustard-like, greenish yellow with holographic shimmer.


I could barely find the holo even under the sun. 
You can catch a glimpse of it in the second photo, but the bright color really steals the show.


Once seen indoors, I realized how much holo the shade really had to begin with.
Suddenly the different tones disappear and I was left with an interesting yellow that for some reason made me crave thanksgiving dinner.


Saturn is a semi-burnt orange, leaning on a red-orange with the same holo shimmer.


I think I've found my favorite orange polish EVER. This is fall in a bottle. The holo in this one gives off every tone you'd fine in falling leaves, leaving me with only about a million nail art ideas come fall.


Even indoors, the holo tries to stick around. Obviously not as bright, but just as beautiful. 

The color itself takes on a more reddish hue, and I love it either way.


Supernova is a rosy-red with holographic shimmer.


Notice the bolder the shade, the bolder the holo pattern? 

Under the sun this shade makes me think of Julie G Gumdrop Collection (which I reviewed here some time ago). 
If you could take Hot Cinnamon and Sugar Rush, nix the texture and mix them together, you'd get this exact shade.


Indoors this color transformed more than any other them.
It became a lighter, more pinky red while the holo goes into hiding.


Starburst is a deep fuschia with a stronger holo shimmer.


 The holo is strong with this one, compared to the others at the very least.
Outdoors you won't miss it.


Indoors the shade leans a bit more on the purple side, but is rich and beautiful.


 Which one of the cosmic colors shines for you?
What do you think of the scattered holo?

Let me know in the comments below, and keep your eyes peeled becoming the second half of the collection is coming right up!

Thanks for reading!

-Melody


Monday, May 20, 2013

Summer Striping and Studded Ruffian Nail Art


Hi everyone!


Today I have a bright nail look for you!

Looking back through the designs I've posted I realized it's been too long since I've done a tape mani.
So today's design features a bright combo of stripes and studs.


The Steps

My thumb a pinky fingers began with a base of Essie Butler Please. 

I then took my striping tape and placed a small strip horizontally across the nails at an angle. I then cut smaller strips and placed them vertically in an angled but evenly spaced striped pattern, beginning from where I placed the horizontal piece.

I then took Sinful Colors Unicorn (swatched here) and eyeslipsface Mango Madness (swatched here) and painted within the stripes with a small, flat nail art brush.

While the polish was still wet  I removed the strips and finished with a line of studs from my Born Pretty Store stud wheel which you can purchase here (use code BHL91 for 10% off).

My index and middle finger began with a base of eyeslipsface Mango Madness. 

I went over the top third of my nail with Essie Butler Please to create a sort of exaggerated ruffian look that came to a rounded point. 
(Ruffian manicures are simply inverted half moons.)
I outlined the ruffian edge with Sinful Colors Unicorn with a long striper brush and finished with a single stud from the Born Pretty Store stud wheel.

My ring finger was created using the same method as my index and middle fingers, except I began with Sinful Colors Unicorn as my base and used eyeslipsface Mango Madness as the outline.

All nails were given one good coat of  Sally Hansen Ultimate Shield Base and Top Coat.


I really loved this color combination. It's bright and fun and a perfect match for the a day in the sun.


What do you think of  this bright design?

Let me know in the comments below and make sure to give this look some love on  Facebook, Instagram, Tumblr, and Pinterest!


And keep up with me on Twitter, and Bloglovin' for more nail art looks and some exciting new collections I'll have to share with you soon!

Thanks for reading!

Melody

Thursday, May 9, 2013

L.A. Girl DIY Nail Art Review Part Four: Overall Value and Recap


Hi everyone!

So I have had to change my original plan for the last part of my review of the L.A. Girl DIY Nail Art Kit. Originally I had a couple of more simple nail art tutorials with the kit to show you, but unfortunately I ended up running out of polish to work with!

They were mini bottles after all, so I should have seen it coming.

Instead, I want to recap the entire kit as a whole and re-evaluate the value and effectiveness of the product now that I've used it to its full potential.

So let's take a final look at the product.


The Contents


I showed you in the first part of the review the contents and individual colors for the Nail Art kit in "Flashy." To see my initial thoughts and more swatches of the individual colors, you can jump over here.

The kit included four mini bottles of bright neon colors, a small nail art brush, chevron nail stickers, and a full instruction sheet to help you get started.


The Colors

For  the most part, I really liked the colors both individually and how they coordinate as a set.


The pink was a real stand out as a bright barbie like neon shade. Feedback from my initial look at these colors proved that I wasn't alone in saying that this is a color you NEED in a full size for summer.

The orange was just as a bright and easy to work with, so if you're into orange polishes and looking for a good neon citrusy hue, I'd spring for this one full size as well. It looks great on toes!

If you read my thoughts on the yellow, then you already know this is a hit or miss. On one hand it's hard to work with, takes a lot of building and isn't very flattering for some. It's actually the first color I ran out of since it took so many layers to get it opaque each time. On the other hand this is a pretty common problem with bright yellow polishes across the board, so L.A. Girl really isn't to blame here. The formula takes getting used to. If you have the patience and a good top coat, you can make this color work in the end...it just won't be easy.

The blue has an incredible formula and is a great basic go-to for nail art. As a stand-alone color it's not anything special, but not something you'd regret having in your stash.


The Tools


The Brush

The picture above shows the brush before I began using it. I was scared at first  at how on earth I could create any nail art look with the bristles that spread out, but a couple of dips into nail polish remover and then shaping the tip fixed it. As many nail art brushes as I have around, I think I'm really going to be using this one often for small line work. I've used and abused it over the past week, and it's still like new. It's surpisingly durable, making it reliable for both beginners and more experienced nail art enthusiasts.

The Stickers

The nail stickers I was unfortunately unable to show you in action before the polishes ran out, but it's not to say I didn't attempt to use them. Unfortunately, they are too big to create  an actual chevron pattern. The size allows for only one strip to be applied per nail. It can still create a cute look, but it's still not the look they were advertised to achieve. 

I attempted to cut them down to make them thinner, but then I had to deal with crooked edges. In the end it would be easier to achieve the actual pattern using the brush than trying to use the stickers. They can be effective when used to create a single chevron stripe accent or even to achieve regular stripes if you cut them in half at the corner.


The Nail Art

The kit advertises that you can creative a total of atleast five different nail art looks:

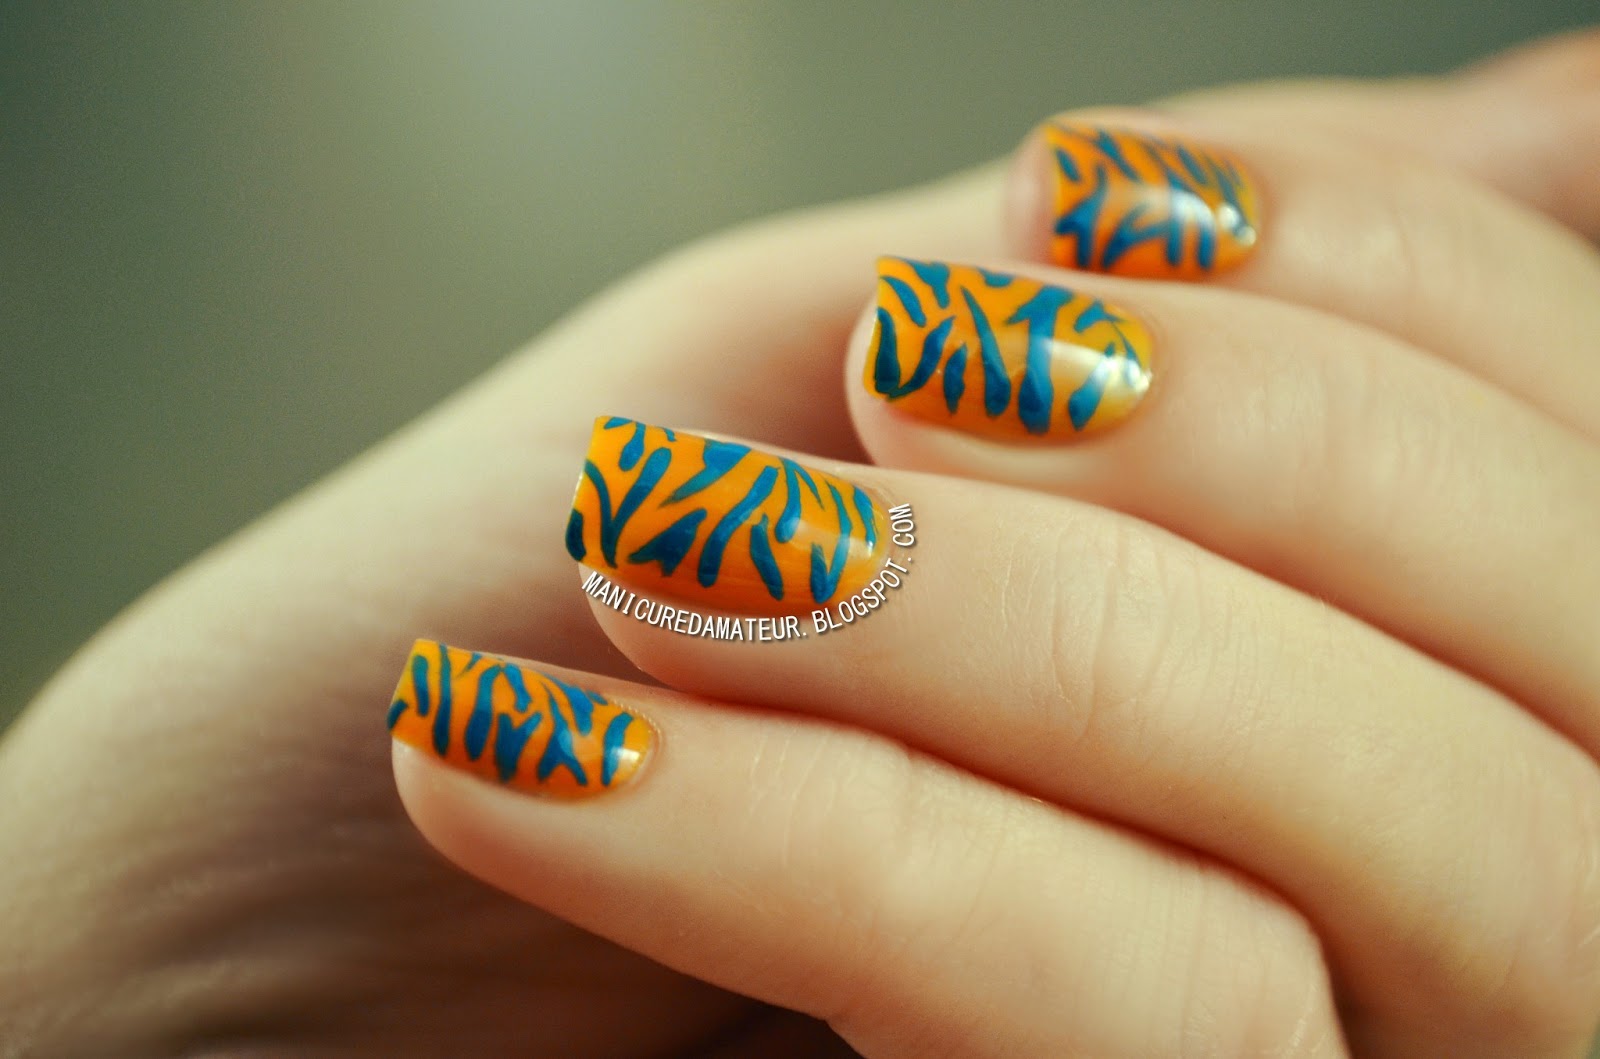
Tiger/Zebra Stripes
Leopard/Cheetah Spots
Chevron Stripes
Polka Dots
(No Water) Swirl Marble

I demonstrated two of them for you, while making attempts to create the other three.

Overall, the colors in the Flashy kit in particular make creating these looks a bit harder than they should have been due to the semi-sheer formula of all but the blue. 
I recommend using the lighter shades as your base and utilizing the blue as the main detail color when possible as it is the only fully opaque shade.

The tiger/zebra and cheetah/leopard looks create the best result from the materials used. 
To see the full tutorial of these looks, just click the images below.


But what about the three remaining looks?

I already explained the trouble with the chevron stickers, but the other two looks only  require the brush.

I was unable to show the polka dots, but that's pretty self explanatory  
Now, I prefer the precision of a dotting tool for but that's now to say that the look couldn't be achieved with the brush. The trick is being able to pick up a generous amount of polish on the tip of the brush and hold it completely upright when dotting on the nail. The dots are small but were surprisingly perfectly round.

The swirl marble is really not a look a favored in the first place, but I still gave it a shot. 
It looks a little messy in my opinion, but I  actually found it to be easier to do by mixing the orange, pink, and yellow shades. The thin formula actually works to their advantage in this case as they blend together in a much more pleasant manner.


The Value

Even after actually running out of a couple of the colors, I still stand by my initials impressions of this kit and think it's a GREAT value. 

For the small price of $5 you're getting 4 mini polishes, a sheet of 24 chevron shaped nail stickers, and a  multipurpose nail brush. For the average user this kit will last longer than it did for me. You have to take into consideration that I had to swatch multiple times due to photography problems (neons are a pain to photograph!), and experiment with the same look until I achieved the best results to show you. So I went through the polishes much quicker than I should have. 

And let's not forget that the brush is something you can use for a very long time, so it's a minuscule price for an important nail investment.


Final Thoughts

After working with this, and only this kit for the past week or so I thought I'd get really sick of it, but I really didn't. It was nice to have exactly what I needed all in one kit and I was still able to create multiple looks to keep me from getting too bored. 

The Flashy kit is actually probably my least favorite of the color options available for a couple of reasons:

1. The formula for nail art polishes really needs to be opaque, and three out of the four were not.
2. There needs to be more contrast in the colors in my opinion.

Now, I stumbled upon a  preview of one of the other color options in "Fabulous." Brianna over at BreezyTheNailPolishLover displayed a skittle mani here of each of the looks created with her kit, and you can see how much better that color combo worked. You can also get a glimpse of just how big those chevron stickers are.

After seeing both her kit and mine, overall I would definitely recommend picking this up if you see it around. Even if it's just to test the colors, you're definitely getting your money's worth. I don't think it matters if you're a beginner or an expert. It's a great little kit for polished lovelies of all skill levels.


So that's  it! 
I know this was long and you're asking yourself why I spent so many days concentrating on this one product. 
I felt it was important to really break it down and focus on each aspect of the kit.

I give it a thumbs up, but do you?
Let me know your thoughts and whether or not you'd  give the kit a try in the comments below!

To see all the L.A. Girl line has to offer, visit their website at lagirlusa.com and give them some love on Facebook and Twitter.

Thanks for reading!

-Melody


*The products in this post were provided for my honest review. Any material provided does not influence my opinions in any way. Gotta keep it real!

Sunday, May 5, 2013

L.A. Girl DIY Nail Art Kit Review Part Two: DIY Tiger / Zebra Stripes Tutorial


Hi everyone!

Today I have a fun and funky nail art design created entirely with the L.A. Girl DIY Nail Art Kit.

For more information on the contents, pricing, and availability of the nail art kit, along with swatches of the individual colors included, you can jump over here to read the first part of the  review.

Now on to the design!


DIY Zebra/Tiger Stripe Nail Art


What you'll need:

For this look we're going to use the blue and orange polish from L.A. DIY Nail Art Kit in Flashy, along with a small nail art brush which is provided in the package.


The following products are not included, but I also recommend a base and top coat, along with a small angled brush for any needed cleanup.
The small angled brush is an old EcoTools angled eyeliner brush.


The Steps

Step 1. 
Start with clean, bare nails. You can skip the base coat if you don't have one, but it is highly recommended to add a clear base to protect your natural nail before polishing. 

 Step 2. 
Apply two to three coats of the orange polish, giving each layer enough time to dry to prevent dragging and streaking.


1. 2.


 Step 3.
Drip a dot onto a piece of paper or other palette. Take the small nail art brush and dip the end into the dot.


Draw a curvy line onto your nail by starting at the outside and drawing inward in a wispy motion.

                                                                                    Step 4. 
                                    Draw another line on the other side, slanting the line in the other direction. 


3.    4.     


Step 5. 
Begin to fill in the rest of you nail with the same technique. I recommend working from the center outward to prevent any unwanted gaps. 
Try not to overthink the design. It's okay for the lines to be bumpy and uneven. If fact, it looks more realistic!

Step 6. 
Once you are happy with your design, give the stripes at least 15 to 20 minutes to dry depending on how thick you applied them. 
If needed, clean up around your nail using a Q-tip or what I recommend - a small angled brush, which is more precise for cleaning around the cuticle area. 
Add your favorite top coat, and enjoy! 


5.  6.


That's it!
It's actually a really quick design that even a first time nail artist can do.
It doesn't require extreme precision and the color combinations are endless.


I hope you enjoyed this tutorial and let me know in the comments below if you try it yourself!

Don't forget to give this look some love on Instagram, Tumblr, and Pinterest,
and keep up with The Manicured Amateur on Facebook, Twitter and Bloglovin' because there are more L.A. Girl DIY Nail Art Tutorials coming your way.

Thanks for reading!

-Melody


*The L.A. Girl Nail Art Kit was provided for my honest review. Any material provided does not influence my opinions in any way. Gotta keep it real!

Saturday, May 4, 2013

L.A. Girl 4 Piece Nail Polish DIY Nail Art Kit Review Part One (Swatches and Review)


Hi everyone!

Today begins a very special multi-post event here at the Manicured Amateur. The lovely ladies over at Beauty21 Cosmetics (who make L.A. Girl and L.A. Colors Polishes) were generous enough to send me the new DIY Nail Art Kit to review for you all.

This brand has a special place in my heart, as one of the first reviews I ever did was on their DIY Ombre Sets that were a Valentine's Day gift from my boyfriend. If you're interested in those sets and seeing the early days of the amateur, you can read the full review here.

Not only do I have individual swatches for you all, but am I going to have fully illustrated tutorials on how to create five basic nail art looks that can be achieved with this kit alone.

Before we get to that, let's take a look at the kit and the colors included.


The Kit


The L.A. Girl DIY Nail Art Kit is an all-in-one product that contains four mini (4.5mL/0.15 fl.oz.) polishes, a small nail art brush, chevron nail stickers and instructions to create a total of five different nail art looks.

There are four different versions of the nail art kit available but the one I have for you today is the "Flashy" set, a collection a four neon colors. 

The names are not printed anywhere, but I have an educated guess as to their full size matches from the "Brites" Collection:

Pink - Heatwave. Could possibly be Flare Up, but Heatwave has warmer undertones.
Orange - Electrocute. Could possibly be Fierce Rays, but FR seems a bit darker.
Yellow - Glow
Blue - Flash Freeze


Pricing and Availability

The DIY Nail Art Kit is currently not available for purchase on the L.A. Girl website but it is available for just $5.00 on cherryculture.com, along with the other three sets. For what you get I think this is a great price.

I have not seen this in stores as of yet, but if you have let me know so I can pass it along!


The Colors


Flash Freeze (?) is a bright blue creme.

L.A. Girl "Flash Freeze" - lightbox


This is the only one out of the four that has a completely opaque formula. It fully covers the nail in just one coat, and is just the perfect consistency. It's a very basic color, but for how easy it is to work with it's not bad to have around.

L.A. Girl "Flash Freeze" - lightbox


Note: If you follow me on Facebook or Twitter, then you already know I had a lot of trouble taking pictures this week.

Before I show you the rest, I have to apologize for including very different swatches of the same polishes. I originally photographed all of these outside, but it was and will be overcast for the next week. The end result left me with ghostly hands and the blue couldn't even be captured, so I delayed posting until I could retake the photos with my new lightbox. 

The results are very different, but necessary for you to see the transformation from indoor to outdoor lighting conditions.


Glow (?) is neon, highlighter yellow semi-sheer creme.
L.A. Girl "Glow" - lightbox


Like most other bright yellow polishes, application of this one is troublesome. It's not quite the consistency  of a jelly, but it is definitely difficult to build up. 

The formula is sheer enough that streaks and unevenness cannot be avoided. On the first coat it will literally look as if you colored your nails with a highlighter (and let's admit it, who didn't try it at least once as a child.). To reach full opacity it takes three to four coats, but even then the nail line still peeks through. It still applies streaky up until the last layer, but top coat will smooth most everything out.

On the plus side it dries extremely fast, so the layering doesn't take too much extra effort. It's still not a color I would prefer to wear alone, but it can definitely serves its purpose in specific nail art looks.


L.A. Girl "Glow" - lightbox

In the overcast shot you can easily see the green undertones.

L.A. Girl "Glow" - overcast


Electrocute (or Fierce Rays?) is a bright neon orange semi-sheer creme.

L.A. Girl "Heat Wave" - lightbox

When I say neon, I mean it. My camera nearly exploded try to take a picture of this color. It's much brighter in real life, but this was all that even my Nikon could handle. The formula is much improved from Glow. It applies evenly, but will still require three coats for full coverage. The nail line will still be a tad visible, but just barely. 

I actually quite liked this one as is. It's funny how my opinion of orange polishes has taken a 180 degree turn. This is basic and bright, and will be making frequent appearances on my toes come summer!


L.A. Girl "Electrocute" - lightbox

I did have better look capturing the the neon effect in the overcast weather.


Heatwave (or Flare Up?) is hot hot hot, might-as-well-be-on-fire, neon pink semi-sheer creme.

L.A. Girl "Heatwave" - lightbox


My camera literally quit on this one. The shutter speed got slower and slower, and the auto focus eventually gave up. It's the truest shade to a hot Barbie pink if I've ever seen one. It looks so plastic it still amazes me.

This shade only needed two coats to achieve the same results as Glow and Electrocute. The nail line just barely shines through in direct lighting.

L.A. Girl "Heatwave" - lightbox

In the overcast shot you really can see what I mean by plastic. It's crazy.

L.A. Girl "Heatwave" - overcast

BAM! Even in the dreary weather it's still this bright. Mind blown.


Overall

I've said it before and I'll say it again. L.A. Girl is an underrated brand in my opinion. They have been doing some great things lately, as we have seen with the 3D Effect holographic polishes (one of which I reviewed here). I only wish they were more widely accessible. I know you can find them in Rite-Aid and other drugstores, but availability is really hit-or miss. The Ombre sets were actually the first I saw of the brand outside of the dollar store.

The shades in this particular kit may be pretty basic, but they sure do pack a punch for the price. If you wanted to purchase these full-size, I'd definitely recommend the pink and orange as staple neons to add to your stash. The yellow needs some improvement, but it's a pattern I've noticed with similar shades from different brands, so I'm not sure what the solution is. The blue doesn't wow me either, but if you need a backup basic blue, give it a shot!


What do you think of these shades? 
Do you love or hate the neon look on your nails?

Let me know in the comments below, and don't forget to check out the looks can be created with these mini marvels by clicking each image below!


And to see all the L.A. Girl line has to offer, visit their website at lagirlusa.com and give them some love on Facebook and Twitter.

Thanks for reading!

-Melody


*The products in this post were provided for my honest review. Any material provided does not influence my opinions in any way. Gotta keep it real!
Related Posts Plugin for WordPress, Blogger...