



homeaboutcontactdisclosure
Showing posts with label avon. Show all posts

Monday, July 1, 2013

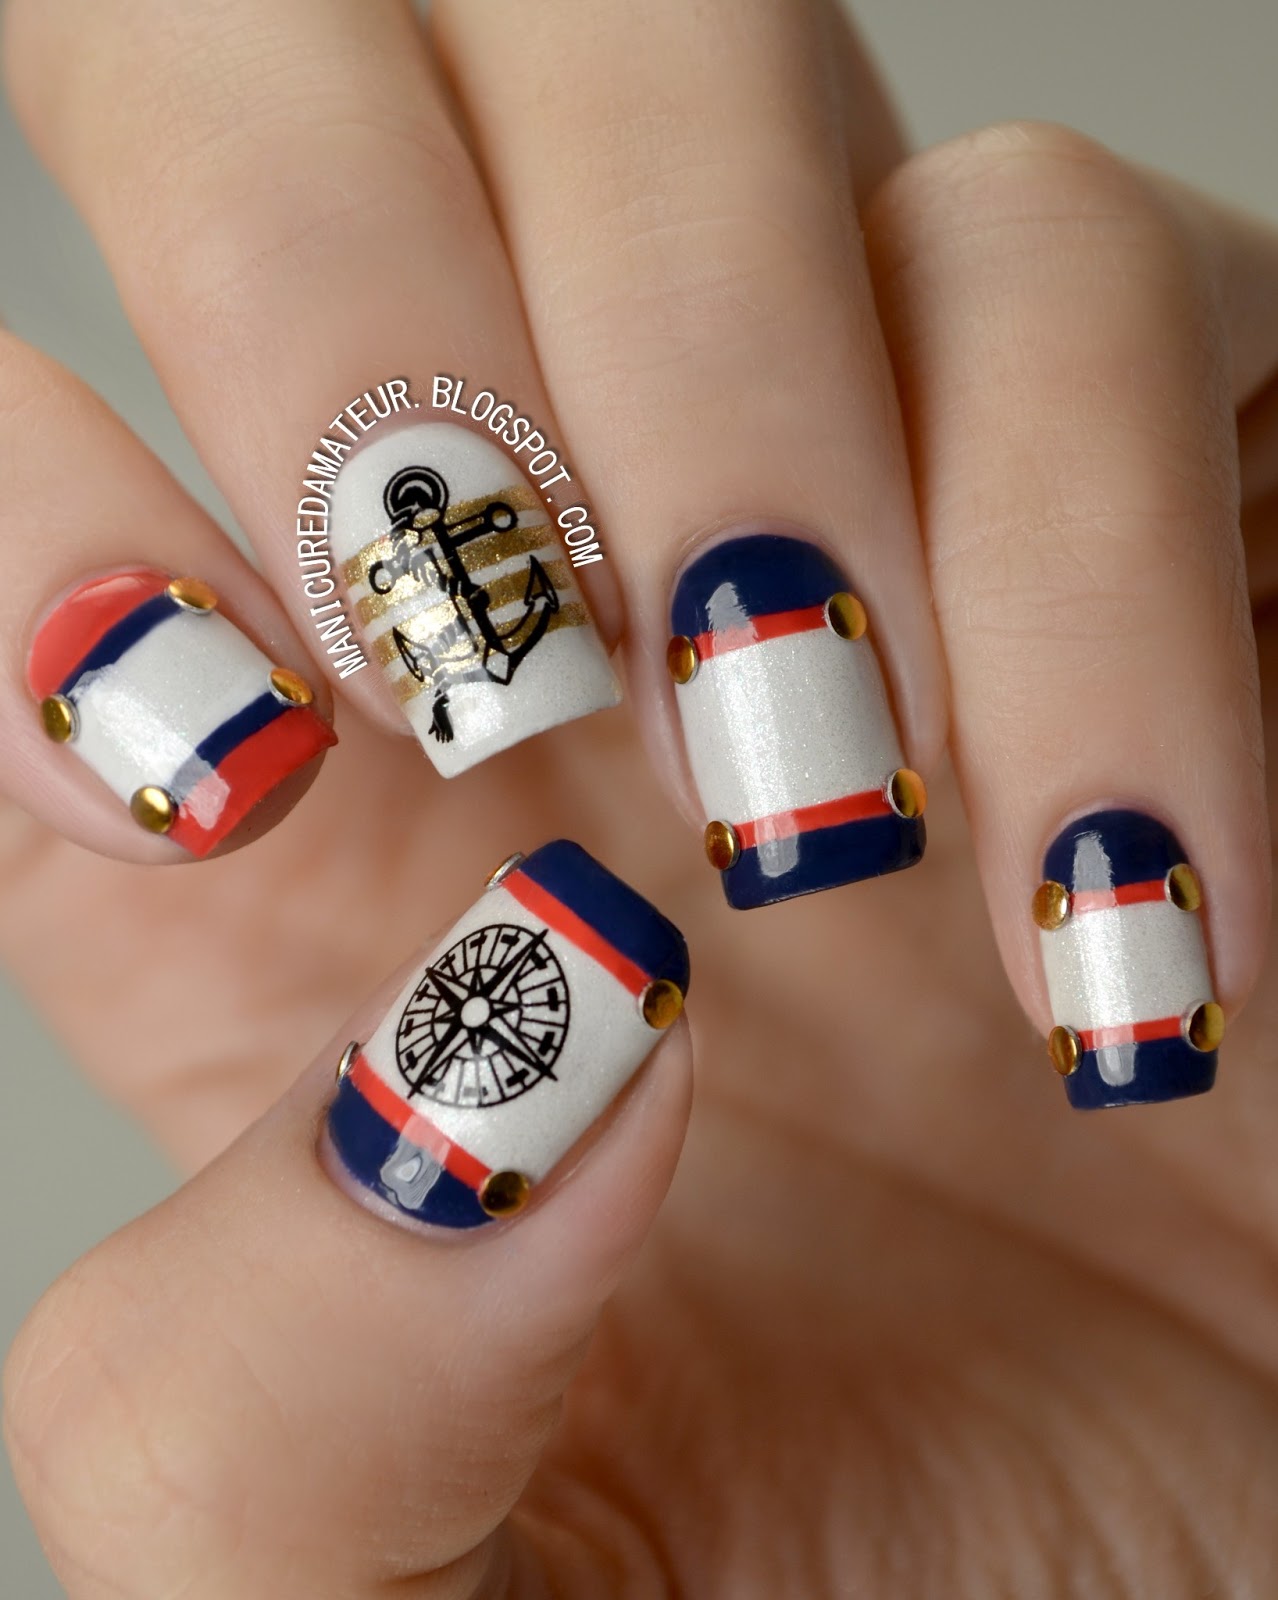
Nautical Nail Art featuring Born Pretty Store Anchor & Compass Water Decals


Happy July everyone!

I can't believe over half the year is already gone.
Whether I believe it or not, we're deep into the heat and I wanted to create a nail art look that was both summery and patriotic.

Red white and blue is a combination I save exclusively for this time of year and now that's here I'm ready to kick things off with a nautical look using Born Pretty Store Achor and Compass Water Decals.

This is actually my first attempt using stickers or decals.
Up until now I avoided using such decorations for the same reason I initially dismissed polish appliques.
In short, I thought they were "cheating."

I'll already tell you that after this look, I changed my mind.


First I needed a small arsenal of colors before working with the decals.


From left to right:

Julep "Nan"
Avon "Golden Vision"

Sinful Colors "Snow Me White"
Wet n Wild Megalast "Break the Ice"
Sinful Colors "New Wave"

Each finger started with a two coats of SC Snow Me White. 
To add a little summer glow if you will, I then added one coat of Wet n Wild Break the Ice for a subtle shimmer.

To create the stripes on all but my middle finger, I took four pieces of nail tape and taped off two baby stripes.

On my thumb, pinky and ring finger I filled in the stripes with Julep Nan and pulled off the tape while the polish was still wet.
I then took a small, flat nail art brush and filled in the bottom and top edge of the nail with Sinful Colors New Wave.
I used the same technique on my index finger, but reversed the colors.

I then turned to my Born Pretty Stud Wheel and added small round gold studs where each little stripe met the edge of my nail.

To create the stripes on my middle finger I placed five evenly spaced pieces of nail tape and painted over the gaps with Avon Golden Vision, removing the tape in the same manner as before.


Now on to the decals!

This specific set of decals comes with one sheet of 20 decals in a variety of two different anchors and three different compasses.

You can purchase these decals through Born Pretty Store's website here and are priced at $2.86.
But don't forget you get 10% off your whole purchase with my discount code BHL91!


Even though directions are included on the back, they contain unnecessary steps are actually more complicated than the actually process.

Here's how I applied the decals.

1. Cut out desired image.
2. Remove clear plastic film.
3. Drop in water for 10-20 seconds.
4. Remove image from water with tweezers.
5. Place image face down on finger (not the nail!) and gently slide the decal off the backing.
6. Pick decal off finger with tweezers and place on the nail.
7. Let dry.
8. Apply top coat.

Notice I didn't use a paper towel or blow dryer or any other means of drying the decal prior to placement.
Skipping this step gives you a few seconds to shift the image around the nail if needed.

The process is so quick and I am incredibly pleased with how flush the image is with the base.
You don't see any clear outlines and the image really sits and looks like it's just apart of the polish underneath.

The images themselves are not pixelated, nicely detailed, and remove just like any polish.


There you have it!

The most time-consuming part of the design was obviously the taping, but it's a simple look that's suitable for all skill levels.

I'm in full support of these decals for those who aren't ambidextrous but desire detailed designs on both hands.

There are so many decals out there, and now I'm itching to try them all!


 What do you think of this summer sails design?
Have you tried any nail art decals?

Let me know in the comments below and give this look some love on Facebook, Instagram, Tumblr and Pinterest.
Remember that Google Reader retires TODAY, so keep up with The Manicured Amateur on Bloglovin' and Feedly for all updates!


Also, if you'd like a more visual tutorial on applying water decals, give me a shout on Facebook or Twitter! 

Thanks for reading!

-Melody


**Born Pretty Store products provided for my unbaised review. This post contains affiliate links.

Saturday, June 22, 2013

Simple Summer Skittle Manicure featuring KKCenterHK 3D Bow Accents


Hi everyone!

So as most of you know, I've had quite the busy past few weeks. 
Things have been hectic as I've been suffering through dog fights, broken cars, landlord trouble, a tree falling on the house and now...moving out.

Complicated times call for simple manicures.
I need a look that's quick and can survive a day of packing, but can be dressed up for an evening with friends.

Sort of like a simple white tee...but for nails.


This is where a skittle mani with 3D decorations come in.
It's a simple solution that looks like you put in much more effort than you actually did.

All you need is a few colors, some cute accents, and you're good to go!


From left to right:


Wet 'N Wild Wild Shine "Hallucination"
Orly "Gumdrop"
Avon Mega Watt "Pop"
Sinful Colors "Snow Me White"
Avon "Inspire"

(Not Pictured) Out The Door top coat


For this particular skittle I wanted to choose colors that would later match the 3D bows.


Each finger began with a base layer of Sinful Colors "Snow Me White".

The pinky finger received two coats of Avon "Inspire".


The ring finger and thumb (not pictured) were left white but I chose to add a single coat of WNW Wild Shine "Hallucination," a subtle glitter top coat with an iridescent shimmer that matches the color palette perfectly.


The middle finger received two coats Avon Mega Watt "Pop," but a bit of shrinking still revealed the white base along the tip of the nail.

The index finger was layered with one coat of Orly "Gumdrop." 
The white base isn't really necessary for this particular shade, but it just saved me some time.


With a generous coat of Out The Door, I left the colors alone while I packed up a few things and moved some furniture.

When a couple of friends asked my boyfriend and I to join them for dinner, I decided I wanted to give the skittle an extra something.

I had little time on my hands, and automatically turned to my multicolored pearl wheel from Born Pretty Store.
Choosing a corresponding pearl for each finger, I dotted a bit of top coat onto the nails and placed the pearls accordingly with a small dotting tool.


What really brought the whole look together was these adorable bows from KKCenterHk.

The bows come in a pack of two and retail for $4.
Each bow is measured at about 10mm x 6mm x 2mm and can be applied with top coat, or nail glue if you want a longer hold. They are also resuable, so you are reassured that you are getting your money's worth.


At first I thought the price was a bit steep, but then when I noticed the patterns and details with each option I   felt the price was well justified.

There are 48 color and patterns available for this shape and style alone, which can been seen here.
It was hard to choose just one, but I ending up going for this cute Cyan Floral Print bow.


Even though my nails beds are tiny, I was pleasantly surprised by the overall look on the nail. It doesn't appear incredibly large, although it does stick out.

Knowing I wouldn't be wearing them for too long, I chose to apply the bows in the same manner as the pearls, and even then they stayed put up until I chose to take them off.

If you are not used to have a large decoration on your nail, it may feel funny at first. 

I was very aware of the presence of these little guys, and was may be a bit too careful about bumping or snagging them at first.
I got used to them pretty quickly and only noticed them when I ran my fingers through my hair.
I often snagged a few strands up under the bows, but they didn't budge.


It's not the most original or astounding look I've ever created, but it's a fantastic demonstration of how small details can make a big difference.
Small decorations like these 3D bows can turn an ordinary manicure to an extraordinary one.
I received multiple compliments and couldn't help giggle at how little time and effort I really put in it.

Dare I say that it's amazing nail art for the lazy nail artist?


What do you think of this cute bow featured skittle look?
What's you favorite quick nail art fix?


Let me know in the comments below and give this look some love on Facebook, Instagram, Tumblr and Pinterest.

And don't forget! Google Reader is saying goodbye is just over a week, so make sure following me on Twitter and Bloglovin' for all updates.

Thanks for reading!

-Melody


**KKCenterHk products sent for my honest review. This post contains affiliate links. For more details, please see my disclosure policy.

Tuesday, June 18, 2013

Avon Cosmic Collection Swatches and Review (Part Two)


Hi everyone!

I want to continue on with the second half of the Avon Cosmic Collection.

If you didn't warm up with the hot shades from the other half, just click the images below to see the rest of the colors along with information on pricing and availability.


Let's move on and cool things down with the icier shades from the collection, shall we?


From left to right:

Moonbeam
Celestial
Galaxy
Aurora
Eclipse


The Colors


 Moonbeam is a silver scattered holo.


Silver holos never disappoint, and under the sun this one is the exception to the "bolder the shade, bolder the holo" pattern this collection possesses.

You can almost see a faint, faint, super faint linear prism at the angle shown in the first photo.


All that holo goodness disappears indoors, but the shimmery silver that's left might just be one of my new go to silvers. 
The formula is just too good to let sit on the shelf.


Celestial is either an icy mint shimmer or a light, teal green with holographic shimmer.


When you look at it outdoors, it's more of the latter. 
The color is much bolder and the scattered holo really shines.


Indoors the color seems to lighten up, taking on a more pastel, minty hue with any icy shimmer.


Galaxy is a bold cerulean blue, with what's supposed to be holographic sparkle.


I was surprised at the hidden the holo is in this particular shade. 
Indoors or out, it just isn't really there unless your hands are positioned in the right way in the right light.


It's such a pretty color either way, does it even really matter?


Aurora is a scattered holo that shifts from violet to purple.


This is the only one that the camera disagreed with just a tad.
The holo is a tad stronger than what is pictured. 
Unfortunately, after rephotographing this shade TWICE the camera came up with the same results.

(Anyone else having Barney flashbacks when looking at this shade?)


This shade is another shape-shifter once you get inside.

While in the sun it's more of a violet, indoors it takes a step to the cooler side of the color wheel and becomes more purple. It also loses the holo, following suit with the others.


...and finally we have Eclipse, a teal going on black with obvious holographic sparkle.


I don't have to justify the holo here, do I?
This shade sparkles better then the twinkly Twilight vampires ever will.

(I apologize for offending at least 75% of you all with that one.)


I know what you're thinking though: "Are you sure that isn't just black?" I'm sure.
It'll look black on the nail while inside, sure. Before you even get to that point you'll notice the teal tinge to the color the second you open the bottle.

Personally I love it so much more this way.
It's so gorgeous and mysterious.


Overall


I applaud Avon for going out on a limb and trying a finish that's a bit ambitious for  a brand that doesn't technically specialize in nail polish.

The holographic is nothing compared to just about any other brand's version, but in fairness this collection was advertised as having a "holographic pearl" finish. To me, this implies that it's intentionally more subtle. If that's the case, then they succeeded.

Holographic or not, these shades are stunning -- every one of them.
They are all eye catching and catch the light both indoors and out.

As far as being cosmic? Well...the formula is certainly out of this world.


What are you favorites from all of these holo hues?
Will you be adding these to your list of shimmery lemmings?

Let me know in the comments below and make sure to give these shades some love on Facebook, Instagram, Tumblr and Pinterest.

Big changes are happening soon here at The Manicured Amateur.
If you're not already, now there's time to be following on Twitter and Bloglovin' for all of the updates.

Thanks for reading!

-Melody


**Products in the post were paid for by me with my own money.
I am not an Avon representative but am proud to encourage readers to order through Julie Pruitt, a long time family friend.

Avon Cosmic Collection Swatches and Review (Part One)


Hi everyone!

Today I finally have the Avon Cosmic Collection to share with you.
I caught word that these polishes were coming, and checked the site everyday until I could finally scoop up the whole set.

These polishes required special attention, and the only way to accurately demonstrate each shade is to photograph each one both outdoors and in, so both parts of this review are VERY pic heavy.

Apart from balancing blogging with preparing for my move, preparing this collection took much longer than expected with the ongoing storms interfering with my photographs.
In short, tornadoes + no power = hiding in the basement in the dark with no internet. 
Bummer Summer 2013.

So let's see the beauties before the clouds come back!


The Collection


The Avon Cosmic Collection consists of ten shimmery shades that reveal an ambiance of holographic sparkle.

The polishes are available individually for $6.00 each.

You can purchase through your local Avon representative who can be located via the "Find A Rep" page on Avon's website.
If you want to save some time, you can enter "Julie Pruitt, Tennessee" on that page to shop online through my dear family friend (my mother's "BFF," haha).


The first part of this review displays the warmer half of the collection in the five following colors:


From left to right:

Radiant
Starlight
Saturn
Supernova
Starburst


The Colors

Every shade in the collection has an incredible formula. the consistency is just perfect.
While every shade could be left at one coat, if you were to look close enough you'd still see the nail poking through. I recommend two coats for best coverage.
Even though these are scattered and not linear "holos," I still chose to go without a topcoat. 
It is known to polishers that top coat can reduce the linear holographic effect, but the actual holo shimmer in these is so subtle that I chose not to risk it.
Despite the extra protection, they seemed too wear well without chipping.
(I say that, but keep in mind I wear no color for more than 24 hours unless it's on my toes.)


The only thing that separated these shades in terms of formula was the amount of holo goodness.
In short: the lighter the shade, the weaker the holo.

And the effect can really only be noticed in direct sunlight with the exception of a couple of shades. In most lighting situations it comes off as just a silvery microshimmer.

Let's take a closer look, shall we?

Remember, the first two photos of each shade will be direct sunlight and the other two will be indoors under daylight bulbs.


Radiant is a light gold with holographic shimmer.


See how subtle? It's definitely a soft and scattered holo, but it's a true gold with shimmer perfect for the holiday season.


Indoors the holo disappears, but an angelic shimmer remains.


Starlight is an odd mustard-like, greenish yellow with holographic shimmer.


I could barely find the holo even under the sun. 
You can catch a glimpse of it in the second photo, but the bright color really steals the show.


Once seen indoors, I realized how much holo the shade really had to begin with.
Suddenly the different tones disappear and I was left with an interesting yellow that for some reason made me crave thanksgiving dinner.


Saturn is a semi-burnt orange, leaning on a red-orange with the same holo shimmer.


I think I've found my favorite orange polish EVER. This is fall in a bottle. The holo in this one gives off every tone you'd fine in falling leaves, leaving me with only about a million nail art ideas come fall.


Even indoors, the holo tries to stick around. Obviously not as bright, but just as beautiful. 

The color itself takes on a more reddish hue, and I love it either way.


Supernova is a rosy-red with holographic shimmer.


Notice the bolder the shade, the bolder the holo pattern? 

Under the sun this shade makes me think of Julie G Gumdrop Collection (which I reviewed here some time ago). 
If you could take Hot Cinnamon and Sugar Rush, nix the texture and mix them together, you'd get this exact shade.


Indoors this color transformed more than any other them.
It became a lighter, more pinky red while the holo goes into hiding.


Starburst is a deep fuschia with a stronger holo shimmer.


 The holo is strong with this one, compared to the others at the very least.
Outdoors you won't miss it.


Indoors the shade leans a bit more on the purple side, but is rich and beautiful.


 Which one of the cosmic colors shines for you?
What do you think of the scattered holo?

Let me know in the comments below, and keep your eyes peeled becoming the second half of the collection is coming right up!

Thanks for reading!

-Melody


Related Posts Plugin for WordPress, Blogger...