


homeaboutcontactdisclosure
Showing posts with label julep. Show all posts

Sunday, July 7, 2013

Maven Madness: Julep It Girl Box + Blakely and Fireworks Add-Ons July 2013


Hi everyone!

I hope all of my fellow American lovelies had an exciting July 4th holiday.

I'm boxes deep into my move, but things have been slow trying to move things in between rainstorms.
Everything polish related is still packed and ready to be moved over, so hang in there with me and I'll be up and running again within the next day or two.

Luckily I was able to photograph my Julep box before packing everything away, and I finally had some time to sit down and share it with you!


The Box

This month's selection was inspired by the California Coast. 
I live in Georgia on the completely other side of the country, so I have no idea how these shades specifically correlate with California beaches, haha.

With no interest in the featured hair products this month, I went with the It-Girl option which includes three polishes instead of two plus the beauty item.


Julep Maven boxes are delivered right to your door every month for $19.99 and usually include two polishes, a beauty item, and one or two random extra gifts.

For a more details on all aspects of the Julep Maven program, read my in-depth review here.


The Colors


Nadia is a pale, banana yellow frost with the ever slightest orange undertones, and silver microshimmer.


I wanted to like it, I really did...but I just couldn't.

The formula is on the thicker side, which is becoming more and more consistent with Julep polishes.
This can cause a problem with application due to the frosty finish. If applied too thick the stroke lines will be wonky and crooked. While it can be opaque in one coat, I recommend two thinner layers for best coverage.

If I could ignore the formula, I would love this color. 
It's an interesting pearly yellow, but at the end of the day the overall finish looks dated and formula isn't top Julep quality.


Angela is a black-based, shimmery teal with a slightly frosty finish and subtle color shift.


Once again, the formula is thick, so careful not to apply too thick. 
However, this one can provide nice, full coverage in just one coat.

The finish can be slightly frosty, but not quite enough to bother me. 
It's also a duo-chrome wannabe, shifting from deep blue to teal.

As much as I think this color is stunning, I think I have a dupe that'll cost you less than a dollar.
Remember my Polish4Pennies post back in May? If not, click over here and scroll down to Sinful Colors "See You Soon." Close enough?

In short, it's higher priced slightly frostier version of SYS or Essie's "Dive Bar."
Angela may have a smidgen more of turquoise tint, but not enough for most polishers to care.


Tracy is a shimmery denim blue textured polish - the newest addition to Julep's Sea Salt line.


This was the whole reason I chose the It Girl box.

I love the other three Sea Salts, mainly for the sophisticated neutral colors.
I was very excited to see Julep add a bolder color to the line, and at first I thought the color was totally unique to my entire textured collection. 

In truth, it's actually pretty close to JulieG's "Blueberry Fizz" from the Frosted Gumdrop Collection. 
There are two minor differences between the two. 
Both the glitter and texture are much finer in the Julep version, as opposed to the JulieG shade which contains slightly larger glitter pieces. Julep's version is also deeper while the JulieG shade is a lighter and icier.

I am also aware that there is a Nicole by OPI shade "Blue-berry Sweet on You" that might be even  more similar, but I don't own the shade to compare.

Which you choose is a matter or price or preference, but I love this one. 
The only complaint I have is that the texture took FOREVER to develop, which is a problem I didn't experience with any other of the Sea Salts...or any of my other brand's textures either. 

It also applies thinner than any other texture I own, so I recommend two god coats for full coverage.


The Extra

Included in every box this month was a new item, Green Tea Facial Blotting Papers.


This is another one of the items I prefer to save for when I actually need it, so unfortunately I don't have an personal comments on how well these work.

Other bloggers seemed to be more excited for these than the actual polishes this month.
Overall feedback notes that the green tea smell is extremely pleasant and that they are truly effective at removing oil during touch touch-ups throughout the day.


The Add-Ons

There weren't many other colors in the whole selection this month that caught my eyes, but the announcement of a true duochrome in the Bombshell box was something I just couldn't ignore.


Blakely is an oil slick reminiscent, purple-to-jade duochrome with a hint of frosty shimmer.


The formula is identical to Angela, except the frostiness is a bit more prominent.
In short, I wish it wasn't.

I was really excited for this shade, but once again the formula and finish brings the excitement down a few notches.

I can't deny how gorgeous the color shift is, and if nothing else it'll make an intense stamping color!


In addition to Blakely I picked up this year's 4th of July inspired glitter topper.


Fireworks is a patriotic mix of red, white, and blue fine and small hexes.

Now I deserve a slap on the wrist for forgetting to individually swatch this shade before packing up my stash for the move, but you did get a good glimpse of it in my Independence Day Nail Art look.
(Click on the photo below to see more of this design!)


It's not as full coverage as most of Julep's glitter selection, and I like it this way. 
It's much more buildable and is absolutely beautiful on it's own, built up as a full accent in three coats, or gradated as I did above.


What was your favorite shade from this month's box?

Let me know in the comments below or give me a shout on Facebook or Twitter.


Overall

In the end, I think Mavens appreciated the variety of finishes Julep had to offer this month.
Personally it wasn't my favorite box with my well-known bias against frosty polishes.
I do love the summer-inspired shades but the fact that I already had them  in better-priced, better formulated versions left something to be desired.

Lately, Julep's formula is become less and less consistent.
Sometimes the formula is a dream, and something the quality reminds me of polishes that have been sitting in a hot mailbox for quite some time.

I'm also catching word of other bloggers and Mavens alike become increasingly disappointed with Julep's customer service and overall value of the products. 
Cynthia from Of Life and Lacquer provided some important insight as a blogger affiliate in a comment left on my detailed review page which I really appreciated. 
Check her out by the way, she's always been one I've looked up to.

I don't share the same horror stories as her and others (except for DD creme debacle), so it's only fair that I not provide any insight into the matter.
It is something I'm keeping my eye on, but I'm not giving up on Julep just yet.

-- 

Interested in becoming a Julep Maven?

The selection window for this month opens in two weeks, so join now with my referral link below and get your first box free!
 I think you have to pay shipping now, but it's still worth it!

http://www.julep.com/rewardsref/index/refer/id/45305/

If the link has not already filled it in for you, enter my referral ID# 3488485 and then enter promo code "FREEBOX" at checkout. It's that easy!

Thanks for reading!

-Melody

Thursday, July 4, 2013

Happy Independence Day! 4th of July Nail Art


Happy Independence everyone!

The weather is icky and I'm busy packing.
Even though I can't join in on barbecues, bonfires and fireworks I thought I'd still get in on the nail art festivities!

I got up early to work on my 4th of July nails, and let me tell you it took me over 6 hours!
I changed my look about four times before settling on something simple.


My thumb is is a two layer base of Sinful Colors "Snow Me White" with a simple glitter gradient of Julep "Fireworks."

My index finger is one layer of China Glaze "Adventure Red-y" with a large silver star from my Born Pretty Store Stud Wheel.

My pinky finger in two layers of La Girl 3D Holo "Brilliant Blue" with another large stoar from BPS.


Now the glitter placement on my middle finger took incredibly long.

Before I began, I painted two coats of LA Girl 3D Holo "Brilliant Blue".
Not having any glequins around, I reached for My Pink Dreams "Casa Blanca" and individually fished and placed each hex glitter until I reached exactly 50 to imitate the stars on the American Flag.
I sware, it had to have taken over an hour as I kept losing count. Haha!

My ringer didn't take as long.
I began with a two layer base of Sinful Colors "Snow Me White" and then placed 6 evenly spaced pieces of nail tape over the nail.
I then painted over the gaps with LA Girl 3D Holo "Sparkle Ruby" and removed the tape to reveal 13 stripes in total matching the stripes on the American Flag once again.


Overall it's a simple, wearable option for any patriotic outfit.
I had more intricate, over the top designs half finished...but sometimes less is more.

What do you think of the 4th of July look?
Did your nails show your patriotic spirit today?


Let me know in the comments below and send me your 4th of July nails on Facebook or Twitter!
And don't forget to give this look some love on Facebook, Instagram, Tumblr and Pinterest!

---

I apologize for being short of words this week.
I officially begin moving into my new place tomorrow.
I tried so hard to post regularly, but I know I've been bad and disappeared for one, to up to four days at a time.

After this weekend, things will be back to normal. 
I promise!

Meanwhile, I've reached over 500 followers on Instagram,
almost 1000 on Tumblr,
and approaching 500 on Facebook!

I cannot thank you all enough for your support.
Once I'm officially moved and settled, I'll be scooping up prizes for a huge giveaway to thank you.

You all are truly lovely and amazing.

Thanks for reading, be safe, and have fun tonight!

-Melody

Monday, July 1, 2013

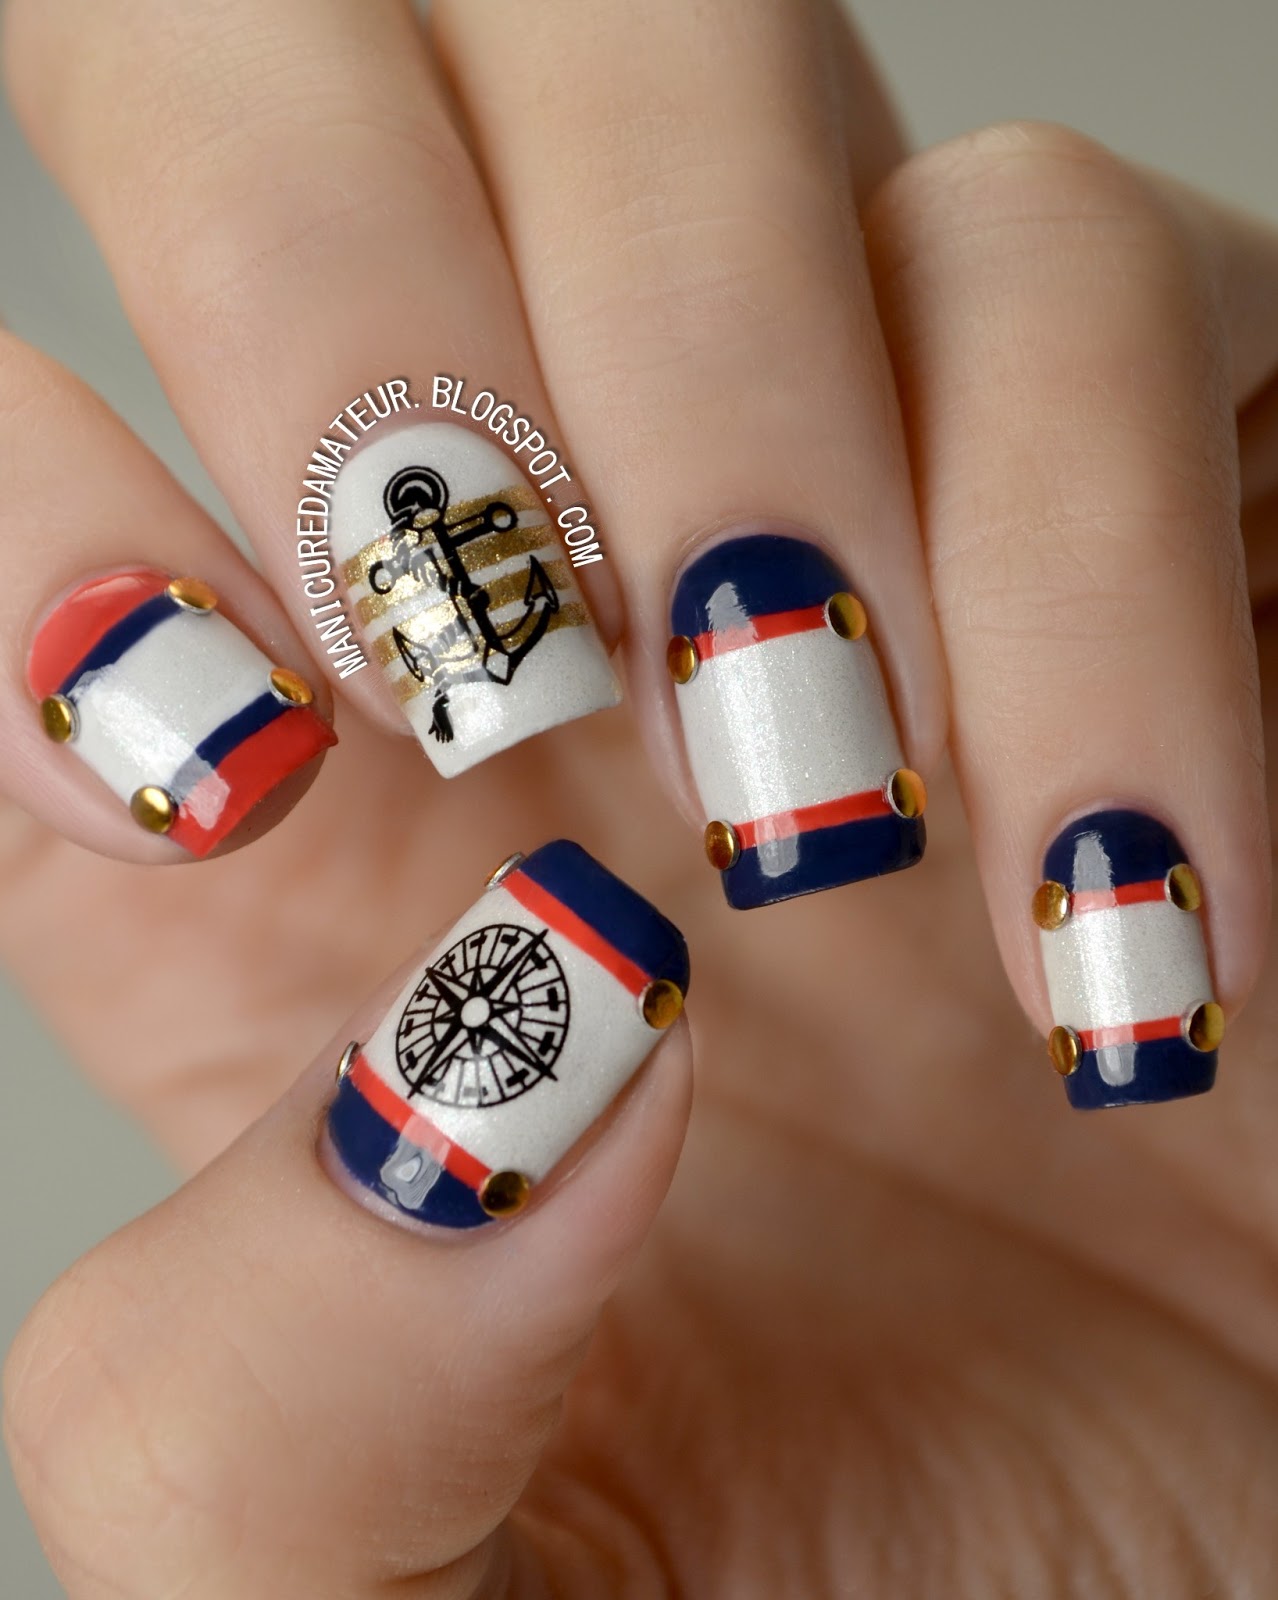
Nautical Nail Art featuring Born Pretty Store Anchor & Compass Water Decals


Happy July everyone!

I can't believe over half the year is already gone.
Whether I believe it or not, we're deep into the heat and I wanted to create a nail art look that was both summery and patriotic.

Red white and blue is a combination I save exclusively for this time of year and now that's here I'm ready to kick things off with a nautical look using Born Pretty Store Achor and Compass Water Decals.

This is actually my first attempt using stickers or decals.
Up until now I avoided using such decorations for the same reason I initially dismissed polish appliques.
In short, I thought they were "cheating."

I'll already tell you that after this look, I changed my mind.


First I needed a small arsenal of colors before working with the decals.


From left to right:

Julep "Nan"
Avon "Golden Vision"

Sinful Colors "Snow Me White"
Wet n Wild Megalast "Break the Ice"
Sinful Colors "New Wave"

Each finger started with a two coats of SC Snow Me White. 
To add a little summer glow if you will, I then added one coat of Wet n Wild Break the Ice for a subtle shimmer.

To create the stripes on all but my middle finger, I took four pieces of nail tape and taped off two baby stripes.

On my thumb, pinky and ring finger I filled in the stripes with Julep Nan and pulled off the tape while the polish was still wet.
I then took a small, flat nail art brush and filled in the bottom and top edge of the nail with Sinful Colors New Wave.
I used the same technique on my index finger, but reversed the colors.

I then turned to my Born Pretty Stud Wheel and added small round gold studs where each little stripe met the edge of my nail.

To create the stripes on my middle finger I placed five evenly spaced pieces of nail tape and painted over the gaps with Avon Golden Vision, removing the tape in the same manner as before.


Now on to the decals!

This specific set of decals comes with one sheet of 20 decals in a variety of two different anchors and three different compasses.

You can purchase these decals through Born Pretty Store's website here and are priced at $2.86.
But don't forget you get 10% off your whole purchase with my discount code BHL91!


Even though directions are included on the back, they contain unnecessary steps are actually more complicated than the actually process.

Here's how I applied the decals.

1. Cut out desired image.
2. Remove clear plastic film.
3. Drop in water for 10-20 seconds.
4. Remove image from water with tweezers.
5. Place image face down on finger (not the nail!) and gently slide the decal off the backing.
6. Pick decal off finger with tweezers and place on the nail.
7. Let dry.
8. Apply top coat.

Notice I didn't use a paper towel or blow dryer or any other means of drying the decal prior to placement.
Skipping this step gives you a few seconds to shift the image around the nail if needed.

The process is so quick and I am incredibly pleased with how flush the image is with the base.
You don't see any clear outlines and the image really sits and looks like it's just apart of the polish underneath.

The images themselves are not pixelated, nicely detailed, and remove just like any polish.


There you have it!

The most time-consuming part of the design was obviously the taping, but it's a simple look that's suitable for all skill levels.

I'm in full support of these decals for those who aren't ambidextrous but desire detailed designs on both hands.

There are so many decals out there, and now I'm itching to try them all!


 What do you think of this summer sails design?
Have you tried any nail art decals?

Let me know in the comments below and give this look some love on Facebook, Instagram, Tumblr and Pinterest.
Remember that Google Reader retires TODAY, so keep up with The Manicured Amateur on Bloglovin' and Feedly for all updates!


Also, if you'd like a more visual tutorial on applying water decals, give me a shout on Facebook or Twitter! 

Thanks for reading!

-Melody


**Born Pretty Store products provided for my unbaised review. This post contains affiliate links.

Sunday, June 9, 2013

Maven Madness Boho Glam Box + Nan Add-On June 2013


Hi Everyone!

A new month means a new Julep Maven box, and this month is all about preppy-chic summer style.
This time around I went with the Boho Glam option with an It-Girl add-on.


The Box


Julep Maven boxes are delivered right to your door every month for $19.99 and usually include two polishes, a beauty item, and one or two random extra gifts.

For a more details on all aspects of the Julep Maven program, read my in-depth review here.


The Colors

The Boho Glam box included two shades in "Dianna" and "Lexi."


Dianna is a light, seafoam green creme.


Childhood on my nails.
When I was younger, my mother had my walls painted this exact color with all white wicker furniture.
Oh the 90's southern cottage style.

Not only am I partial to this shade from a nostalgic perspective, but it's just gorgeous.

It's rich  and creamy and the formula is great.
It's thicker than the other two, but just thick enough to apply smooth and opaque in just one coat.

This is a true seafoam green without being muted or leaning towards a more minty hue. Love it!


Lexi is a bright yellow creme.


I think we have a winner for best true yellow ever, at least in my collection thus far.

Let me make my broken record statement in saying that all bright yellows have a streaky formula to some extent.
However, this one had the least amount of streaks, and what streaks it had evened themselves out during the drying process. 
Just to make sure  it was completely even, I used two coats.

It's super bright without being super  pastel or super green.
This is seriously the yellow you need.


The Beauty Item

This month Julep debuted their first face makeup product, the DD Creme.


The DD Creme is available for the retail price of $28.80 and is available in four tones:

Light
Medium
Medium-Dark
Dark

Being the Casper face that I am, I received mine in "light."


The product is advertised to be "dynamic do-all" solution to help prime, perfect and protect the face with a lightweight formula with buildable coverage.


Ugh.
There's been a huge amount of drama revolving around this product since it's release.
Julep has been flooded with criticism by the majority of Mavens.

Not in the know? Let me sum up:

1. There is little to no product in the package.
2. The "light" version is way too dark and way too orange.

Some Mavens even resorted to cutting open the tube at the top to prove how empty the package was.
I didn't go that far, but the shot below hopefully conveys how much the bottle had to be squeezed to release the product upon my second "use."


Yup, it's almost gone.


But is it as dark and orange as other Mavens claim?
Let take a look.
Below shows the product swatched on the under side of my arm, the area that most closely resembles the lightness of my face.
(Pasty skin for the win...not)


Looking at that photo alone will turn people away.

So what happened when I blended it?


 I mean, the amount of orange is tame compared to any cast member of the Jersey Shore,
but it's definitely too dark and too wrong.

The color is actually not my main concern. 
Even mismatched face products can be minimized with the right powder, highlighter, etc.

My dismay for the product lies is how awfully oily it was.
So much so, that I could not bare to have it on my face long enough to take a  full face picture for you all.

In all fairness I have combination skin but GURLPLZ, this was ridiculous.
Had I left it on any longer I would have surely broken out, and that is far from "perfect" as the product was advertised.

The debate continues on, as customers with darker skin tones seemed to have been more satisfied than us lighter skinned ladies who apparently are SOL (excuse my rude abbreviation).

In the end, the mass of Mavens are displeased with the miscommunication and possibly misleading advertising about this creme. Although Julep clearly marked the tube to contain 1oz of product, for the price point it either needed more product  or a second thought on the package design.

I am not in a completely state of disappointment because I never fell victim to the hype of CC, BB, or any other alphabet creme.

Apply sunscreen, apply foundation lightly, and save your money. It's the same thing.


The Extra

To fit in with the beachy theme, this month's little extra was a few bits of Salt Water Taffy.
(All consumables included in Maven boxes are accompanied with an ingredient list and allergen warning.)


 They look sweet, but I'm not a taffy person myself.
My roommate on the other hand is a sucker for salted candy anything, so I was happy to pass them along.

His review? "The strawberry is where it's at." Haha, men.


The Add-On

Interesting enough, this was the color I was most excited about.
The rest of It Girl option wasn't calling my name, but I just couldn't pass up the chance to add-on "Nan."


Nan is described as a "Nantucket red."
Basically, it's a shade of red that looks faded, almost to a dusty rose.


If you're rocking shorties, you could probably get away with one coat, but in most cases the nail line will peek through. 
I recommend two layers as shown in the photo.

I am simply smitten over this color and is possibly one of my favorites Julep has released this year!


Overall

When it comes down to it, the colors popped and the DD creme flopped.

I applaud Julep for trying something new, and in their favor their hand cremes and other beauty items are fabulous. Unfortunately the DD Creme just couldn't live up to the hype.

Matters aside, I'm in it for the polish as most of us Mavens are.
The colors I received were great quality and complimented the theme well.
The yellow is astounding, the seafoam is dreamy and the red is unique.

If you're still on the fence about joining the Julep Maven program, don't let the DD debacle deter you from becoming a member. 
I've been a Maven for over a year and it's been worth ever penny.


What was your favorite shade from this month's box?
What  are you thoughts on the coveted cremes of the alphabet?

Let me know in the comments below or give me a shout on Facebook or Twitter.


If you're not currently a Maven, now is the time!
The selection window for this month opens in 11 days, so join now with my referral link below and get your first box free!
 I think you have to pay shipping now, but it's still worth it!

http://www.julep.com/rewardsref/index/refer/id/45305/

If the link has not already filled it in for you, enter my referral ID# 3488485 and then enter promo code "FREEBOX" at checkout. It's that easy!

---

Speaking of free, I'm having a GIVEAWAY!
Once I get to 500 likes on Facebook, I'll be giving out prizes to a couple of lucky readers.
More details to come closer to when the goal is reached.

You don't want to miss out, so if you're not already, follow me on Facebook, Twitter, Instagram, and Bloglovin' for all the happenings here at The Manicured Amateur.

Thanks for reading!

-Melody

Saturday, May 18, 2013

Free-Hand Dog and Paw Print Nail Art


Hi everyone!

Sorry I'm late!

I thought I could keep posting at my normal rate while I tend to Odie, but after staying up with him all night I've confused my body into changing my sleep schedule to daylight hours. 
Some extra melatonin should get me back on track, but I still slept through a day or two without a post!

With my world revolving around the repercussions of the dog fight, I found it only fitting to create a look inspired by my furbaby. 

So today I have a free-handed nail art design to share with you full of glitter, paw prints, and a puppy portrait. 

I shortened my nails for extra precaution while caring for Odie's injuries, but don't worry. My extensive vitamin routine causes my nails to grow very fast.


My thumb (not pictured), index and pinky are sporting Hard Candy "Cocoa Smore" from the Candy Sprinkles collection. Swatches of the entire collection can be viewed here. I then chose to matify them using the Julep Matte Top Coat.

The paw print pattern on my middle finger was created with OPI's "Nein! Nein! OK Fine!" I began with a single coat for the base and followed with Julep's Matte Top Coat once again. I then took a medium sized dotting tool to create the paw prints. 


My ring finger was free-handed utilizing a couple of small nail art brushes and a dotting tool for his eyes and nose. 

I began with two coats of Sally Hansen Complete Salon Manicure in  "Bocha Mocha." 

Taking a small nail art brush, I began working in the different tones of Odie's fur using OPI "Don't Pretzal My Buttons" (a light nude) for highlights and Julep "Olivia" (a dark brown) for shading. 

The area around the nose and eyes were created using OPI "Nein! Nein! OK Fine!" Any highlighted areas were used by mixing in a bit Julep Eileen (a stark white), which was also used for the eyes.

The darkest parts of the nose and the pupils of his eyes were dotted in with Sally Hansen Hard As Nails in "Black Heart." 
I'll admit, I exaggerated the eyes a bit. He's usually squinting, but it wouldn't translate properly on the nail.

I finished the design with a generous coat of Out The Door Top Coat.


I want to thank everyone again for the well wishes for Odie. 

After a long, exhausting week of worry and tending to his wounds I finally can rest assured that he is going to make a full recovery. 

The major puncture wound in his leg has finally drained (gross, I know) and is beginning to close, meaning the antibiotics have flushed out the infection before it spread. The swelling has almost completely diminished and Odie is able to walk again! He also ate some food for the first time today. :)

He's back to his happy, sappy self...well, minus the shame he feels wearing his ecollar.
...and from the cats trying to steal his food!


Now that things are getting back to normal, I have lots of things planned for upcoming posts here at the Manicured Amateur. 

My no-buy has been lifted and I'm going to have lots of new goodies on the way to share with you, plus requested tutorials and a look into my nail care routine!


So keep up with me on Facebook, Twitter, and Bloglovin' 
and give this look some love on Instagram, Tumblr, and Pinterest!

Thanks for reading!

-Melody

Saturday, May 11, 2013

Maven Madness: Julep Boho Glam Box + Gabrielle Add-On May 2013


Hi everyone!

It's that time of the month again, and no, it has nothing to do with your Aunt Flo coming to visit. :P
It time for me to share with you this month's Julep Maven box!

This month's 20s inspired collection was too tempting to not upgrade, but alas my bank account just wouldn't allow it. 

In the end I chose the Boho Glam option.


The Box


Julep Maven boxes are delivered right to your door every month for $19.99 and usually include two polishes, a beauty item, and one or two random extra gifts.

For a more details on all aspects of the Julep Maven program, read my in-depth review here.


The Colors


Alice is a very pale, lavender pearly-frost with golden shimmer.

Julep "Alice"


It really skirts the line between a pearl and a frost finish, but either way it's glamorous. In some lighting situations the shimmer will come across silver instead of gold, but I promise it's the latter of the two! There's also the slightest hint of magenta microglitter, but I really only caught a glimpse of it the bottle under a lamp. It never showed up on the nail or even in my bottle shots.

 The formula and application was flawless and opaque in one coat.


Millie is a deep indigo creme.


Once again, application just could not be any better. One glossy coat and you're good to go.

 It's such a sophisticated and mysterious color, much like the starlets of the time.


The Extras

To fit with the 20s theme, each Maven box  included an adorable vintage lipstick trio.
The Boho Glam box included the "New York" trio which included the following three shades:

Lady in Red - matte crimson red
Satin Doll - sheer poppy red
Tea for Two - very sheer shimmery. nude


I can't get over the cute Art Deco style packaging!


Also included were a set of "vintage finish" gold hair pins with white and coral acrylic roses.
I'm such a sucker for cute hair accessories and these are just my style!


The Add-On


Gabrielle is deep, dusty purple creme.
Julep "Gabrielle"


The formula is an exact match for Millie, and the shade is quite similiar as well.
The only difference is that Gabrielle is more of a pure purple and shows up a tinge lighter in direct sunlight. Indoors it's hard to tell them apart.


Overall


I haven't been this excited over a Maven box in a while. 
Although the boxes have yet to really disappoint me, there was just something about this box I just really loved.


Which your favorite from the Boho Glam Box? 
Do you like the old 1920s Hollywood style?
Let me know in the comments below and share your thoughts on my Facebook and Twitter!

And if you want to become a Julep Maven yourself you can get your first FREE! That's right! 
Juster enter my referral code "3488485" when you sign up on Julep's website, take your style quiz and then enter promo code "FREEBOX" at checkout!
You can cancel anytime, so what do you have to lose?!

Thanks for reading!

-Melody
Related Posts Plugin for WordPress, Blogger...