homeaboutcontactdisclosure
Showing posts with label nail art. Show all posts

Thursday, July 4, 2013

Happy Independence Day! 4th of July Nail Art


Happy Independence everyone!

The weather is icky and I'm busy packing.
Even though I can't join in on barbecues, bonfires and fireworks I thought I'd still get in on the nail art festivities!

I got up early to work on my 4th of July nails, and let me tell you it took me over 6 hours!
I changed my look about four times before settling on something simple.


My thumb is is a two layer base of Sinful Colors "Snow Me White" with a simple glitter gradient of Julep "Fireworks."

My index finger is one layer of China Glaze "Adventure Red-y" with a large silver star from my Born Pretty Store Stud Wheel.

My pinky finger in two layers of La Girl 3D Holo "Brilliant Blue" with another large stoar from BPS.


Now the glitter placement on my middle finger took incredibly long.

Before I began, I painted two coats of LA Girl 3D Holo "Brilliant Blue".
Not having any glequins around, I reached for My Pink Dreams "Casa Blanca" and individually fished and placed each hex glitter until I reached exactly 50 to imitate the stars on the American Flag.
I sware, it had to have taken over an hour as I kept losing count. Haha!

My ringer didn't take as long.
I began with a two layer base of Sinful Colors "Snow Me White" and then placed 6 evenly spaced pieces of nail tape over the nail.
I then painted over the gaps with LA Girl 3D Holo "Sparkle Ruby" and removed the tape to reveal 13 stripes in total matching the stripes on the American Flag once again.


Overall it's a simple, wearable option for any patriotic outfit.
I had more intricate, over the top designs half finished...but sometimes less is more.

What do you think of the 4th of July look?
Did your nails show your patriotic spirit today?


Let me know in the comments below and send me your 4th of July nails on Facebook or Twitter!
And don't forget to give this look some love on Facebook, Instagram, Tumblr and Pinterest!

---

I apologize for being short of words this week.
I officially begin moving into my new place tomorrow.
I tried so hard to post regularly, but I know I've been bad and disappeared for one, to up to four days at a time.

After this weekend, things will be back to normal. 
I promise!

Meanwhile, I've reached over 500 followers on Instagram,
almost 1000 on Tumblr,
and approaching 500 on Facebook!

I cannot thank you all enough for your support.
Once I'm officially moved and settled, I'll be scooping up prizes for a huge giveaway to thank you.

You all are truly lovely and amazing.

Thanks for reading, be safe, and have fun tonight!

-Melody

Monday, July 1, 2013

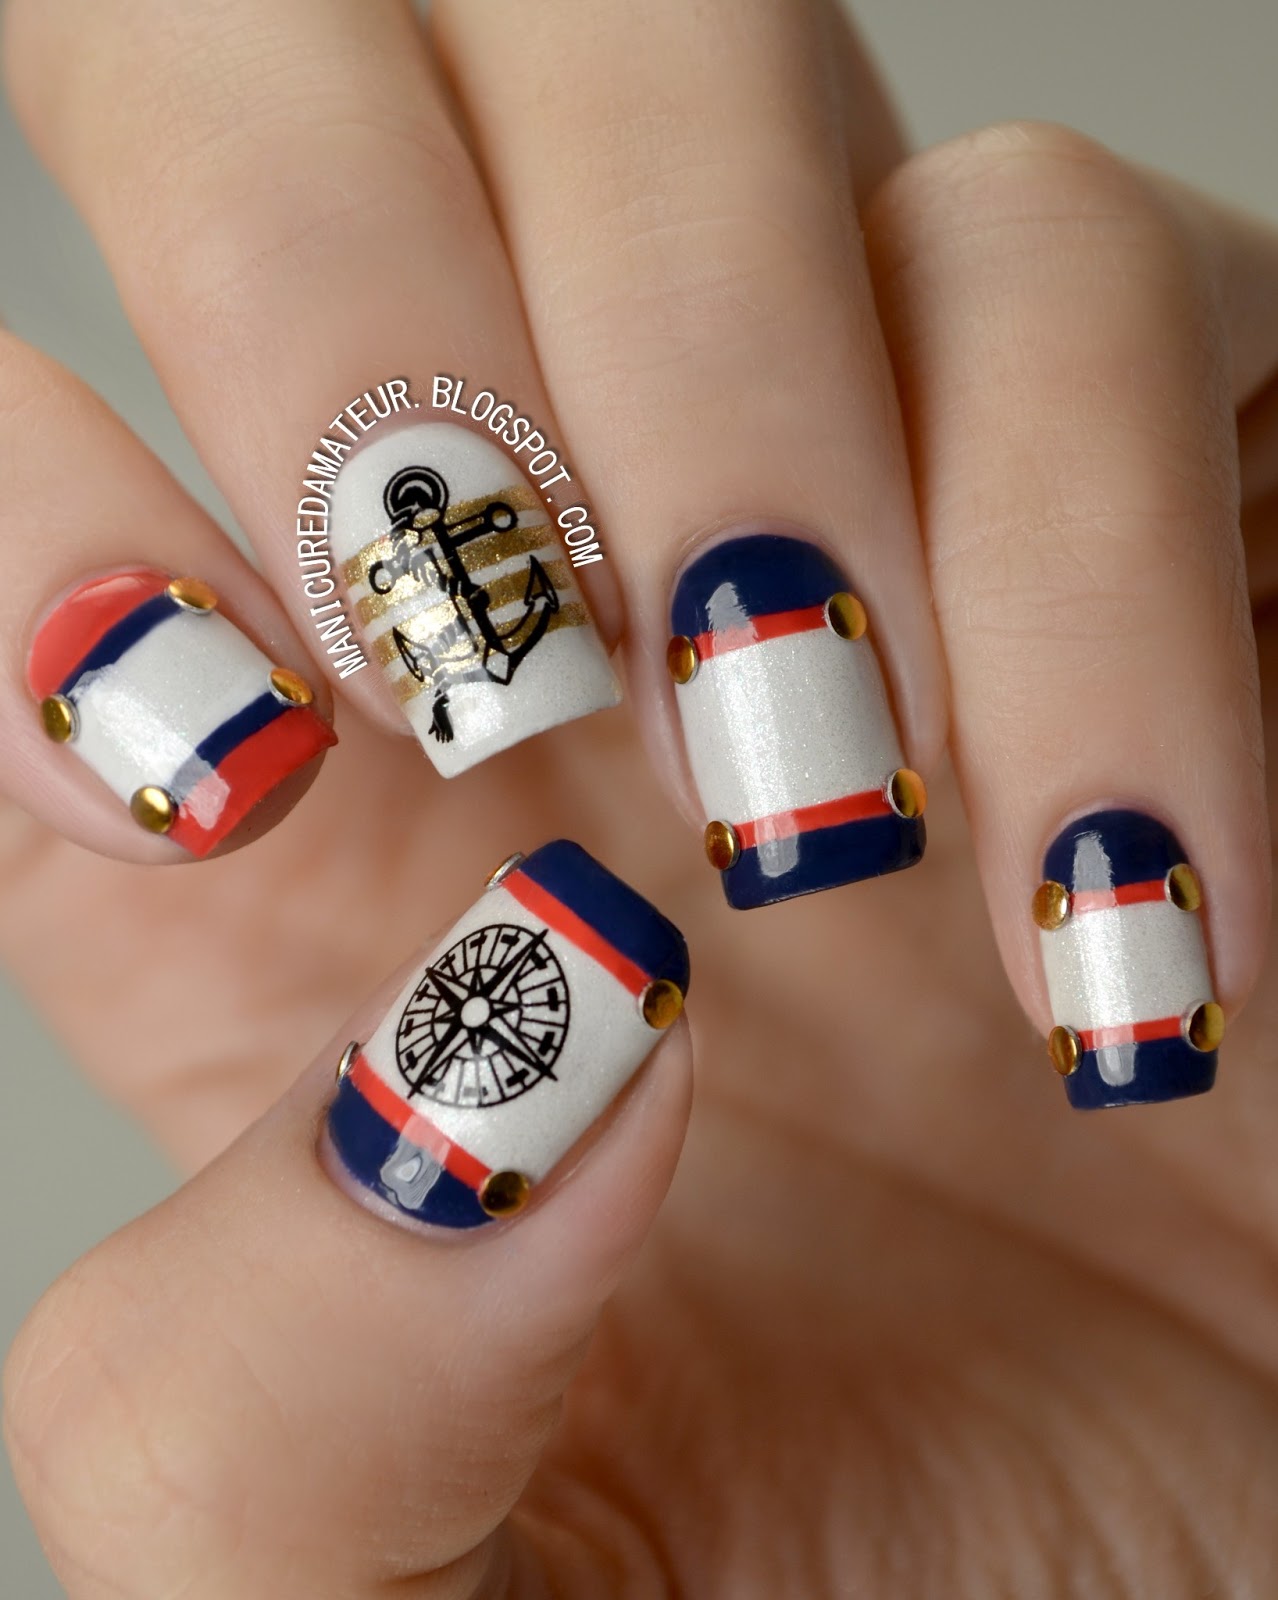
Nautical Nail Art featuring Born Pretty Store Anchor & Compass Water Decals


Happy July everyone!

I can't believe over half the year is already gone.
Whether I believe it or not, we're deep into the heat and I wanted to create a nail art look that was both summery and patriotic.

Red white and blue is a combination I save exclusively for this time of year and now that's here I'm ready to kick things off with a nautical look using Born Pretty Store Achor and Compass Water Decals.

This is actually my first attempt using stickers or decals.
Up until now I avoided using such decorations for the same reason I initially dismissed polish appliques.
In short, I thought they were "cheating."

I'll already tell you that after this look, I changed my mind.


First I needed a small arsenal of colors before working with the decals.


From left to right:

Julep "Nan"
Avon "Golden Vision"

Sinful Colors "Snow Me White"
Wet n Wild Megalast "Break the Ice"
Sinful Colors "New Wave"

Each finger started with a two coats of SC Snow Me White. 
To add a little summer glow if you will, I then added one coat of Wet n Wild Break the Ice for a subtle shimmer.

To create the stripes on all but my middle finger, I took four pieces of nail tape and taped off two baby stripes.

On my thumb, pinky and ring finger I filled in the stripes with Julep Nan and pulled off the tape while the polish was still wet.
I then took a small, flat nail art brush and filled in the bottom and top edge of the nail with Sinful Colors New Wave.
I used the same technique on my index finger, but reversed the colors.

I then turned to my Born Pretty Stud Wheel and added small round gold studs where each little stripe met the edge of my nail.

To create the stripes on my middle finger I placed five evenly spaced pieces of nail tape and painted over the gaps with Avon Golden Vision, removing the tape in the same manner as before.


Now on to the decals!

This specific set of decals comes with one sheet of 20 decals in a variety of two different anchors and three different compasses.

You can purchase these decals through Born Pretty Store's website here and are priced at $2.86.
But don't forget you get 10% off your whole purchase with my discount code BHL91!


Even though directions are included on the back, they contain unnecessary steps are actually more complicated than the actually process.

Here's how I applied the decals.

1. Cut out desired image.
2. Remove clear plastic film.
3. Drop in water for 10-20 seconds.
4. Remove image from water with tweezers.
5. Place image face down on finger (not the nail!) and gently slide the decal off the backing.
6. Pick decal off finger with tweezers and place on the nail.
7. Let dry.
8. Apply top coat.

Notice I didn't use a paper towel or blow dryer or any other means of drying the decal prior to placement.
Skipping this step gives you a few seconds to shift the image around the nail if needed.

The process is so quick and I am incredibly pleased with how flush the image is with the base.
You don't see any clear outlines and the image really sits and looks like it's just apart of the polish underneath.

The images themselves are not pixelated, nicely detailed, and remove just like any polish.


There you have it!

The most time-consuming part of the design was obviously the taping, but it's a simple look that's suitable for all skill levels.

I'm in full support of these decals for those who aren't ambidextrous but desire detailed designs on both hands.

There are so many decals out there, and now I'm itching to try them all!


 What do you think of this summer sails design?
Have you tried any nail art decals?

Let me know in the comments below and give this look some love on Facebook, Instagram, Tumblr and Pinterest.
Remember that Google Reader retires TODAY, so keep up with The Manicured Amateur on Bloglovin' and Feedly for all updates!


Also, if you'd like a more visual tutorial on applying water decals, give me a shout on Facebook or Twitter! 

Thanks for reading!

-Melody


**Born Pretty Store products provided for my unbaised review. This post contains affiliate links.

Monday, June 24, 2013

Color Club "Reign In Spain" (Birchbox Wanderlust Exclusive) & Funky Striped Nail Art


 Hi everyone!

According to the calendar, summer is officially here! 
That means it's time for travel and adventures under the sun.

Whether you breaking out neons, glitterx or hanging on to your spring pastels, your summer nails should be bright.

This month Color Club and Birchbox had their subscribers covered.

Photo Courtesy of Birchbox.com


 The Wanderlust Collection includes four mini (7ml, 0.5 fl.oz) polishes, an exclusive to Birchbox.
The set retails for $8.00 and can be purchased here at Birchbox.com.

The mini collection includes three neons shades and a stark off-white:

From left to right:

Reign in Spain
Mod in Manhattan
London Calling
Pardon My French

Every Birchbox subscriber received one of the four polishes in their June box.


Included in my own box was Reign in Spain.


Reign In Spain is a super neon, coral creme.
(One coat shown over Sinful Colors "Snow Me White.")


If only the camera could capture the true color. 
You heard me say it before and I'll say it again. Neons are impossible to photograph correctly.
In person this color is much more bold and much more bright.

The formula was so incredible that I questioned whether or not a white base was even necessary.
While most neon polishes are semi-sheer and require building, this particular shade was incredibly opaque and creamy.

I think I've found my go-to summer shade.
It makes my skin look nice and sunkissed, and I can imagine it's a flattering shade for just about anyone.


As much as this color stands out on it's own, I couldn't help but add a little something.


This bright shade needs to shine, so not wanting to stay inside too much longer I grabbed minimal supplies and went to work.


I knew I wanted to keep it simple with either stripes or dots, so I reached for a dotting tool and the Salon Perfect Nail Art Striper Polish in "White Out." 

Creating the look took no more than five minutes!

First, I simply drew three stripes with the white striper: the first being off center and twice as thick, followed by the two thinner stripes closer to the edges of the nail.

Taking the dotting tool and the white polish, I dabbed dots on alternating sides of one of the stripes to create a waved effect.

I then took the same dotting tool dipped in a dot of the CC polish and dotted down the line in between the two remaining white stripes.


It's quick, it's quirky, it's perfectly imperfect.


What do you think of this funky summer look?
Are you a Birchbox subscriber?

Let me know in the comments below and give this look some love on Facebook, Instagram, Tumblr and Pinterest.


If you're interested in becoming a Birchbox subscriber, you can sign up at Birchbox.com.
For $10 a month you'll receive 4 to 5 beauty samples and access to exclusive sales and specials on full size products in the Birchbox Shop.

You can also check out Birchbox on Facebook, Twitter and Instagram.
While you're at it, check out Color Club on Facebook, Twitter too!

Thanks for reading!

- Melody


**Birchbox subscription is paid monthly with my own money. This post contains referral links.

Saturday, June 22, 2013

Simple Summer Skittle Manicure featuring KKCenterHK 3D Bow Accents


Hi everyone!

So as most of you know, I've had quite the busy past few weeks. 
Things have been hectic as I've been suffering through dog fights, broken cars, landlord trouble, a tree falling on the house and now...moving out.

Complicated times call for simple manicures.
I need a look that's quick and can survive a day of packing, but can be dressed up for an evening with friends.

Sort of like a simple white tee...but for nails.


This is where a skittle mani with 3D decorations come in.
It's a simple solution that looks like you put in much more effort than you actually did.

All you need is a few colors, some cute accents, and you're good to go!


From left to right:


Wet 'N Wild Wild Shine "Hallucination"
Orly "Gumdrop"
Avon Mega Watt "Pop"
Sinful Colors "Snow Me White"
Avon "Inspire"

(Not Pictured) Out The Door top coat


For this particular skittle I wanted to choose colors that would later match the 3D bows.


Each finger began with a base layer of Sinful Colors "Snow Me White".

The pinky finger received two coats of Avon "Inspire".


The ring finger and thumb (not pictured) were left white but I chose to add a single coat of WNW Wild Shine "Hallucination," a subtle glitter top coat with an iridescent shimmer that matches the color palette perfectly.


The middle finger received two coats Avon Mega Watt "Pop," but a bit of shrinking still revealed the white base along the tip of the nail.

The index finger was layered with one coat of Orly "Gumdrop." 
The white base isn't really necessary for this particular shade, but it just saved me some time.


With a generous coat of Out The Door, I left the colors alone while I packed up a few things and moved some furniture.

When a couple of friends asked my boyfriend and I to join them for dinner, I decided I wanted to give the skittle an extra something.

I had little time on my hands, and automatically turned to my multicolored pearl wheel from Born Pretty Store.
Choosing a corresponding pearl for each finger, I dotted a bit of top coat onto the nails and placed the pearls accordingly with a small dotting tool.


What really brought the whole look together was these adorable bows from KKCenterHk.

The bows come in a pack of two and retail for $4.
Each bow is measured at about 10mm x 6mm x 2mm and can be applied with top coat, or nail glue if you want a longer hold. They are also resuable, so you are reassured that you are getting your money's worth.


At first I thought the price was a bit steep, but then when I noticed the patterns and details with each option I   felt the price was well justified.

There are 48 color and patterns available for this shape and style alone, which can been seen here.
It was hard to choose just one, but I ending up going for this cute Cyan Floral Print bow.


Even though my nails beds are tiny, I was pleasantly surprised by the overall look on the nail. It doesn't appear incredibly large, although it does stick out.

Knowing I wouldn't be wearing them for too long, I chose to apply the bows in the same manner as the pearls, and even then they stayed put up until I chose to take them off.

If you are not used to have a large decoration on your nail, it may feel funny at first. 

I was very aware of the presence of these little guys, and was may be a bit too careful about bumping or snagging them at first.
I got used to them pretty quickly and only noticed them when I ran my fingers through my hair.
I often snagged a few strands up under the bows, but they didn't budge.


It's not the most original or astounding look I've ever created, but it's a fantastic demonstration of how small details can make a big difference.
Small decorations like these 3D bows can turn an ordinary manicure to an extraordinary one.
I received multiple compliments and couldn't help giggle at how little time and effort I really put in it.

Dare I say that it's amazing nail art for the lazy nail artist?


What do you think of this cute bow featured skittle look?
What's you favorite quick nail art fix?


Let me know in the comments below and give this look some love on Facebook, Instagram, Tumblr and Pinterest.

And don't forget! Google Reader is saying goodbye is just over a week, so make sure following me on Twitter and Bloglovin' for all updates.

Thanks for reading!

-Melody


**KKCenterHk products sent for my honest review. This post contains affiliate links. For more details, please see my disclosure policy.

Monday, June 10, 2013

Born Pretty Store Cosmiss Nail Polish Review + Half Glitter Half Texture Nail Art!


Hi everyone!
Today I have a quick post of another polish brand from Born Pretty Store.

Now if you read my review on Born Pretty Store's March Nail Lacquer, then you already know I was pleasantly surprised with the quality of their polishes. (if not, you can read it here.)

These Cosmiss Candy Color Glitter Sparkle Yogurt Series Varnishes are new to BPS, and once I saw them I knew I had to try one out.


They have no names, but this is Cosmiss #3, a semi-sheer, milky light olive green with ranbow hexes, round and fine glitter.


For how much glitter is packed in this baby, it went on like butter.
The base is really sheer and will take atleast three layers to reach the full opacity as shown in the photos.
My main surprise was how flat the glitter sits on the nail.
I did use a top coat to give it a nice, even glossy finish.

I know it's kind of snot colored, but I like it. I love interesting colors, and this one is definitely that.
And the glitter so dazzling who even cares what color the base is, haha.


If this particular base color isn't your taste, not to worry!
Born Pretty Store has got you covered with 10 different glittery shades to choose from for $4.36.

You can purchase them here and get 10% off you entire purchase using my special promo code BHL91!


I got so excited about this polish, I rushed to create a quick nail art look using my new Cosmiss beauty.


I grabbed a few quick items and went to work.


 Already having the Cosmiss varnish applied, I picked up a roll of nail tape and taped off half of each nail starting from the upper left corner, down to the lower right corner of each tip.

Using Sally Hansen Sugar Coat in Lich 'O Rich, I painted the lower half of each nail and then quickly but gently pulled off the tape while the polish was still wet.

I know I've neglected to officially share the SH Sugar Coat collection with you yet, but it's coming I promise!


I could have stopped there, but I was too excited over a few more goodies I received from Born Pretty Store.

I turned to my nail wheel of half pearls and added a red one to the center of each nail by placing a dot of top coat where I wanted the pearls to be. 

The pearls are easy to pick up and handle by taking a dotting tool or toothpick that has just a tiny bit of top coat on the tip.

(Want the pearls for yourself, you can get them here for $4.74)


After the fact I realized the red makes them look like clown noses. But hey, it matches the glitter right?

I'm quite happy with the look and I'll  definitely be getting my hands on more Cosmiss varnishes as soon as I can.


What do you think of this Cosmiss polish?
Are you a fan of my bad clown party-like design? 


Let me know in the comments below, and give it some love on Facebook, Instagram, Tumblr and Pinterest.

Don't forget I'm having a giveaway at 500 Facebook followers, so spread the word!

Thanks for reading!

-Melody


**Products in this post were purchased by me with my own money.

Saturday, June 8, 2013

Sinful Colors Sail La Vie/Ahoy There Collection Review + Nautical Nail Art!


Hi everyone!

I gave everyone quite the build up to this collection with a preview of this nautical nail art design.


Only one collection was used to create the whole look.
Yup, it's the new Sinful Colors Sail La Vie/Ahoy There Collection!

The Collection

Sinful Colors has thrown us overboard once again, giving two different names to the same set.
If you visit Walgreens you'll see this as the "Sail La Vie" collection.
If you visit Rite-Aid, you'll see an entirely different display with the title "Ahoy There!"
I have no explanation as to why the company does this, but the collection is the same both in shades and in price.

Each shade is sold individually for just under $2.


The collection consists of three older core shades and five brand new shades.

Snow Me White
Out of This World
Cross My Heart
Anchors Away (NEW)
Sail La Vie (NEW)
My Bouyfriend (NEW)
New Wave (NEW)
Into The Blue (NEW)


The Colors

Snow Me White is well...white.


Can't really get any more basic than white. If applied thickly it's opaque in one coat, but I prefer two thinner coats as shown in the photos.

This is a cost effective, dependable white. I've actually purchased this on multiple occasions.
It's a good stamping white and I turn to it often.


Out of this World is a light silver foil.


For being one of the brand's older shades, I expected this to go full frost on me. Minus a streak or two revealed in the second photo, it's completely smooth.

The only downside it that it's pretty sheer and takes three coats to reach full coverage.

I like that it's on the lighter side of silver, as most silver foils have a shinier, gunmetal undertone.
If you're looking for a budget-friendly foil, give this one a shot.


Cross My Heart is a hot, cherry to chili pepper red jelly, depending on the light.


Being a jelly, it takes four coats for full coverage on it's own, although you lovelies sporting short nails can get away with three.

The formula is perfect. It's not thick or goopy and applies completely even.
I love reds, but don't often wear them due to their staining power. This one didn't stain a bit.


Why do I really love this color?
It turned out to be a neon in disguise!

It takes on a more orangey tone, but it's freakin' bright.
The picture just can't do it justice (because photographing neons are pain in the tukus). 


Anchors Away...well, it's a golderod, dandelion yellow-orange creme with the most subtle microshimmer.
Yeah.


This color boggled my mind. 
In most lighting situations the bottle looked more yellow, but on the nail it looks more orange. After surveying my boyfriend, roommate, and taking over 500 photos of this color alone I've decided to let YOU decide.


Is it orange or yellow? Let me know in the comments below!

Whatever color it is, I absolutely love it. It's just so interesting. 

The formula was on the thin side and needed two coats. 
The microshimmer is pretty non-exisitent, and can only be seen on the brush during application, and looking really really under direct sunlight.


Sail La Vie is light, periwinkle blue creme with barely-there microshimmer.


The formula on this one is identical to Anchors Away. 
Two coats got the job done, and the microshimmer isn't even worth mentioning.

This one was a bit hard to photograph, and I can only hope the purple undertones translated well enough into the photos.

It's so gorgeous and versatile. 
It's light enough for spring, bright enough for summer, and icy enough for  winter.


My Bouyfriend is rich, medium periwinkle blue creme.


This is literally a darker version of Sail La Vie. 
The purple tones were better captured in this one than it's  lighter counterpart.

The formula is thicker, making it a one coater.

I don't have much to say. It's gorgeous and one of my favorites out of the lot.


New Wave is a muted navy blue creme.


The formula to this one is identical to "My Bouyfriend". Great consistency and opaque on one coat.

The color is pretty, but doesn't wow me. It's the darker sibling to an older shade by SC called "Rain Storm" which you have seen me use as a glitter base on multiple occasions.


Into The Blue is a deep-but-bold blue crelly.


Although this has the thin, crelly-like formula, it's a one coater.

I don't know how and I don't care. It's amazing. It's much bolder in person but the camera can only take so much.


 I thought I'd knock out two birds with one stone and show you all the blues in daylight, side by side.


...and then put altogether, I came up with this:


There are so many ways to go with a nautical palette such as this one, and I really wanted to utilize every shade I could.


With all of the blue tones in the collection, an ocean scene was the first thing that came to mind.

It all started with a simple gradient using Sail La Vie, Anchors Away, Cross My Heart, and Sail La Vie again at the bottom.

I continued to dab on different layers to create a one-point perspective sunset in the background.

The sail boat was sort of messily free-handed. I intentionally made the sails wobbly to imitate the idea of wrinkles. But of course, looking at it up close just makes it come across messy.

Basically the entire thing was painted by hand, adding depth and detail until I was satisfied or got tired. I forgot which came first. It was a lot easier than it looks (just time consuming). 
If you can paint the sail boat, what you do with the background is up to you.

The french tips were also free-handed and is something anyone can do.

Beginning with Snow Me White as my base, I took a short striper brush and created the "smile line" using Anchors away. I then painted the area beneath with Into The Blue and then created a large stripe through the middle with Snow Me White.

In retrospect I could have just painted the edges with Into The Blue and saved time and polish, but you live and learn right?


Overall

I love a collection that can get me inspired right off the bat, and this set did just that (run away, she's rhyming again).
I am pleased with the finish look of my design and the colors used to make it happen.

For an eight shade collection under $20, you can do some great things. There are some basic staple colors, along with more unique hues that can be happily worn on their own.

My standouts are Anchors Away, Sail La Vie, and My Bouyfriend.

Which colors are you favorites?
Will you be picking any of these up?
What do think of my nautical nail art look?


Let me know in the comments below and make sure to give the look some love on Facebook, Instagram, Tumblr and Pinterest!


___


I know I left everyone hanging for a couple of days.
The stress from the event of this week called for some major R&R.
So I pushed life aside for a time to catch up on sleep, come with a housing plan, and seek advice from family and friends.

Even though the repairs have finally begun on the house after the tree incident (story here), it's just been too much.
My boyfriend, roommate and I have had enough.
My roommate made the decision to move out, forcing us to do the same.
Financially my boyfriend and I aren't prepared to look into a place of our own, but a friend has opened up her home to us while we save up and wait for something to become available.

Even though it's scary and unexpected, that's life.

What does this mean for the near future of The Manicured Amateur?
NOTHING BUT GOOD. And I've finally realized it.


No longer dealing with my landlord's ill practices means we can finally catch up on finances and get money put away.
As much as I hate to say it: more money means more opportunities.
..and it also means more polish!
Even better? Our new roommate is a fellow polish lover!
I have some great post ideas involving twinsies posts, nail art for shorties and more.

So keep up with me on Facebook, Twitter, and Bloglovin',
because things are about to get much more interesting around here!

If I miss a day or so, forgive me. 
I'll most likely be buried in cardboard boxes, that is, if the cats haven't beaten me to it.

Thank you every one for your support and thanks for reading!

-Melody
Related Posts Plugin for WordPress, Blogger...