


homeaboutcontactdisclosure
Showing posts with label china glaze. Show all posts

Thursday, July 4, 2013

Happy Independence Day! 4th of July Nail Art


Happy Independence everyone!

The weather is icky and I'm busy packing.
Even though I can't join in on barbecues, bonfires and fireworks I thought I'd still get in on the nail art festivities!

I got up early to work on my 4th of July nails, and let me tell you it took me over 6 hours!
I changed my look about four times before settling on something simple.


My thumb is is a two layer base of Sinful Colors "Snow Me White" with a simple glitter gradient of Julep "Fireworks."

My index finger is one layer of China Glaze "Adventure Red-y" with a large silver star from my Born Pretty Store Stud Wheel.

My pinky finger in two layers of La Girl 3D Holo "Brilliant Blue" with another large stoar from BPS.


Now the glitter placement on my middle finger took incredibly long.

Before I began, I painted two coats of LA Girl 3D Holo "Brilliant Blue".
Not having any glequins around, I reached for My Pink Dreams "Casa Blanca" and individually fished and placed each hex glitter until I reached exactly 50 to imitate the stars on the American Flag.
I sware, it had to have taken over an hour as I kept losing count. Haha!

My ringer didn't take as long.
I began with a two layer base of Sinful Colors "Snow Me White" and then placed 6 evenly spaced pieces of nail tape over the nail.
I then painted over the gaps with LA Girl 3D Holo "Sparkle Ruby" and removed the tape to reveal 13 stripes in total matching the stripes on the American Flag once again.


Overall it's a simple, wearable option for any patriotic outfit.
I had more intricate, over the top designs half finished...but sometimes less is more.

What do you think of the 4th of July look?
Did your nails show your patriotic spirit today?


Let me know in the comments below and send me your 4th of July nails on Facebook or Twitter!
And don't forget to give this look some love on Facebook, Instagram, Tumblr and Pinterest!

---

I apologize for being short of words this week.
I officially begin moving into my new place tomorrow.
I tried so hard to post regularly, but I know I've been bad and disappeared for one, to up to four days at a time.

After this weekend, things will be back to normal. 
I promise!

Meanwhile, I've reached over 500 followers on Instagram,
almost 1000 on Tumblr,
and approaching 500 on Facebook!

I cannot thank you all enough for your support.
Once I'm officially moved and settled, I'll be scooping up prizes for a huge giveaway to thank you.

You all are truly lovely and amazing.

Thanks for reading, be safe, and have fun tonight!

-Melody

Friday, April 12, 2013

NOTD: Neon, Black and White Pueen Nail Stamping Plates Preview

Hi everyone!

So the work from my original post was lost due to a brief power outage from these horrible storms.
I don't remember Georgia ever having this many tornado warnings this early in the year, but scurrying to the basement is becoming a weekly routine.


I didn't want to leave you hanging, so I thought I'd show you a preview of the Pueen Stamping Plates I've been playing around with lately.


I stumbled across Pueen Cosmetics on Amazon. These standard plates are available as a 25 piece set for $18.99. 
They're official website appears to be closed temporarily, but you may visit the Amazon page where I purchased them here.


For these nails I used plate PUEEN13. 


I began with a white base of China Glaze White on White.
With a standard size stamper and old gift card as my scraper, I used Sally Hansen Black Heart to apply the design leaving the top 4th of my nail unstamped.

Unfortunately the design didn't come come off the plate completely. I think the circles were just too large of a  space for the polish to handle. I did my best to fill in any incomplete areas with a small nail art brush, but it still came off a bit wonky. I also drew a black line across the top of stamped area to separate it from the open space.

I filled in the gap with Avon Inspire and sealed everything with Julep Matte Top Coat.


This image has given me the most trouble so far and the matte finish was questionable. Other Pueen plates with smaller images and patterns are picking up fine. 

I liked the idea of this in my head, but the execution was off...
not to mention my matte top coat is down to bottom of the bottle.

I wanna play with them just a bit more before I do a full review.


Is there a certain image from the 2013 Pueen Nail Stamping plates you'd like to see?
Have a favorite matte top coat you'd like to recommend?


Let me know in the comments below of give me a shout on Facebook and Twitter!

Happy Friday, and stay safe and dry out there!

-Melody

Wednesday, March 27, 2013

It's Easter Beagle Snoopy Nail Art, Charlie Brown!


Hi everyone!

Today I have a quick post on my animated spin on a classic Easter egg mani.


I don't know about you all, but whenever a holiday rolls around, there's a Charlie Brown special on television. 
When Easter season arrives, instead of the Easter Bunny I think of the Easter Beagle...which is basically Snoopy galavanting around, stealing everyone's eggs and redistributing them on Easter Sunday.


From left to right: Avon Nail Experts Gel Strength Base Coat, CG Dance Baby, CG With Love, Loreal Broozy Bruch, Julep Sally, Essie Action, Nicole by OPI Ladies in the Limelight, Julep Freedom Polymer Top Coat, CG White on White, SH Hard as Nails Black Heart.


Starting with Avon's Gel Strength Base Coat, I layered two coats of China Glaze White On White as my base color, and added a layer of Nicole by OPI Ladies in the Limelight for my ring finger.

I used a small nail art brush and small dotting tool to paint the patterns of the eggs on my thumb, ring and pinky finger. To create a more cartoon-like appearence, I outlined the eggs with SH Black Heart and took an angled brush dipped in polish remover to create negative space along the tips and finish the egg shape.

Snoopy was freehanded using SH Black Heart with an added layer of CG White on White to erase any sketchy strokes.

I ended up changing my mind on the background for Snoopy. Instead on white, I layered thinned coats on Julep Sally, Nicole by OPI Ladies in the Limelight, and Essie Action until a smooth vignette was visible.

I finished the look with Julep's Freedom Polymer Top Coat. However, I think I've run it into the ground. Instead of creating the glossy finish it used to, in the past few days all of my mani attempts and come out smudgy, foggy, or rubbery.


Despite my topcoat woes, this look definitely makes me smile. And it gave me an excuse to watch cartoons.


What are you wearing for Easter Sunday? 

Comment below and Show me your Easter "egg-spired" nails on Facebook or Twitter.

Happy hump-day! (Is it just me or is that horrible phrase?)

-Melody


Friday, March 22, 2013

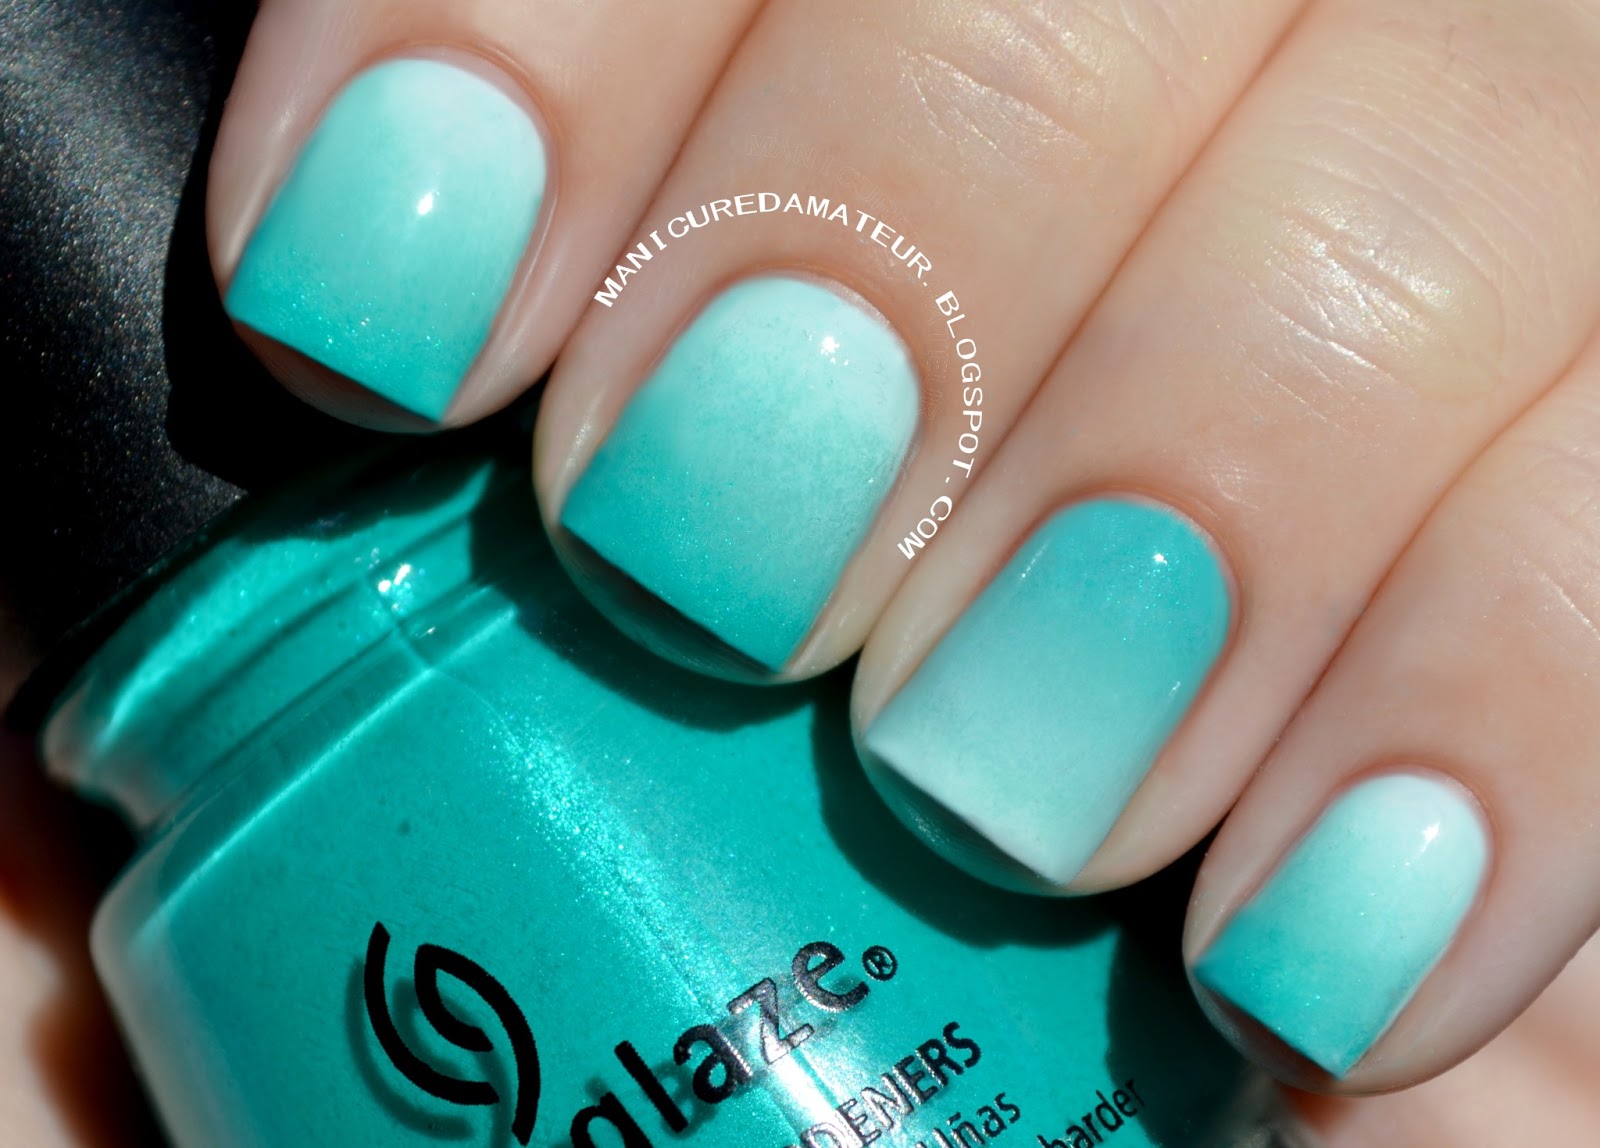
China Glaze Ombre Collections Review + Gradient Swatches


Hi everyone!


Today I want to discuss the release of the new Ombre Collections by China Glaze.

There are three collections in total, each containing four FULL size polishes, ten porous sponges and directions to achieving the gradient effect.


First, I want to mention that I chose not include individual swatches for every color. Why? Every color is a pre-released shade and a part of the permanent collection. There are some great staple China Glaze colors here and some cult favorites such as Aquadelic, Grape Pop, and the holy grail of China Glaze colors: For Audrey.

You can google search any of the included colors and come up with dozens of swatches from other polished lovelies, so I'll skip that step here.

I have turned my attention towards the curation of the shades . How well do the colors go together? How do the finishes of each polish effect the gradients? 
If you're wondering the same thing, keep on reading!


The Sweet Sensations Kit


The Sweet Sensations collection includes the following the shades:

Angel's Breath: A semi-sheer off white with pink undertones, originally from the United in Purpose (Breast Cancer Awareness) 2012 Collection .
Something Sweet: A pale baby pink creme, originally from the Up & Away Spring 2010 Collection.
Dance Baby: A bubble gum pink with purple undertones, originally from the Electropop Spring 2012 Collection.
Make An Entrance: A classic medium pink with blue undertones, originally from The Creme Couture 2004 Collection! Most likely reformulated, since it's original release was before CG went "big 3 free."


This kit gave me the most trouble creating the gradient for two reasons.

I put the blame partially on Angel's Breath. It applies much thinner than the other shades in this kit, so it's blending impact is severely reduced.

The other reason, and more importantly is that the value of Make an Entrance varies too far from the others. It's much darker. While I seemed to have worked for my middle finger, four times out of five I just couldn't get it to "mesh" with the lighter shades.


The Wait Teal You See! Kit


The Wait Til You See! kit contains the following shades:

White on White: A great basic bright white creme a  part of the Core Collection.
For Audrey: You've seen it everywhere. The true Tiffany-inspired turquoise from the Something Blue 2007 Collection. A nail junkie's must-have.
Aquadelic: An aqua blue creme with a slight green tint. Almost the same as For Audrey, but not quite. Originally from the Electropop Spring 2012 Collection.
Turned Up Turquoise: a satin-finish bright turquoise with micro-shimmer, originally from the Wow Factor/Nervy Neons Summer 2006 Collection.


Yeah, I nailed this one. Oddly enough I was expecting this one to give me the most trouble, but it gave no trouble at all.

I assumed the middle "section" would be too prominent because Aquadelic and For Audrey are so similar. I was wrong. Sometimes three color values are all you really need. The shades in this kit all had the exact same formula and blended perfectly, with minimal sponge markings I like to refer to as "static."

I was hesitant to even use Turned U Turquoise due to the presence of the micro-shimmer. I assumed it wouldn't blend properly and you'd really notice where the shimmer began. CG got me again. The shimmer is nearly non-existent in person just as it is in the picture above.

The Grape Expectations Kit


The Grape Expectations kit contains the following shades:

Sweet Hook: A light pastel lilac creme originally from the Electropop Spring 2012 Collection.
Spontaneous: A classic purple creme, originally from the Flirt 2010 Collection
Grape Pop: A warm toned violet creme with blue undertones. Does that make sense? Originally from the Up & Away Spring 2010 Collection.
Crimson: A blackened-out, vampy purple creme, originally from the Haunting Halloween 2011 Collection.


I have mixed feelings about the curation of this kit. While the difference in shades isn't quite as severe as the Sweet Sensations set, there is still a stark contract between the lightest and darkest shade.

Crimson is so incredibly dark that any "static" is immediately emphasized, which is why I think the gradient wasn't as smooth as the other two.

Also, I have one point I'd like to mention concerning Sweet Hook. It is a lilac, not a lavender. While it's seems to have hidden its pinky undertones in the picture above, in some lighting I just couldn't look past it. While a pink to purple gradient is pretty too, these kits are advertised as "ombre" shades, meaning they are corresponding values of the same color. In short, it needs to be purple...not pink.


The Sponges


Also included inside each box are ten hexagonal flat sponges to assist you with the gradients.


I don't really have much to say about the included sponges, because I didn't use them. Honestly, it's just because I were forgot they were in the box.

You will noticed that they are much more porous compared to the sponges I used, which are barely porous at all. Many polished lovelies prefer more porous sponges, claiming it creates a better gradient. I'll have to try it next time to know for sure, but unfortunately outside of these kits I have a hard time locating any sponges other than the dense ones pictured above.
If you know where to find them, let me know!


Overall


The question is here is not whether or not you should buy these sets. Of course you should. $12.99 for four full-size CG polishes + sponges? You do the math. That's a steal. Even if you own some of the colors as I did, they are great staples colors that won't hurt to have backups of.

The question is how they perform as an all-in-on gradient set. As an ombre set, sure. You'd get away with one color on each nail easily. When attempting the gradient, Try experimenting with your combinations and switching out either the darkest or lightest shades in either the Sweet Sensations or Grape Expectations kit. The Wait Til You See kit on the other hand, is a complete success.


Did you pick up any of these sets? Which one is your favorite? What do you think of the gradient trend?

Let me know in the comments below or share you thoughts with me on my facebook or twitter.

Oh and TGIF!

-Melody

Sunday, March 17, 2013

Polish for Paddy's Day! St. Patrick's Day Clover Manicure

Happy St. Patrick's Day everyone!

It's been a rough week in my household.
My boyfriend, roommate and I all caught a horrible stomach virus that left us delirious, nauseous, unconscious or a combination of the three for the majority of the week. 

So if you're like us and aren't much in an "all-out partying for Paddy" kinda mood, you can still create a subtle-but-spirited mani that won't get you pinched.
(Who came up with that horrid tradition anyway?)


Colors and Tools Used:


Steps


After applying one layer of Avon Gel Strength Base Coast to all nails, I applied two coats of Julep Adrianna for my base color.

I then took the small dotting tool and placed two dots of Julep Fiona and dragged then down into a heart shape to create a leaf. I repeated the steps on each side of the original "leaf" to complete the clover.

After randomly painting clovers on the nail, I used the small nail art brush to touch up the edges of the leaves and ensure the clovers were smooth and opaque.

I then took the same nail art brush and dabbed on a thin layer of Julep Colbie.

For my ring finger I made a jelly sandwich beginning with a thin layer of China Glaze Budding Romance. Scraping off most of the glitter off of the brush, I layered a very thin coat of Julep Colbie (normally very full coverage) on top of CG Budding Romance. Next I added a second layer of CG BR to complete the sandwhich.

Following the same steps for the other four nails, I randomly painted clovers with Julep Adrianna all over the nail and touched up with the small nail art brush.

Finally, I took a small angled brush to clean up any stray polish on fingers and cuticles and topped the design with two coats of Julep Freedom Polymer Top Coat.


This is my first time-intensive design in a while. I obsessed over touch and clean up knowing I was going to take photos, so I'm satisfied with it.
The greens make my hands look a bit pinker than usual, but for a holiday I can suck it up.


What do you think of the pattern? Did you party for Paddy?
Comment below or let me know on facebook or twitter. Thanks for reading!

-Melody

Monday, March 4, 2013

Amateur Manicures: Dabbling in Dotting

Happy Monday!


Excited to begin posting on a regular schedule. But first, at look at what I've been wearing lately.


Left
I began with two coats of Colorblast by Orly's Tempting Tea Rose. It's supposed to be an off white with the slightest pink undertones, but I have yet to notice it. I used Loreal's "Jet Set to Paris" for the two darkest rows of dots. The lighter turquoise blue is Loreal's "Club Prive," but came off a lot more green in photos. The light mint is Julep's Susie, and at the last minute I added Sally for a subtle contrast.


Right
Showing off one of my favorite from the China Glaze Avant Garden collection, I used Passion for Petals as my base and both and small and large dotting tool to creating the vertical rows with Julep's Sally. To finish it off I took Passion for Petals once more and placed dots right over the larger ones in the center to create an outline effect.


Both looks were topped off using Julep's Freedom Polymer Top Coat.


Now even though many have demonstrated how to create your own dotting tool, I wanted to have multiple sizes at my disposal. Investing in dotting tools will cost you about as much as that soda you thought about picking up while filling up your gas tank. I turned to eBay and grabbed a set for less than two dollars and free shipping. The catch? For that price most products come from China which means shipping can take up to a month. I've had mine for almost a year and they've held up completely, even when the cats decide to "borrow" them.


What's your favorite dotted manicure? Have you tried one yourself? 
Let me know what you think and thanks for stopping by and sticking around!

Related Posts Plugin for WordPress, Blogger...