Hello everyone!
Today I want to discuss the now trending "real nail polish strips."
Today I want to discuss the now trending "real nail polish strips."
It's nail art for the non-nail artists, and I'm going to show you how they work, how well they work, and who'll they'll work for.
Are you ready for a polish strip showdown? If so, keep on scrolling!
Are you ready for a polish strip showdown? If so, keep on scrolling!
As a polish addict, I was actually turned off by the idea of nail art that didn't involve the process of actually painting my nails. But leave it to Birchbox and Cravebox to make me step out of my comfort zone.
The Incoco Nail Appliques were included in the March 2013 Birchbox, and the Sally Hansen Salon Effects Nail Polish Strips were included in the Bikini Ready Cravebox.
The Incoco Nail Appliques were included in the March 2013 Birchbox, and the Sally Hansen Salon Effects Nail Polish Strips were included in the Bikini Ready Cravebox.
I thought I would take the opportunity to compare both brands. Let's first take a look at what's included with each product.
Contestant #1: Incoco Nail Appliques
Contestant #1: Incoco Nail Appliques
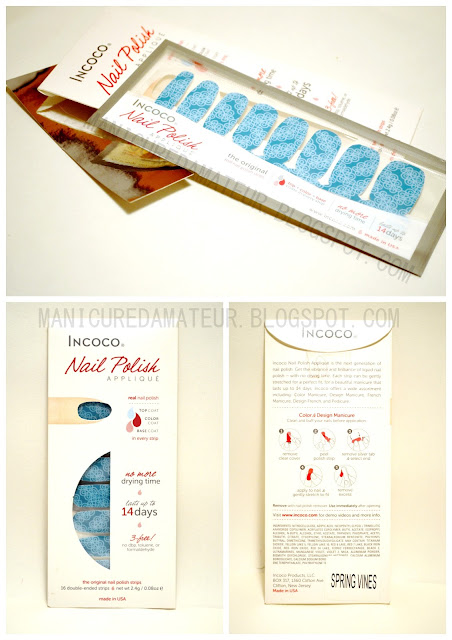
The Incoco Nail Appliques are 100% real nail polish strips that come in a plethora of colors, designs, and finishes and are free of Formaldehyde, DBP (Dibutyl Phthalate) or Toluene.
Single shade manicure and pedicure strips are available for $7.99.
Design manicure and pedicure strips are available for $8.99.
Single shade manicure and pedicure strips are available for $7.99.
Design manicure and pedicure strips are available for $8.99.
French manicure strips are available for $9.99
Pictured below are the design manicure strips in Spring Vines, but to shop all the options visit Incoco.com.
Each package contains two rows of eight double-sided strips that can be stretched to conform to your nail shape along with a strip of silver tape to reseal any unused strips.
They are advertised to last up to 14 days as they contain base coat, polish, and top coat all in one.
Instructions for use can found on the back of the package.
Contestant #2: Sally Hansen Salon Effects Real Polish Strips
The Sally Hansen Salon Effects Real Polish Strips are free of Formaldehyde, DBP (Dibutyl Phthalate) or Toluene, and are made of 100% real nail polish.
There are currently 40 varieties available, all of which can be viewed at sallyhansen.com.
They can be purchased wherever Sally Hansen products are sold and usually range from $7 to $9.
Pictured below are strips in the pattern "Tri-bal It On."
Pictured below are strips in the pattern "Tri-bal It On."
Each package contains two plastic and foil wrapped packets containing eight double ended nail polish strips, a mini sized 3-1 Emory/buffer board, double-ended cuticle stick and instruction page.
The all inclusive strips also contain base coat and top coat and are claimed to last for up to 10 days.
Tutorial
The process of applying the nail polish strips is identical between both brands, so I only chose one for the full demonstration.
Below is an illustrated guide, followed by some helpful hints to make the process go even smoother.
Tips from the manicured amateur:
1. Both brands claim that the strips can be stretched to fit the width of your nail if you are between sizes. This process didn't really work for me. So instead I chose a size just barely larger, hovered the strip over my nail, and just barely snipped the long edge until I was satisfied.
2. The directions of both varieties instruct you to immediately fold the excess strip downward and immediately proceed with filing. The problem is that the strips take a couple of minutes to fully adhere to the nail, so immediately grinding at them risks the potential of shifting. I suggest cutting the leftover strip, leaving just enough to fold under the entire tip of the nail. Trust me, this makes the filing part go much quicker.
3. Unfortunately, while it's true that you do not have to be conscious of wet polish, you have to be conscious of peeling polish strips. Try to avoid contact with water, especially warm water, for the first couple of hours.
So how'd they hold up? Well, let's take a look...
The Matchup
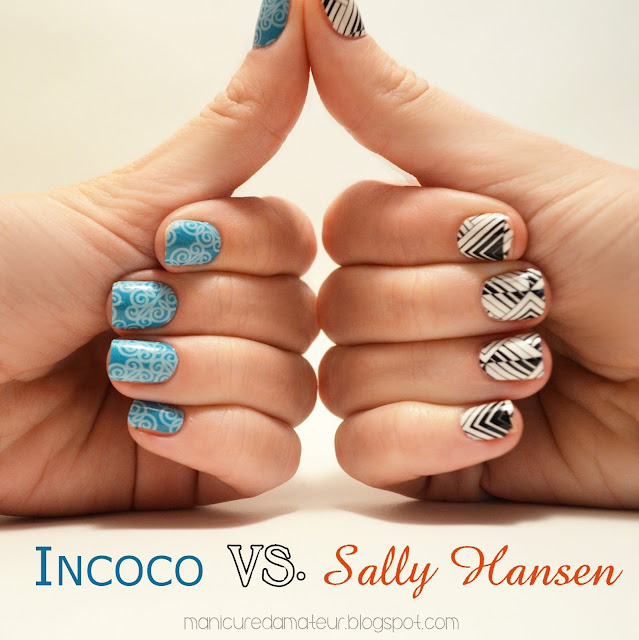
Below is the final result after one full day of wear.
You will immediately notice certain characteristics of each brand.
 |
| Left: Incoco Nail Appliques in "Spring Vines." Right: Sally Hansen Salon Effect Nail Polish Strips in "Tri-bal It On." |
So the first thing I'm sure you notice are the very visible chips on the Sally Hansen side, which began overnight. I woke up to the pointer finger curled up and peeling before I was even awake. The thumb and pinky finger followed suite when doing the dishes.
So much for 10 days right? Well...maybe. Not so coincidentally, these are my three nubby nails that had recently broken and had been filed down. I had trouble applying the strips in the first place as I was unable to fold over the excess and get the strip to fully adhere to the tip. Notice the other two nails are perfectly in tact.
The Incoco hand doesn't get off "scott free" either. While there were no visible chips, nearly every edge looked as if it was curling. Except for the noticeable fold in my nail, they actually weren't curling at all. I just couldn't get past how much it looked like a sticker.
While the camera might not have picked it up as much as I needed it to, the Incoco strips also have weird lines that I assume to be "printer" marks. The Sally Hansen strips do not have this and looked much more authentic.
The Tally
So let's take break it down:
- Price: Incoco - $8-10 + shipping. Sally Hansen - $7-9
- Availability: Incoco - online only. Sally Hansen - online and in stores.
- Variety: Incoco - I couldn't even count. Sally Hansen - 40 varieties.
- Package: Incoco - 16 nails strips. Sally Hansen - 16 nail strips + file + cuticle stick.
- Composition: SAME for both. 3-free. 100% real nail polish with base and top coat included.
- Application: SAME for both, but more difficult for shorter nails.
- Durability: Incoco - 14 day claim (no chips after vigorous use). Sally Hansen: 10 day claim (chipped less than 24 hours on short nails).
- Appearance: Incoco - Visible edges, print lines. Sally Hansen - Clean edges, minor speckling.
So which one wins?
The Champion
SALLY HANSEN
Surprised? It came down to the simple fact that I change my nail polish every day, so I could care less if it begins to chip. In addition to that, I felt the quality of the design of the Sally Hansen strips were better, even if the strips themselves were not.
Also, Sally Hansen is pretty much in every major retailer around me. If I choose to repurchase them, I can just walk across the street as opposed to paying extra money to wait around for a week to have them delivered.
That being said, the Incoco strips are more suitable for those who want the long-term wear. Giving credit where it is due, they stuck on better and stuck on longer. They also have more colors and designs to choose from and even release seasonal collections.
In the end nail polish strips aren't for me. The idea of nail polish strips make it seem like painting your nails is a chore. I am sure other polish addicts and bloggers alike will agree that it's part of the fun! Plus, if your polish messes up, you repaint the layer and go on with your day. If your nail polish strip messes up, you're plum out of luck.
So which brand do you think should have won the polish strip showdown?
What do you think of nail polish strips as a whole?
Let me know in the comments below what you think of this concept and which, if any, you have tried.
You can also share your thoughts or recommendations on my Facebook and/or Twitter page!
Thanks for reading! I know this was a doozy.
You can also share your thoughts or recommendations on my Facebook and/or Twitter page!
Thanks for reading! I know this was a doozy.
-Melody


Hmm, very interesting. I have never tried incoco before.
ReplyDeleteHowever, I actually get very very little chipping with the Sally Hansen ones (just some tip wear). But i find that the other edges, the ones facing the cuticle, rises a just a tiny tiny bit off the nail after a while, which kind of annoys me.
I had never even heard of the brand until they showed up in my Birchbox (which I am still on the fence about). I definitely like them. Unless there's a certain design I just have to have, I see no reason not to stick with the Sally Hansen strips.
ReplyDeleteI figured that I had experienced more chipping than usual. Had I waited until my nubby nails grew out I bet they would have been just fine. The edges rising would have bothered me too.
i tried that exact sally hansen design too but they didnt work for me :( i need a professional like you!
ReplyDeleteI'm no professional, but the flattery is much appreciated. :)
ReplyDeleteThanks for this! I'm not sold on polish strips. The seem expensive considering one box does one or two manicures and I can get a bottle of polish for less money (probably have that mani last longer) and get many manis out of it.
ReplyDeleteI agree. And the process isn't any faster than waiting for polish to dry. This kind of product is really targeted toward those wanting a nail art design but feel incapable of doing it themselves.
DeleteAah that makes sense! Yes as far as nail art goes, these are lovely and it'd make perfect sense for non-nail artsey types to want to pick these up.
DeleteVery interesting. Will you come to my house and paint my nails everyday?? ;))
ReplyDeleteYour blog provided us with valuable information to work with. Each & every tips of your post are awesome. Thanks a lot for sharing. Keep blogging.. sns nails
ReplyDelete