homeaboutcontactdisclosure

Saturday, June 29, 2013

Indie Spotlight: Femme Fatale Swatches and Review


Hi everyone!

I know what you're thinking, "WHERE HAVE YOU BEEN?!"

Four days without sharing my nail adventures with you all has incredibly hard.

With the packing and moving well underway, I've had no choice but to devote all my time to emptying the house.
We expect to be fully moved into our new home by the end of next weekend and I can not be more excited.

You all have been incredibly supportive during such a hectic time, and I cannot thank you enough.

Even though my hands have been overworked, beat up and reak of cardboard, I haven't stopped polishing.
I'm been testing a lot of new nail products include strips, press-ons, and new nail care items,
but my shining stars for the week have been none other than my new beauties from Femme Fatale Cosmetics.

Femme Fatale Cosmetics is one of the most highly coveted Australian indie brands and international distributors.
Femme Fatale Cosmetics are quality tested and 3 Free.

All of the stress and exhaustion of this month immediately melted when I received notice that I'd have the opportunity to share a few of their polishes with you all.

Today I have four of the following glittery shades:


From left to right:

Eventide
Jadefire
Keeper of the Grove
Suspended Starlight


No more jibber jabber, let's see 'em!


Jadefire is a yummy mix of coral, red, green, and gold hexes of different sizes, along with red and gold fine glitter in shimmery yellow-green tinted base.

(One coat shown over Sinful Colors "Unicorn.")


The base is very thin which allows this to easily be built up on it's own or worn over a base color.
The glitter is a bit clumpy on the brush, but spreads easily and does not require dabbing.

To reach full opacity on it's own you'll need three coats and will result in a more muted, darker yellow-green.

I chose a base to saturate the color, but I recommend choosing a shade as close to the yellow tint as possible, otherwise a bit of patchiness may show (intentionally displayed in the second photo).


Something about this combo makes me crave a fruit salad.
I have no idea how that relates to the name Jadefire, but who cares!

It's a smart choice of colors that can be appropriate for spring, summer and even fall, and is unique to my collection thus far.


Keeper of the Grove is a slightly green-tinted shmmery base packed full of all sorts of different glitter: 
from tiny green and gold hexes to small blue and fuschia round glitter, slightly larger gold and fuschia hexes and even large pink hearts!
(One coat shown over Fingerpaints "Tough Art To Follow.")


This one is definitely a full coverage glitter, but can still be used as a topper if so desired.
Most swatches I have seen of this shade use a matching lighter green as a base, so I thought I'd change it up with a darker shade to fully emphasize on just how diverse this glitter mix is.

Like Jadefire, the base is thin and the tint is extremely subtle to the point that it almost isn't there.
The glitter is very dense, but still doesn't need dabbing.
Fishing is necessary to obtain the hearts, but because the base is so thin it's not a big effort.


This is absolutely beautiful.
Whether or not you catch the possible gaming inspiration behind the name, the combination is simply a winner.


Eventide is a feminine mix of fuschia and gold glitter of all shapes and sizes -- small and medium hexes and small and large squares all stirred in a clear base.
(One coat shown over China Glaze "Purr-fect Plum.")


The base is slightly thicker than the previous two, but not by much.
The formula is pretty much perfect proven by the fact that I didn't even have to fish for the large squares!

The only important note to make is that a top coat is a must. 
Without one or two good layers, the top layer of the square glitters will begin to peel off if snagged or meddled with too much, leaving you with just the patchy holographic underlayer.


The options are endless with this one - light base, dark base, no base or jelly sandwhich, you can do it all.
It's so sparkly and regal and I can't get enough of it.


Suspended Starlight is blue jelly packed with turquoise and deep royal blue shredded, fine, small and medium hexes, along with large silver moon and star glitters!
(One coat shown over Sally Hansen Xtreme Wear "Pacific Blue.")


This has the most prominent base out of the four, and can definitely be built up on it's own.
Like Eventide, a top coat is required to prevent the moon and star glitters from peeling away.
Fishing isn't really necessary for them either, unless you have a specific placement pattern in mind.


 Are you as over the moon for this one as I am?
Even at one coat this has so much depth and and is the perfect emulation of a twinkling night sky.


Overall I think that Femme Fatale Cosmetics are carefully thought out color combinations that are sure to catch attention.
With so many ways to wear each shade you'll love them more and more with every mani.

With one of these is your favorite?
Let me know in the comments below and give them some love on Facebook, Tumblr, Instagram, and Pinterest!


Want Femme Fatale Cosmetics for yourself?


To see the entire line of Femme Fatale Cosmetics and to see the other available artisan lines carried, you can visit Femme Fatale's website.

While purchasing Femme Fatale Cosmetics through their website is only available to Australian lovelies,
the rest us international beauties can see access stocklists through the following carriers:

United States
Llarowe - $13.00 per full size 12ml bottle.
(Currently carries Eventide, Jadefire, and Keeper of the Grove)

Canada

Harlow & Co. - $13.50 per full size 12ml bottle.

Singapore

Shop Ecclectico - $18.00 per full size 12ml bottle.
(Currently carries Jadefire)
 **Participating Austrailian brands currently 20% off (FF currently priced at $16.00)!

Norway

Norway Nails - NOK159 per full size 12ml bottle.
(Currently carries Eventide, Jadefire, Keeper of the Grove and Suspended Starlight)

France

Ledouxnage - € 8.64 - € 14.40 per full size 12ml bottle.

No matter where you go to shop, you will notice these babies sell fast,
so make sure to keep up with Femme Fatale on Facebook, Twitter and Instagram for restocks, new releases and more.


Thanks for reading!

-Melody

Monday, June 24, 2013

Color Club "Reign In Spain" (Birchbox Wanderlust Exclusive) & Funky Striped Nail Art


 Hi everyone!

According to the calendar, summer is officially here! 
That means it's time for travel and adventures under the sun.

Whether you breaking out neons, glitterx or hanging on to your spring pastels, your summer nails should be bright.

This month Color Club and Birchbox had their subscribers covered.

Photo Courtesy of Birchbox.com


 The Wanderlust Collection includes four mini (7ml, 0.5 fl.oz) polishes, an exclusive to Birchbox.
The set retails for $8.00 and can be purchased here at Birchbox.com.

The mini collection includes three neons shades and a stark off-white:

From left to right:

Reign in Spain
Mod in Manhattan
London Calling
Pardon My French

Every Birchbox subscriber received one of the four polishes in their June box.


Included in my own box was Reign in Spain.


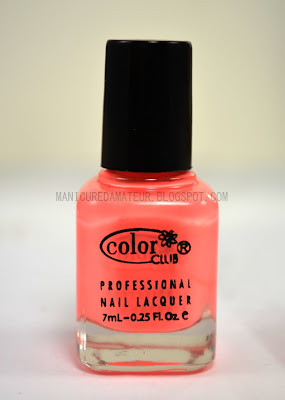
Reign In Spain is a super neon, coral creme.
(One coat shown over Sinful Colors "Snow Me White.")


If only the camera could capture the true color. 
You heard me say it before and I'll say it again. Neons are impossible to photograph correctly.
In person this color is much more bold and much more bright.

The formula was so incredible that I questioned whether or not a white base was even necessary.
While most neon polishes are semi-sheer and require building, this particular shade was incredibly opaque and creamy.

I think I've found my go-to summer shade.
It makes my skin look nice and sunkissed, and I can imagine it's a flattering shade for just about anyone.


As much as this color stands out on it's own, I couldn't help but add a little something.


This bright shade needs to shine, so not wanting to stay inside too much longer I grabbed minimal supplies and went to work.


I knew I wanted to keep it simple with either stripes or dots, so I reached for a dotting tool and the Salon Perfect Nail Art Striper Polish in "White Out." 

Creating the look took no more than five minutes!

First, I simply drew three stripes with the white striper: the first being off center and twice as thick, followed by the two thinner stripes closer to the edges of the nail.

Taking the dotting tool and the white polish, I dabbed dots on alternating sides of one of the stripes to create a waved effect.

I then took the same dotting tool dipped in a dot of the CC polish and dotted down the line in between the two remaining white stripes.


It's quick, it's quirky, it's perfectly imperfect.


What do you think of this funky summer look?
Are you a Birchbox subscriber?

Let me know in the comments below and give this look some love on FacebookInstagramTumblr and Pinterest.


If you're interested in becoming a Birchbox subscriber, you can sign up at Birchbox.com.
For $10 a month you'll receive 4 to 5 beauty samples and access to exclusive sales and specials on full size products in the Birchbox Shop.

You can also check out Birchbox on Facebook, Twitter and Instagram.
While you're at it, check out Color Club on Facebook, Twitter too!

Thanks for reading!

- Melody


**Birchbox subscription is paid monthly with my own money. This post contains referral links.

Saturday, June 22, 2013

Simple Summer Skittle Manicure featuring KKCenterHK 3D Bow Accents


Hi everyone!

So as most of you know, I've had quite the busy past few weeks. 
Things have been hectic as I've been suffering through dog fights, broken cars, landlord trouble, a tree falling on the house and now...moving out.

Complicated times call for simple manicures.
I need a look that's quick and can survive a day of packing, but can be dressed up for an evening with friends.

Sort of like a simple white tee...but for nails.


This is where a skittle mani with 3D decorations come in.
It's a simple solution that looks like you put in much more effort than you actually did.

All you need is a few colors, some cute accents, and you're good to go!


From left to right:


Wet 'N Wild Wild Shine "Hallucination"
Orly "Gumdrop"
Avon Mega Watt "Pop"
Sinful Colors "Snow Me White"
Avon "Inspire"

(Not Pictured) Out The Door top coat


For this particular skittle I wanted to choose colors that would later match the 3D bows.


Each finger began with a base layer of Sinful Colors "Snow Me White".

The pinky finger received two coats of Avon "Inspire".


The ring finger and thumb (not pictured) were left white but I chose to add a single coat of WNW Wild Shine "Hallucination," a subtle glitter top coat with an iridescent shimmer that matches the color palette perfectly.


The middle finger received two coats Avon Mega Watt "Pop," but a bit of shrinking still revealed the white base along the tip of the nail.

The index finger was layered with one coat of Orly "Gumdrop." 
The white base isn't really necessary for this particular shade, but it just saved me some time.


With a generous coat of Out The Door, I left the colors alone while I packed up a few things and moved some furniture.

When a couple of friends asked my boyfriend and I to join them for dinner, I decided I wanted to give the skittle an extra something.

I had little time on my hands, and automatically turned to my multicolored pearl wheel from Born Pretty Store.
Choosing a corresponding pearl for each finger, I dotted a bit of top coat onto the nails and placed the pearls accordingly with a small dotting tool.


What really brought the whole look together was these adorable bows from KKCenterHk.

The bows come in a pack of two and retail for $4.
Each bow is measured at about 10mm x 6mm x 2mm and can be applied with top coat, or nail glue if you want a longer hold. They are also resuable, so you are reassured that you are getting your money's worth.


At first I thought the price was a bit steep, but then when I noticed the patterns and details with each option I   felt the price was well justified.

There are 48 color and patterns available for this shape and style alone, which can been seen here.
It was hard to choose just one, but I ending up going for this cute Cyan Floral Print bow.


Even though my nails beds are tiny, I was pleasantly surprised by the overall look on the nail. It doesn't appear incredibly large, although it does stick out.

Knowing I wouldn't be wearing them for too long, I chose to apply the bows in the same manner as the pearls, and even then they stayed put up until I chose to take them off.

If you are not used to have a large decoration on your nail, it may feel funny at first. 

I was very aware of the presence of these little guys, and was may be a bit too careful about bumping or snagging them at first.
I got used to them pretty quickly and only noticed them when I ran my fingers through my hair.
I often snagged a few strands up under the bows, but they didn't budge.


It's not the most original or astounding look I've ever created, but it's a fantastic demonstration of how small details can make a big difference.
Small decorations like these 3D bows can turn an ordinary manicure to an extraordinary one.
I received multiple compliments and couldn't help giggle at how little time and effort I really put in it.

Dare I say that it's amazing nail art for the lazy nail artist?


What do you think of this cute bow featured skittle look?
What's you favorite quick nail art fix?


Let me know in the comments below and give this look some love on Facebook, Instagram, Tumblr and Pinterest.

And don't forget! Google Reader is saying goodbye is just over a week, so make sure following me on Twitter and Bloglovin' for all updates.

Thanks for reading!

-Melody


**KKCenterHk products sent for my honest review. This post contains affiliate links. For more details, please see my disclosure policy.

Friday, June 21, 2013

Indie Spotlight: Hit Polish "Pretty in Paisley" and "Tropics" (Swatches and Review)


Hi everyone!

Today I'm hitting the blog with another indie brand, Hit Polish Nail Lacquer!

Hit Polish, formally known and D&R Apothecary, is the creative endeavor of Rachel from South Carolina.
With over 300 different polishes under her belt she continuously releases new, limited edition shades that keeps her customers coming back for more.

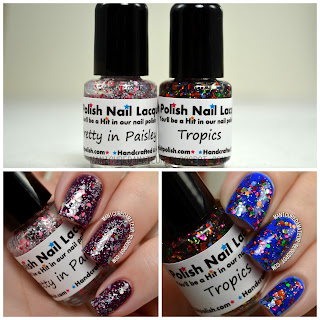
Rachel was kind enough to send me two baby bottles of two shades included in next month's line-up, "Pretty in Paisley" and "Tropics".


This is only a couple of the  wide selection of new glittery beauties that are coming soon!


Pretty in Paisley is a gentle mix of silver fine glitter sprinkled with mint, lavender, pastel pink and red hexes all swirled in a clear base.

(One coat shown over CQ "Candy Grape" with one layer of Out The Door top coat)


The glitter is dense without the base being thick. 
The consistency is pretty flawless with no fishing or dabbing needed.
The glitter applies evenly and you aren't left feeling like a certain color got left behind.

Because the glitter is so packed, you can build this up with an extra layer or two and wear it on it's own or use it as a topper as I did here. I personally recommend a base color that is dark enough to not overshadow the light hues of the glitter.


The pastel colors are a match made in heaven, and then adding the red for that extra pop sent this combo over the top.

It's precious, basically.


Tropics is fresh, bright mix of gold fine glitter and metallic rainbows hexes of varying sizes in a clear base.

(One coat over Over Avon Mega Watt "Shock" with one layer of Out The Door top coat.)


The formula is consistent with PiP and just as easy to apply.

This one is also able to reach full coverage on it's own, but because the fine glitter-to-base ratio is lower than PiP, it takes at least three coats if not four.


There is something definitely more tropical feeling to this mix compared to other rainbow glitters. 
I think it's the light metallic blue against the shiny and citrusy yellow, orange, green and hot pink that really sold me.

While it can be paired with just about any base color, I couldn't think of any more fitting than a jelly blue, ocean-like hue for the glitters to swim in.
(Not to mention the glitter remedied the exposed flaws in the base color's formula, but I'll get to that collection later.)


Most indie polish makers release at least one glitter combo, and a lot of them can be pretty similar. 
What sets each brand apart, in my opinion, is the quality and consistency of  the base and Rachel "nails it" every time.

Even though these are glitters you can count on, the amount of Hit Polish lacquers you'll want is something you can't count.

There's just so many shades I feel I must have, but they're always limited edition so I have to grab them while I can!


Want Hit Polish for yourself?

You can find the current line up of Hit Polish nail lacquers at Rachel's Etsy shop.

Currently, all stock is being cleared for the July release, so ALL polishes are 20% off!
Full size 15ml bottles are currently marked down to $6.40 each, and minis ave been reduced to either $2.60 or $3.20 a piece.

Grab what you can, because the new line up (which includes the to I shared today) are expected to be released on July 15th, so grab what you can now!


What do you think of these Hit Polish beauties?
Will you be hitting Etsy to purchase any Hit Polish?

Let me know in the comments below and give these shades some love on Facebook, Instagram, Tumblr and Pinterest!

And for Hit Polish updates, sneak peeks and more, keep up with Rachel on Hit Polish's Facebook, Twitter, and Instagram.

Thanks for reading!

Tuesday, June 18, 2013

Avon Cosmic Collection Swatches and Review (Part Two)


Hi everyone!

I want to continue on with the second half of the Avon Cosmic Collection.

If you didn't warm up with the hot shades from the other half, just click the images below to see the rest of the colors along with information on pricing and availability.


Let's move on and cool things down with the icier shades from the collection, shall we?


From left to right:

Moonbeam
Celestial
Galaxy
Aurora
Eclipse


The Colors


 Moonbeam is a silver scattered holo.


Silver holos never disappoint, and under the sun this one is the exception to the "bolder the shade, bolder the holo" pattern this collection possesses.

You can almost see a faint, faint, super faint linear prism at the angle shown in the first photo.


All that holo goodness disappears indoors, but the shimmery silver that's left might just be one of my new go to silvers. 
The formula is just too good to let sit on the shelf.


Celestial is either an icy mint shimmer or a light, teal green with holographic shimmer.


When you look at it outdoors, it's more of the latter. 
The color is much bolder and the scattered holo really shines.


Indoors the color seems to lighten up, taking on a more pastel, minty hue with any icy shimmer.


Galaxy is a bold cerulean blue, with what's supposed to be holographic sparkle.


I was surprised at the hidden the holo is in this particular shade. 
Indoors or out, it just isn't really there unless your hands are positioned in the right way in the right light.


It's such a pretty color either way, does it even really matter?


Aurora is a scattered holo that shifts from violet to purple.


This is the only one that the camera disagreed with just a tad.
The holo is a tad stronger than what is pictured. 
Unfortunately, after rephotographing this shade TWICE the camera came up with the same results.

(Anyone else having Barney flashbacks when looking at this shade?)


This shade is another shape-shifter once you get inside.

While in the sun it's more of a violet, indoors it takes a step to the cooler side of the color wheel and becomes more purple. It also loses the holo, following suit with the others.


...and finally we have Eclipse, a teal going on black with obvious holographic sparkle.


I don't have to justify the holo here, do I?
This shade sparkles better then the twinkly Twilight vampires ever will.

(I apologize for offending at least 75% of you all with that one.)


I know what you're thinking though: "Are you sure that isn't just black?" I'm sure.
It'll look black on the nail while inside, sure. Before you even get to that point you'll notice the teal tinge to the color the second you open the bottle.

Personally I love it so much more this way.
It's so gorgeous and mysterious.


Overall


I applaud Avon for going out on a limb and trying a finish that's a bit ambitious for  a brand that doesn't technically specialize in nail polish.

The holographic is nothing compared to just about any other brand's version, but in fairness this collection was advertised as having a "holographic pearl" finish. To me, this implies that it's intentionally more subtle. If that's the case, then they succeeded.

Holographic or not, these shades are stunning -- every one of them.
They are all eye catching and catch the light both indoors and out.

As far as being cosmic? Well...the formula is certainly out of this world.


What are you favorites from all of these holo hues?
Will you be adding these to your list of shimmery lemmings?

Let me know in the comments below and make sure to give these shades some love on Facebook, Instagram, Tumblr and Pinterest.

Big changes are happening soon here at The Manicured Amateur.
If you're not already, now there's time to be following on Twitter and Bloglovin' for all of the updates.

Thanks for reading!

-Melody


**Products in the post were paid for by me with my own money.
I am not an Avon representative but am proud to encourage readers to order through Julie Pruitt, a long time family friend.

Related Posts Plugin for WordPress, Blogger...