


homeaboutcontactdisclosure
Showing posts with label bornprettystore. Show all posts

Monday, July 1, 2013

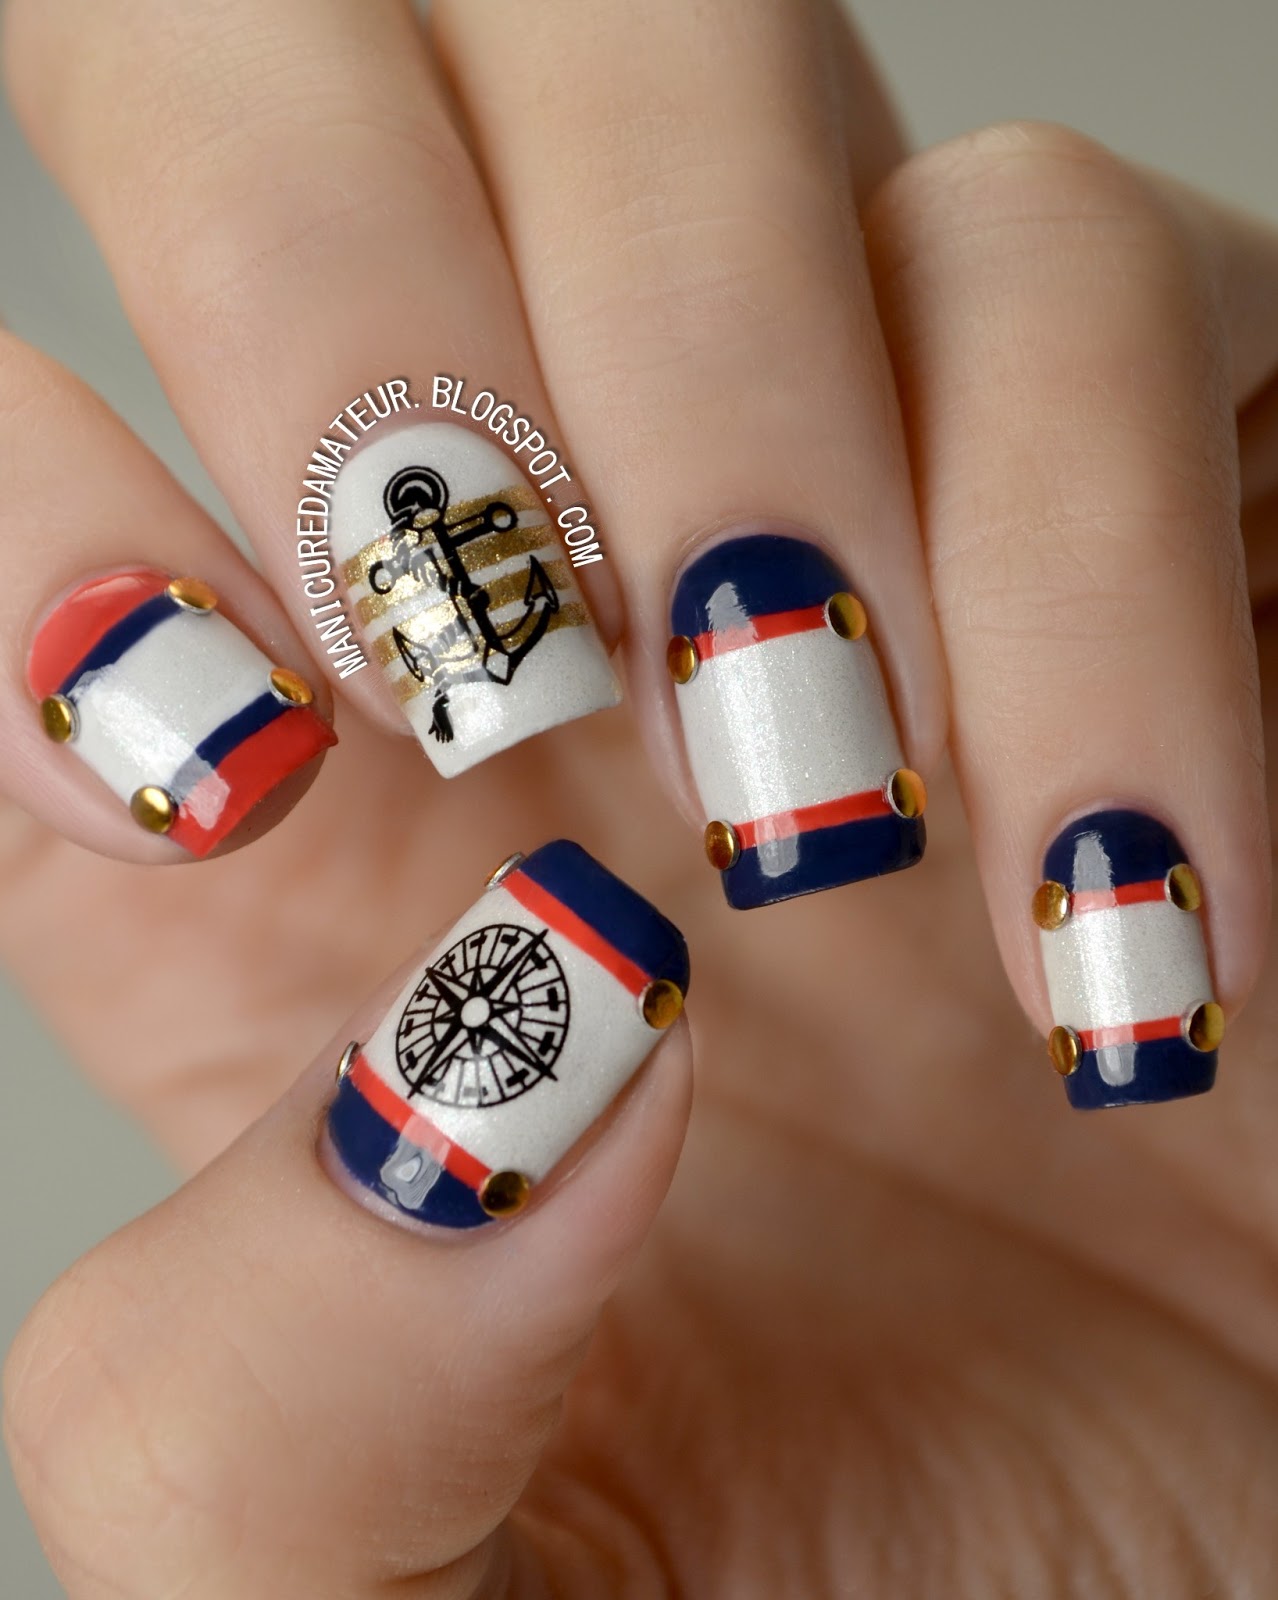
Nautical Nail Art featuring Born Pretty Store Anchor & Compass Water Decals


Happy July everyone!

I can't believe over half the year is already gone.
Whether I believe it or not, we're deep into the heat and I wanted to create a nail art look that was both summery and patriotic.

Red white and blue is a combination I save exclusively for this time of year and now that's here I'm ready to kick things off with a nautical look using Born Pretty Store Achor and Compass Water Decals.

This is actually my first attempt using stickers or decals.
Up until now I avoided using such decorations for the same reason I initially dismissed polish appliques.
In short, I thought they were "cheating."

I'll already tell you that after this look, I changed my mind.


First I needed a small arsenal of colors before working with the decals.


From left to right:

Julep "Nan"
Avon "Golden Vision"

Sinful Colors "Snow Me White"
Wet n Wild Megalast "Break the Ice"
Sinful Colors "New Wave"

Each finger started with a two coats of SC Snow Me White. 
To add a little summer glow if you will, I then added one coat of Wet n Wild Break the Ice for a subtle shimmer.

To create the stripes on all but my middle finger, I took four pieces of nail tape and taped off two baby stripes.

On my thumb, pinky and ring finger I filled in the stripes with Julep Nan and pulled off the tape while the polish was still wet.
I then took a small, flat nail art brush and filled in the bottom and top edge of the nail with Sinful Colors New Wave.
I used the same technique on my index finger, but reversed the colors.

I then turned to my Born Pretty Stud Wheel and added small round gold studs where each little stripe met the edge of my nail.

To create the stripes on my middle finger I placed five evenly spaced pieces of nail tape and painted over the gaps with Avon Golden Vision, removing the tape in the same manner as before.


Now on to the decals!

This specific set of decals comes with one sheet of 20 decals in a variety of two different anchors and three different compasses.

You can purchase these decals through Born Pretty Store's website here and are priced at $2.86.
But don't forget you get 10% off your whole purchase with my discount code BHL91!


Even though directions are included on the back, they contain unnecessary steps are actually more complicated than the actually process.

Here's how I applied the decals.

1. Cut out desired image.
2. Remove clear plastic film.
3. Drop in water for 10-20 seconds.
4. Remove image from water with tweezers.
5. Place image face down on finger (not the nail!) and gently slide the decal off the backing.
6. Pick decal off finger with tweezers and place on the nail.
7. Let dry.
8. Apply top coat.

Notice I didn't use a paper towel or blow dryer or any other means of drying the decal prior to placement.
Skipping this step gives you a few seconds to shift the image around the nail if needed.

The process is so quick and I am incredibly pleased with how flush the image is with the base.
You don't see any clear outlines and the image really sits and looks like it's just apart of the polish underneath.

The images themselves are not pixelated, nicely detailed, and remove just like any polish.


There you have it!

The most time-consuming part of the design was obviously the taping, but it's a simple look that's suitable for all skill levels.

I'm in full support of these decals for those who aren't ambidextrous but desire detailed designs on both hands.

There are so many decals out there, and now I'm itching to try them all!


 What do you think of this summer sails design?
Have you tried any nail art decals?

Let me know in the comments below and give this look some love on Facebook, Instagram, Tumblr and Pinterest.
Remember that Google Reader retires TODAY, so keep up with The Manicured Amateur on Bloglovin' and Feedly for all updates!


Also, if you'd like a more visual tutorial on applying water decals, give me a shout on Facebook or Twitter! 

Thanks for reading!

-Melody


**Born Pretty Store products provided for my unbaised review. This post contains affiliate links.

Saturday, June 22, 2013

Simple Summer Skittle Manicure featuring KKCenterHK 3D Bow Accents


Hi everyone!

So as most of you know, I've had quite the busy past few weeks. 
Things have been hectic as I've been suffering through dog fights, broken cars, landlord trouble, a tree falling on the house and now...moving out.

Complicated times call for simple manicures.
I need a look that's quick and can survive a day of packing, but can be dressed up for an evening with friends.

Sort of like a simple white tee...but for nails.


This is where a skittle mani with 3D decorations come in.
It's a simple solution that looks like you put in much more effort than you actually did.

All you need is a few colors, some cute accents, and you're good to go!


From left to right:


Wet 'N Wild Wild Shine "Hallucination"
Orly "Gumdrop"
Avon Mega Watt "Pop"
Sinful Colors "Snow Me White"
Avon "Inspire"

(Not Pictured) Out The Door top coat


For this particular skittle I wanted to choose colors that would later match the 3D bows.


Each finger began with a base layer of Sinful Colors "Snow Me White".

The pinky finger received two coats of Avon "Inspire".


The ring finger and thumb (not pictured) were left white but I chose to add a single coat of WNW Wild Shine "Hallucination," a subtle glitter top coat with an iridescent shimmer that matches the color palette perfectly.


The middle finger received two coats Avon Mega Watt "Pop," but a bit of shrinking still revealed the white base along the tip of the nail.

The index finger was layered with one coat of Orly "Gumdrop." 
The white base isn't really necessary for this particular shade, but it just saved me some time.


With a generous coat of Out The Door, I left the colors alone while I packed up a few things and moved some furniture.

When a couple of friends asked my boyfriend and I to join them for dinner, I decided I wanted to give the skittle an extra something.

I had little time on my hands, and automatically turned to my multicolored pearl wheel from Born Pretty Store.
Choosing a corresponding pearl for each finger, I dotted a bit of top coat onto the nails and placed the pearls accordingly with a small dotting tool.


What really brought the whole look together was these adorable bows from KKCenterHk.

The bows come in a pack of two and retail for $4.
Each bow is measured at about 10mm x 6mm x 2mm and can be applied with top coat, or nail glue if you want a longer hold. They are also resuable, so you are reassured that you are getting your money's worth.


At first I thought the price was a bit steep, but then when I noticed the patterns and details with each option I   felt the price was well justified.

There are 48 color and patterns available for this shape and style alone, which can been seen here.
It was hard to choose just one, but I ending up going for this cute Cyan Floral Print bow.


Even though my nails beds are tiny, I was pleasantly surprised by the overall look on the nail. It doesn't appear incredibly large, although it does stick out.

Knowing I wouldn't be wearing them for too long, I chose to apply the bows in the same manner as the pearls, and even then they stayed put up until I chose to take them off.

If you are not used to have a large decoration on your nail, it may feel funny at first. 

I was very aware of the presence of these little guys, and was may be a bit too careful about bumping or snagging them at first.
I got used to them pretty quickly and only noticed them when I ran my fingers through my hair.
I often snagged a few strands up under the bows, but they didn't budge.


It's not the most original or astounding look I've ever created, but it's a fantastic demonstration of how small details can make a big difference.
Small decorations like these 3D bows can turn an ordinary manicure to an extraordinary one.
I received multiple compliments and couldn't help giggle at how little time and effort I really put in it.

Dare I say that it's amazing nail art for the lazy nail artist?


What do you think of this cute bow featured skittle look?
What's you favorite quick nail art fix?


Let me know in the comments below and give this look some love on Facebook, Instagram, Tumblr and Pinterest.

And don't forget! Google Reader is saying goodbye is just over a week, so make sure following me on Twitter and Bloglovin' for all updates.

Thanks for reading!

-Melody


**KKCenterHk products sent for my honest review. This post contains affiliate links. For more details, please see my disclosure policy.

Monday, June 10, 2013

Born Pretty Store Cosmiss Nail Polish Review + Half Glitter Half Texture Nail Art!


Hi everyone!
Today I have a quick post of another polish brand from Born Pretty Store.

Now if you read my review on Born Pretty Store's March Nail Lacquer, then you already know I was pleasantly surprised with the quality of their polishes. (if not, you can read it here.)

These Cosmiss Candy Color Glitter Sparkle Yogurt Series Varnishes are new to BPS, and once I saw them I knew I had to try one out.


They have no names, but this is Cosmiss #3, a semi-sheer, milky light olive green with ranbow hexes, round and fine glitter.


For how much glitter is packed in this baby, it went on like butter.
The base is really sheer and will take atleast three layers to reach the full opacity as shown in the photos.
My main surprise was how flat the glitter sits on the nail.
I did use a top coat to give it a nice, even glossy finish.

I know it's kind of snot colored, but I like it. I love interesting colors, and this one is definitely that.
And the glitter so dazzling who even cares what color the base is, haha.


If this particular base color isn't your taste, not to worry!
Born Pretty Store has got you covered with 10 different glittery shades to choose from for $4.36.

You can purchase them here and get 10% off you entire purchase using my special promo code BHL91!


I got so excited about this polish, I rushed to create a quick nail art look using my new Cosmiss beauty.


I grabbed a few quick items and went to work.


 Already having the Cosmiss varnish applied, I picked up a roll of nail tape and taped off half of each nail starting from the upper left corner, down to the lower right corner of each tip.

Using Sally Hansen Sugar Coat in Lich 'O Rich, I painted the lower half of each nail and then quickly but gently pulled off the tape while the polish was still wet.

I know I've neglected to officially share the SH Sugar Coat collection with you yet, but it's coming I promise!


I could have stopped there, but I was too excited over a few more goodies I received from Born Pretty Store.

I turned to my nail wheel of half pearls and added a red one to the center of each nail by placing a dot of top coat where I wanted the pearls to be. 

The pearls are easy to pick up and handle by taking a dotting tool or toothpick that has just a tiny bit of top coat on the tip.

(Want the pearls for yourself, you can get them here for $4.74)


After the fact I realized the red makes them look like clown noses. But hey, it matches the glitter right?

I'm quite happy with the look and I'll  definitely be getting my hands on more Cosmiss varnishes as soon as I can.


What do you think of this Cosmiss polish?
Are you a fan of my bad clown party-like design? 


Let me know in the comments below, and give it some love on Facebook, Instagram, Tumblr and Pinterest.

Don't forget I'm having a giveaway at 500 Facebook followers, so spread the word!

Thanks for reading!

-Melody


**Products in this post were purchased by me with my own money.

Thursday, May 30, 2013

Swirly-Stamped Ruffian Nail Art featuring Born Pretty Store March Nail Lacquer


Hi everyone!

Today I have a "new-to-me" polish brand to share with you, accompanied with a cutesy nail art look to go along with it.


Before receiving this color I hadn't really looked into the actual nail polish section of Born Pretty Store.
I wish I had sooner, because they are so many varieties of brands, finishes and shades.

Below is March Nail lacquer Sweet Candy Colors #5, a light to medium purple that skirts the line between lilac and lavendar.


Before I even talk about the polish, do you see the bottle?! How precious is that?
I won't lie, I was sold at the bow alone.

Now I really wish I had looked into BPS's nail polishes sooner. The formula was divine! It has a rather thin consistency, but is still opaque in one coat! You could add an additional layer to further saturate the color, but  it doesn't really need it.

The only downside to this shade wasn't even a polish issue, it was just a pain to photograph!
It's a warm toned purple, but it displayed more blueish cool tones depending upon the angle of my hands, the lighting and the background.


I'm pretty positive this will be one of my new go-tos as far as lighter purples are concerned. 
The formula is just too good not to work with.

It's so good, I immediately knew I had to feature it in some sort of nail art look!


I already had my March Nail Lacquer base, so I decided to stamp over it using Pueen Plate #13 with Sinful Colors "Snow Me White." 

Using the same white, I freehanded a ruffian edge along the top of the nail with a small nail art brush. I got a little carried away and made the lines a bit thick as a touched it up more and more, but it's one of those things that's only notable when referring to close up photos.

To add an extra pop of color, I took a dotting tool and dotted the center of the swirls with  Sinful Colors "Anchors Away"  from the new Sail La Vie/Ahoy There collection (review coming soon!).

The ring finger began with Sally Hansen Sugar Coat "Sugar Fix" (another review coming soon!). I originally through the texture would  provide a balanced contrast to the intricate design of the other nails, but it didn't really. Instead of removing and applying a white creme, I'll be honest and say I got lazy and just added a layer of top coat over it.


I knew the nail needed something, and I ended up turning to a wheel of teeny tiny caviar beads I purchased off eBay over a year ago. 

If you're wondering why you've never seen me use them before, it's because they're awful. The color bleeds terribly, but for $0.99 they were good for trying out.
If you have a brand of caviar beads you love, comment with your recommendations!


I ended up using the beads when I discovered that two of the colors matched perfectly with the polishes I had just  used. 

With the top coat still squishy on the nail, I just barely added a bit of top coat to the tip of my dotting tool, picked up the beads one at a time and placed them in an alternating linear pattern you see in the photos.


Overall I love the finished look, despite the slight sloppy execution.
(My sleep schedule as been suffering as of late, so I've been in full zombie mode this past week.)
The March Nail Lacquer shade was just perfect and I can guarantee I'll be scooping up more shades soon.


Want March Nail Lacquer for yourself?


You can view all of the available shades at Born Pretty Store's website here. The polishes are priced at $7.29 with free shipping.

Even better?


Use my special promo code, "BHL91" and get 10% off your entire order!


What do you think of this design?
Will you be adding March Lacquer to your stash?

Let me know in the comments below and give this look some love on Facebook, Instagram, Tumblr, and Pinterest!

Thanks for reading!

-Melody


**Born Pretty Store products for provided in exchange for my honest review. All other products and materials were purchased with my own funds.
Please refer to my disclosure policy for additional information.


Monday, May 20, 2013

Summer Striping and Studded Ruffian Nail Art


Hi everyone!


Today I have a bright nail look for you!

Looking back through the designs I've posted I realized it's been too long since I've done a tape mani.
So today's design features a bright combo of stripes and studs.


The Steps

My thumb a pinky fingers began with a base of Essie Butler Please. 

I then took my striping tape and placed a small strip horizontally across the nails at an angle. I then cut smaller strips and placed them vertically in an angled but evenly spaced striped pattern, beginning from where I placed the horizontal piece.

I then took Sinful Colors Unicorn (swatched here) and eyeslipsface Mango Madness (swatched here) and painted within the stripes with a small, flat nail art brush.

While the polish was still wet  I removed the strips and finished with a line of studs from my Born Pretty Store stud wheel which you can purchase here (use code BHL91 for 10% off).

My index and middle finger began with a base of eyeslipsface Mango Madness. 

I went over the top third of my nail with Essie Butler Please to create a sort of exaggerated ruffian look that came to a rounded point. 
(Ruffian manicures are simply inverted half moons.)
I outlined the ruffian edge with Sinful Colors Unicorn with a long striper brush and finished with a single stud from the Born Pretty Store stud wheel.

My ring finger was created using the same method as my index and middle fingers, except I began with Sinful Colors Unicorn as my base and used eyeslipsface Mango Madness as the outline.

All nails were given one good coat of  Sally Hansen Ultimate Shield Base and Top Coat.


I really loved this color combination. It's bright and fun and a perfect match for the a day in the sun.


What do you think of  this bright design?

Let me know in the comments below and make sure to give this look some love on  Facebook, Instagram, Tumblr, and Pinterest!


And keep up with me on Twitter, and Bloglovin' for more nail art looks and some exciting new collections I'll have to share with you soon!

Thanks for reading!

Melody

Sunday, May 12, 2013

Happy Mother's Day! Sassy & Sweet Floral Studded Nail Art

Happy Mother's Day everyone!


I spent a lovely afternoon with my own mother and grandmother enjoying lunch and visit the thrift store as we always do when we can get together. My mother also bought her first China Glaze polish today. I almost cried. HAHA!

Today's Mother's Day mani is a tribute to my own mother. When I was little I was such a tomboy (am still am to an extent), and favored my father's interests more than my mother's. It hasn't been until the past couple  years as I have become an adult that I have been able to better connect with mother. I'm still a daddy's girl following in his artistic footsteps, but now I've embraced my more feminine nature of antiquing and interior design...all of which is thanks to my mom.

So today's look is a little sweet and a little sassy. My mother is known to be shy and sweet, while I literally have a family nickname of "Sassyfrass." 
I chose flowers to represent her, and the studs to represent me.


The white base is a subtle glitter mix called "Strawberry Fields" from Neener Neener Nails, which I reviewed here. 
I like the subtle dimension the glitters add to base, although goes almost unnoticed in the pictures above.

The pink base and dotted flowers were created with "Flirty Fuschia" from the eyeslipsface (e.l.f) 14 Piece Spring 2013 Nail Cube, which I reviewed here. 
Apart from mauve and turquoise, my mother is a sucker for fuschia.

The flower centers were dotted in with Sinful Colors "Pistache" from the Buff to Bright collection which I reviewed here. 
Although the glitters can't be seen in the pictures, this shade matches the light green glitters in the white base perfectly and is a nice compliment to the pink.

And finally, the black studs are from Born Pretty Store. 
I debated on placement of these and still not sure if my final choice was the best way to go, but I  like the hard contrast to the brighter colors. It gives it an edge, which is just my style.


Whether you're a mother, grandmother, godmother, or birthmother, I wish you a special day filled with love.

Let me know what you think of this look and don't forget to give it some love on Facebook, Instagram, Tumblr and Pinterest!
Thanks for reading!

-Melody

Sunday, April 28, 2013

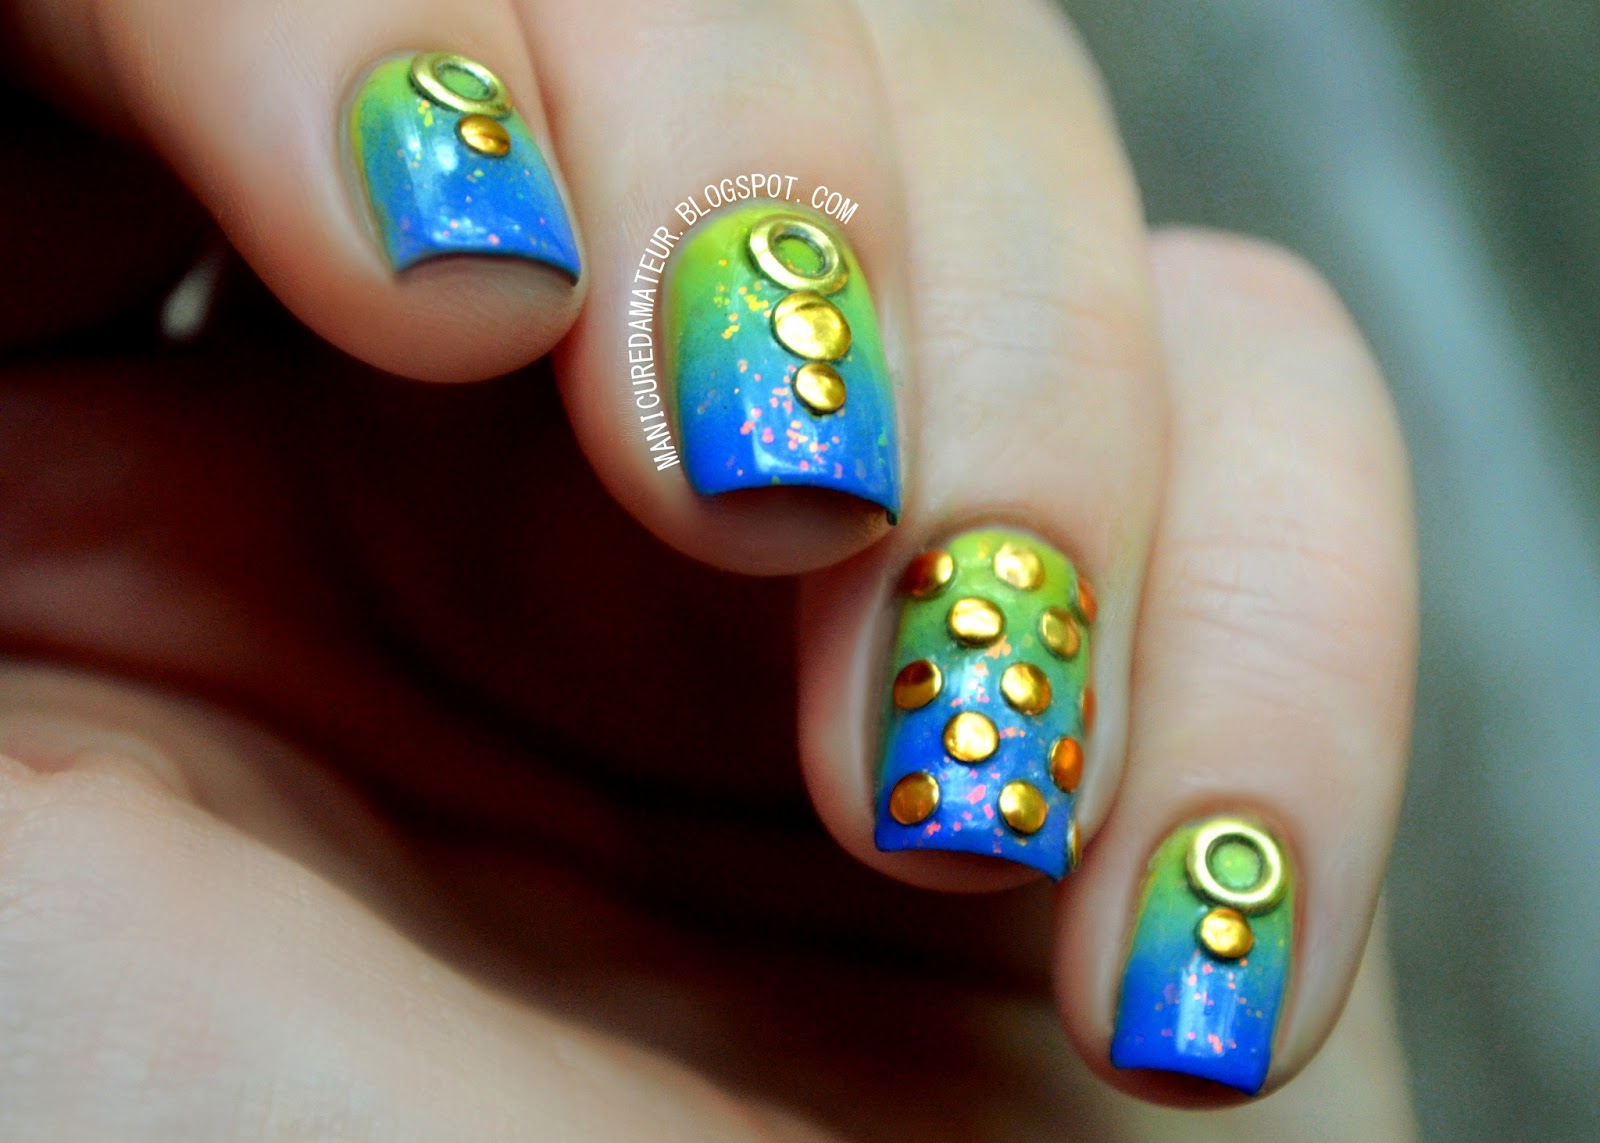
Treasures of the Sea: Yellow to Blue Gradient and Round Stud Nail Art

Hello everyone!

As many of you know I am preparing my house for the move in of yet another roommate
That makes for three, 20 something year-old males and myself. Even three out of the four animals are boys.
Needless to say it's a madhouse here, and unfortunately it's been at the expense of my lightbox.

I had to apologize for the inconsistencies with the lighting of my photos lately, but don't fret! My boyfriend and I are hard at work custom building me a new one.


Today I wanted to share with you another nail art look that doesn't hesitate to shine.

The rain is back in the peach state, but the beach is still on my mind. This design was created with the idea of the sun on the sea, and the treasures hidden underneath.

Okay, so admittedly the idea came to me when watching The Little Mermaid. I am not ashamed. The glittery ocean world with golden castles and crowns was inspiration I just couldn't ignore.


I began with a neon yellow base using Avon Inspire. 

To recreate the look of sun shining through water, I used Avon Inspire, Serene Green, and Sally Hansen Hard As Nails Pacific Blue to create a bright, primary gradient that's Disney approved.

To emphasize the concept and add a little sparkle, I added one coat of eyeslipsface (e.l.f) Fairy Dust. The pink flakies really only reveal themselves in sunlight, and the pink is even a subtle ode to Ariel's hair (and my own).


While I may not have a gold crown of my own, I used three varieties of round studs from Born Pretty Store to give this look the royal treatment. They are applied by simply painting a top coat over the gradient, picking up the studs with a wax-based pencil or orange stick and placing the studs in the desired spots. I just use an old, white eyeliner pencil that I was allergic to and it works great.

 I sealed the entire design with Out the Door top coat, and voilĂ !


The end result is fit for a mermaid, a princess, and all polished lovelies under the summer sun. 
It's beach and pool proof, as the studs really stay put.

I won't lie, with my long red hair I definitely felt like the Little Mermaid.
By the way, did you know her daughter's name was Melody in the sequel? Too bad she had black hair.


What do you think of this design?
How do dress your nails for days by the sea?

Share you summer mani must-haves in the comments below and give this look some love on Facebook, Instagram, Tumblr and Pinterest!

Thanks for reading!

-Melody
Related Posts Plugin for WordPress, Blogger...